Chapter 1 Quickstart
If you’re new to providing liquidity to a decentralized exchange, this chapter is your hands-on starting point. I will show you how to open concentrated liquidity positions step by step–no prior experience required. By the end of this chapter, you will have:
- Created your first concentrated liquidity positions on Uniswap v4, Uniswap v3, and Meteora.
- Calculated your position’s fee APR.
- Learned how to track token flows in a spreadsheet and calculate token net flows.
Don’t expect to make money just yet. Profitability is the focus of later chapters. For now, the goal is to get comfortable with the mechanics.
💡 What is a Liquidity Provider (LP)?
When you trade on a decentralized exchange (DEX)–a crypto trading platform that runs entirely on smart contracts–someone has to supply the tokens you’re swapping. That someone is a liquidity provider (LP).
As an LP, you deposit tokens into a shared pool and earn a small fee every time someone swaps against the pool. The fee accumulates automatically; you can claim it any time.
In Uniswap v3 or v4, you choose a price range for your liquidity–the interval of prices at which you’re willing to facilitate trades. Your liquidity only earns fees when the pool price is inside that range. This design, called concentrated liquidity, yields much higher fees when in range than older AMM (Automated Market Maker) designs, which spreads liquidity uniformly from 0 to \(\infty\). The trade-off: your position goes idle when the pool price moves out of range. As the pool price moves through your range, the AMM automatically converts one token into the other–buying the falling asset and selling the rising one. By the time price exits your range entirely, your position holds 100% of one token and stops converting.
We will soon become LPs of cbBTC3-USDC pools on Base and Solana–both are fast, low-cost blockchains4.
| token | chain | address |
|---|---|---|
| cbBTC | Base | 0xcbB7C0000aB88B473b1f5aFd9ef808440eed33Bf |
| USDC | Base | 0x833589fCD6eDb6E08f4c7C32D4f71b54bdA02913 |
| cbBTC | Solana | cbbtcf3aa214zXHbiAZQwf4122FBYbraNdFqgw4iMij |
| USDC | Solana | EPjFWdd5AufqSSqeM2qN1xzybapC8G4wEGGkZwyTDt1v |
As preparation, install two crypto wallet browser extensions: Rabby5 for EVM-compatible chains like Base, and Phantom6 for Solana. Then fund your wallets:
- In Phantom (Solana): create a new wallet address and fund it with 0.07 SOL and $25 of cbBTC.
- In Rabby (Base): create a new wallet address and fund it with 0.001 ETH, $50 of cbBTC, and 10 USDC.
One easy way to fund both: buy $75 worth of BTC on Coinbase and withdraw one-third to your Phantom wallet address on Solana and two-thirds to your Rabby wallet address on Base. You will automatically receive cbBTC on both chains.
🔒 Security: Wallet Hygiene
Use a new wallet for DeFi experimentation–not your main holdings wallet. Keep it funded with only what you’re willing to lose. Never share your seed phrase with anyone or any website.
1.1 Uniswap V4 LP Position
You now have 0.001 ETH, $50 of cbBTC, and 10 USDC in your Rabby wallet on Base. Let’s create a two-sided position on Uniswap v4–one where you deposit two tokens and spread liquidity across a range containing the current price. Two-sided positions start earning fees immediately.
Step 1: Visit Uniswap’s website
🔒 Security: UI Phishing
Always type the URL into your browser or use a saved bookmark–never click a link from a search engine, social media post, or message. Fake Uniswap sites that drain wallets rank highly in search results. As of April, 2026, the legitimate URL is https://app.uniswap.org. Cross-check it against Uniswap’s official Twitter/X account and Discord server before visiting.
Go to https://app.uniswap.org/positions. You will see an empty page if you have no open positions.
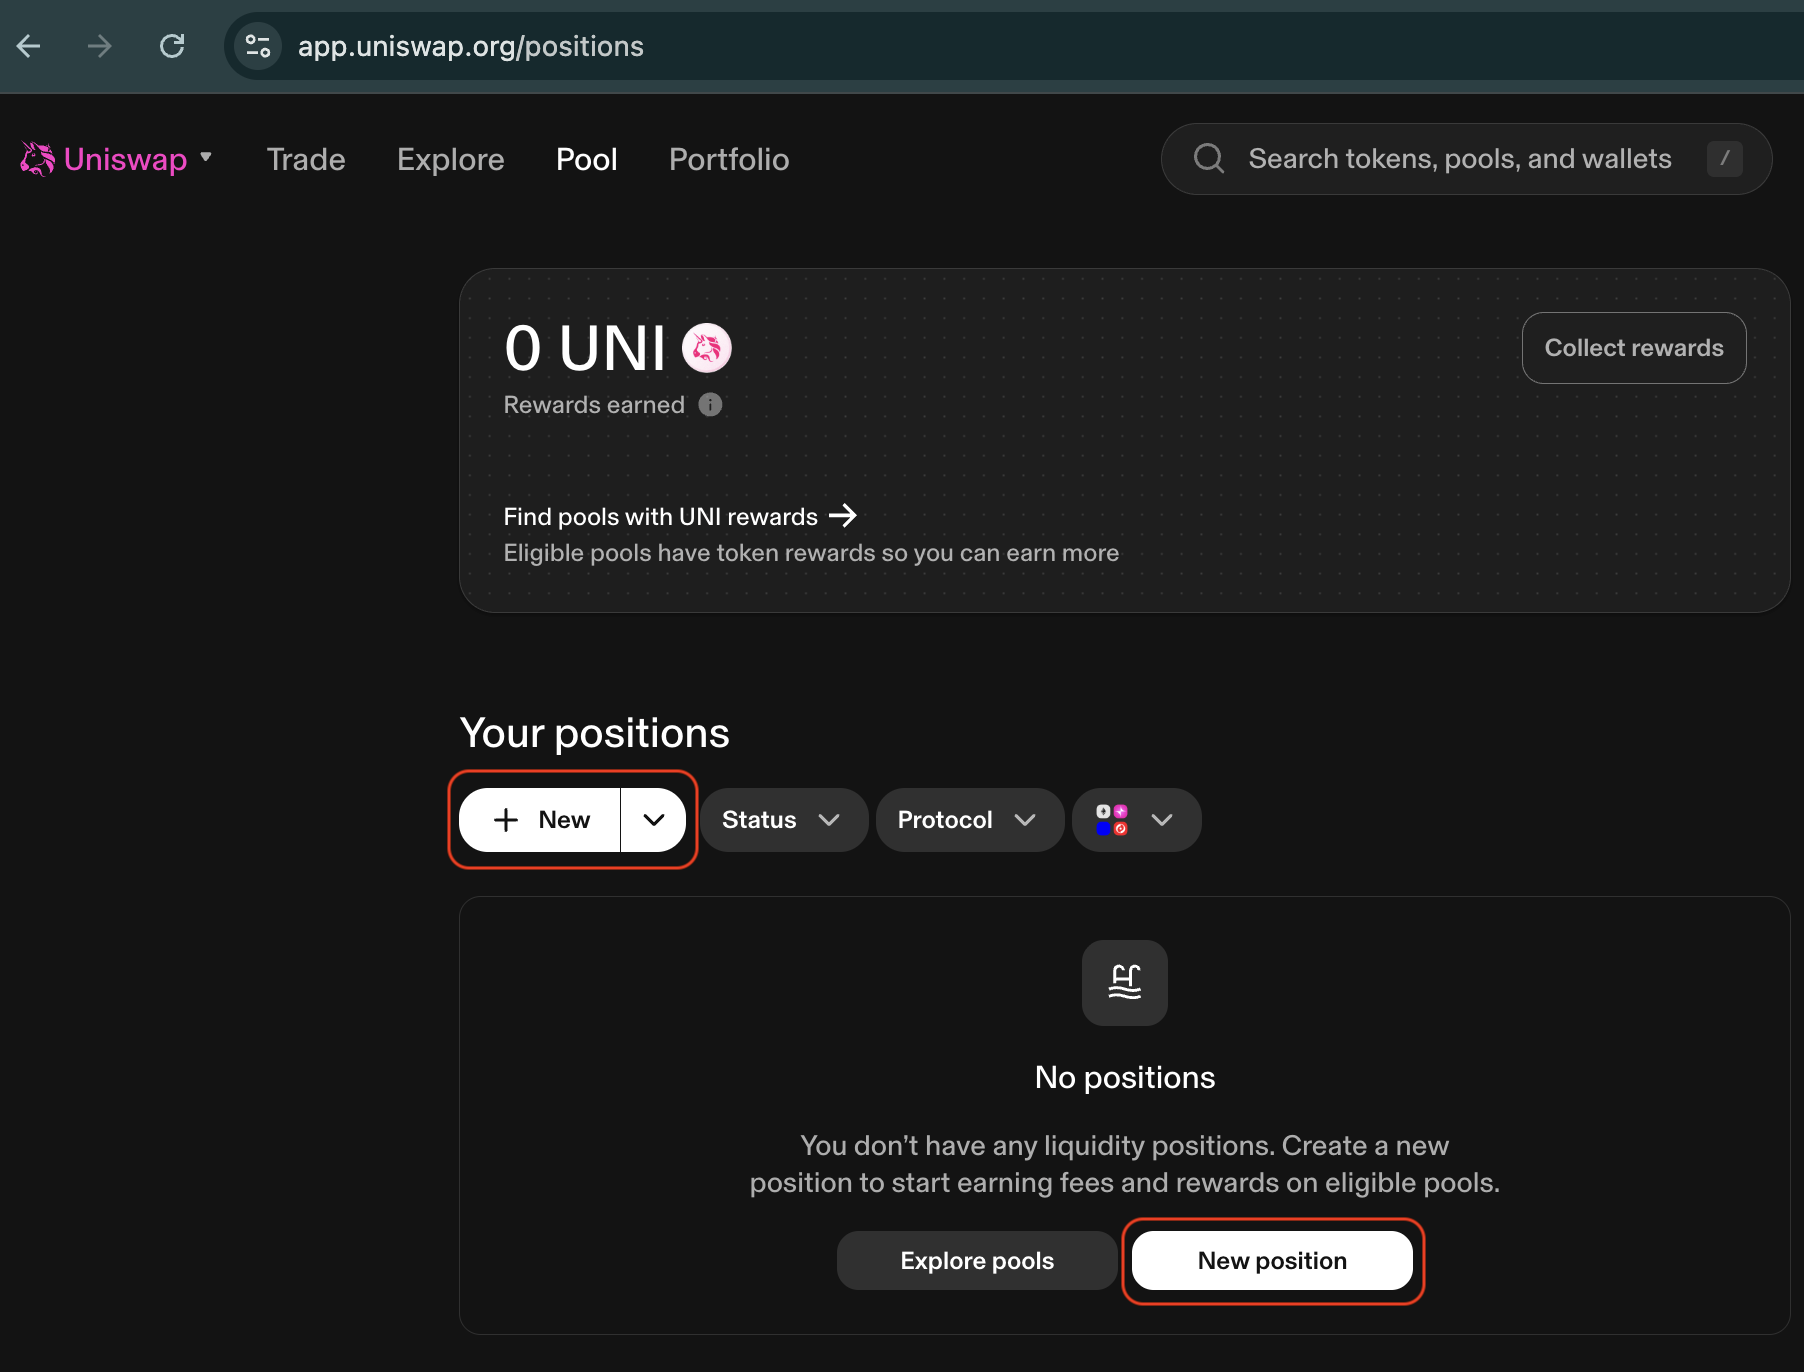
Click + New or New Position. The pool selection page opens, defaulting to a
v4 position with ETH selected.
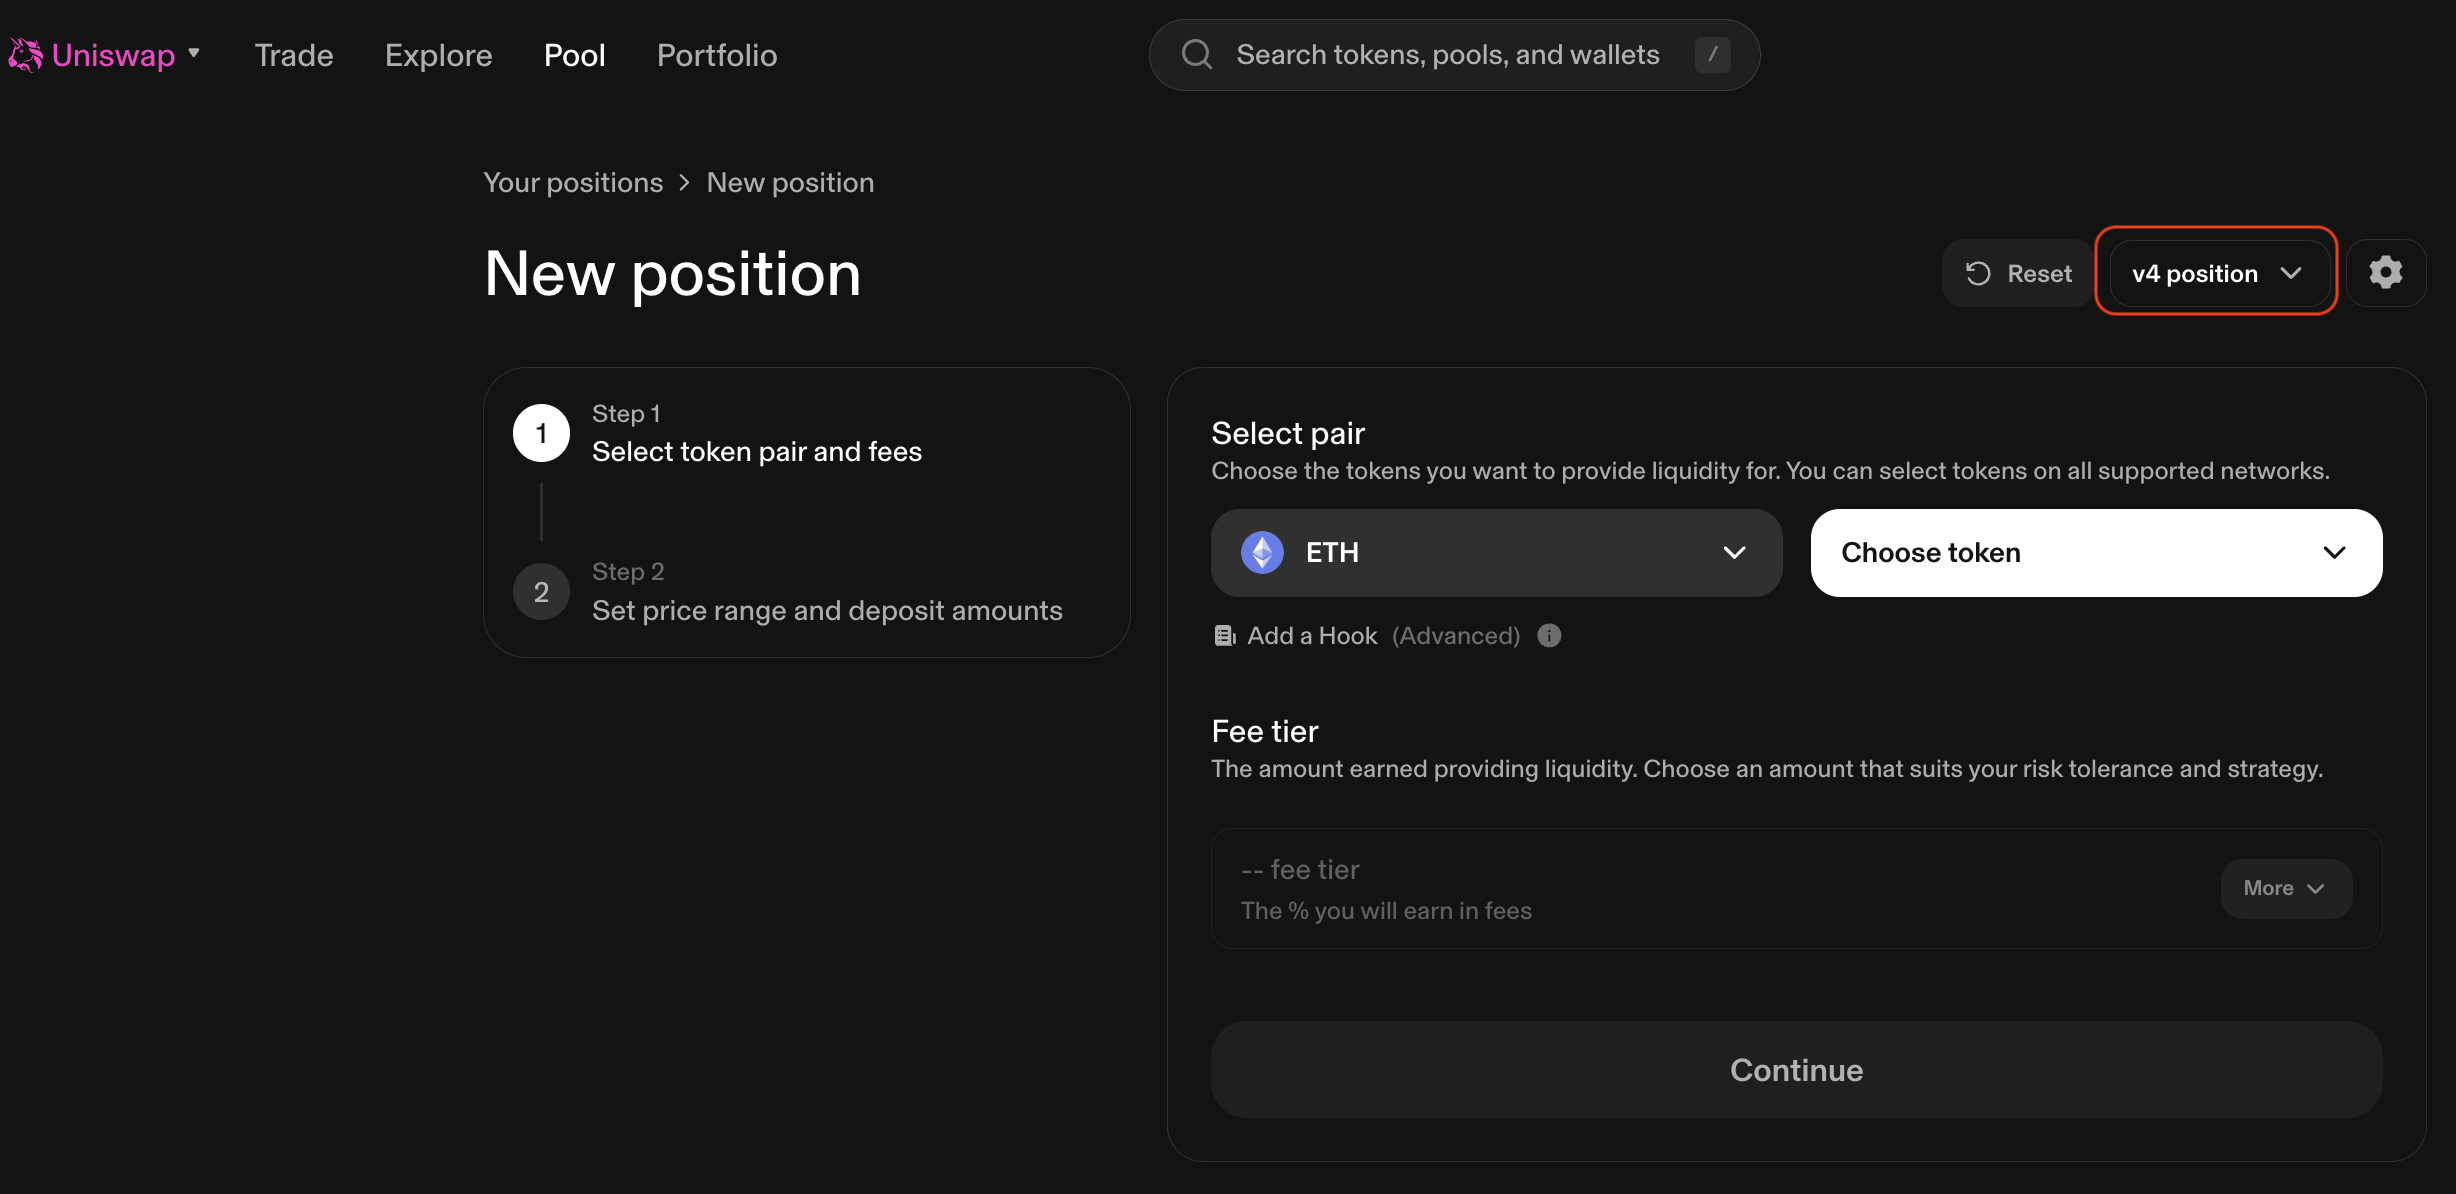
Step 2: Select token pair and fee tier
Click the drop-down boxes under Select pair. The token search window pops up.
Uniswap is deployed on multiple networks–make sure you select Base.
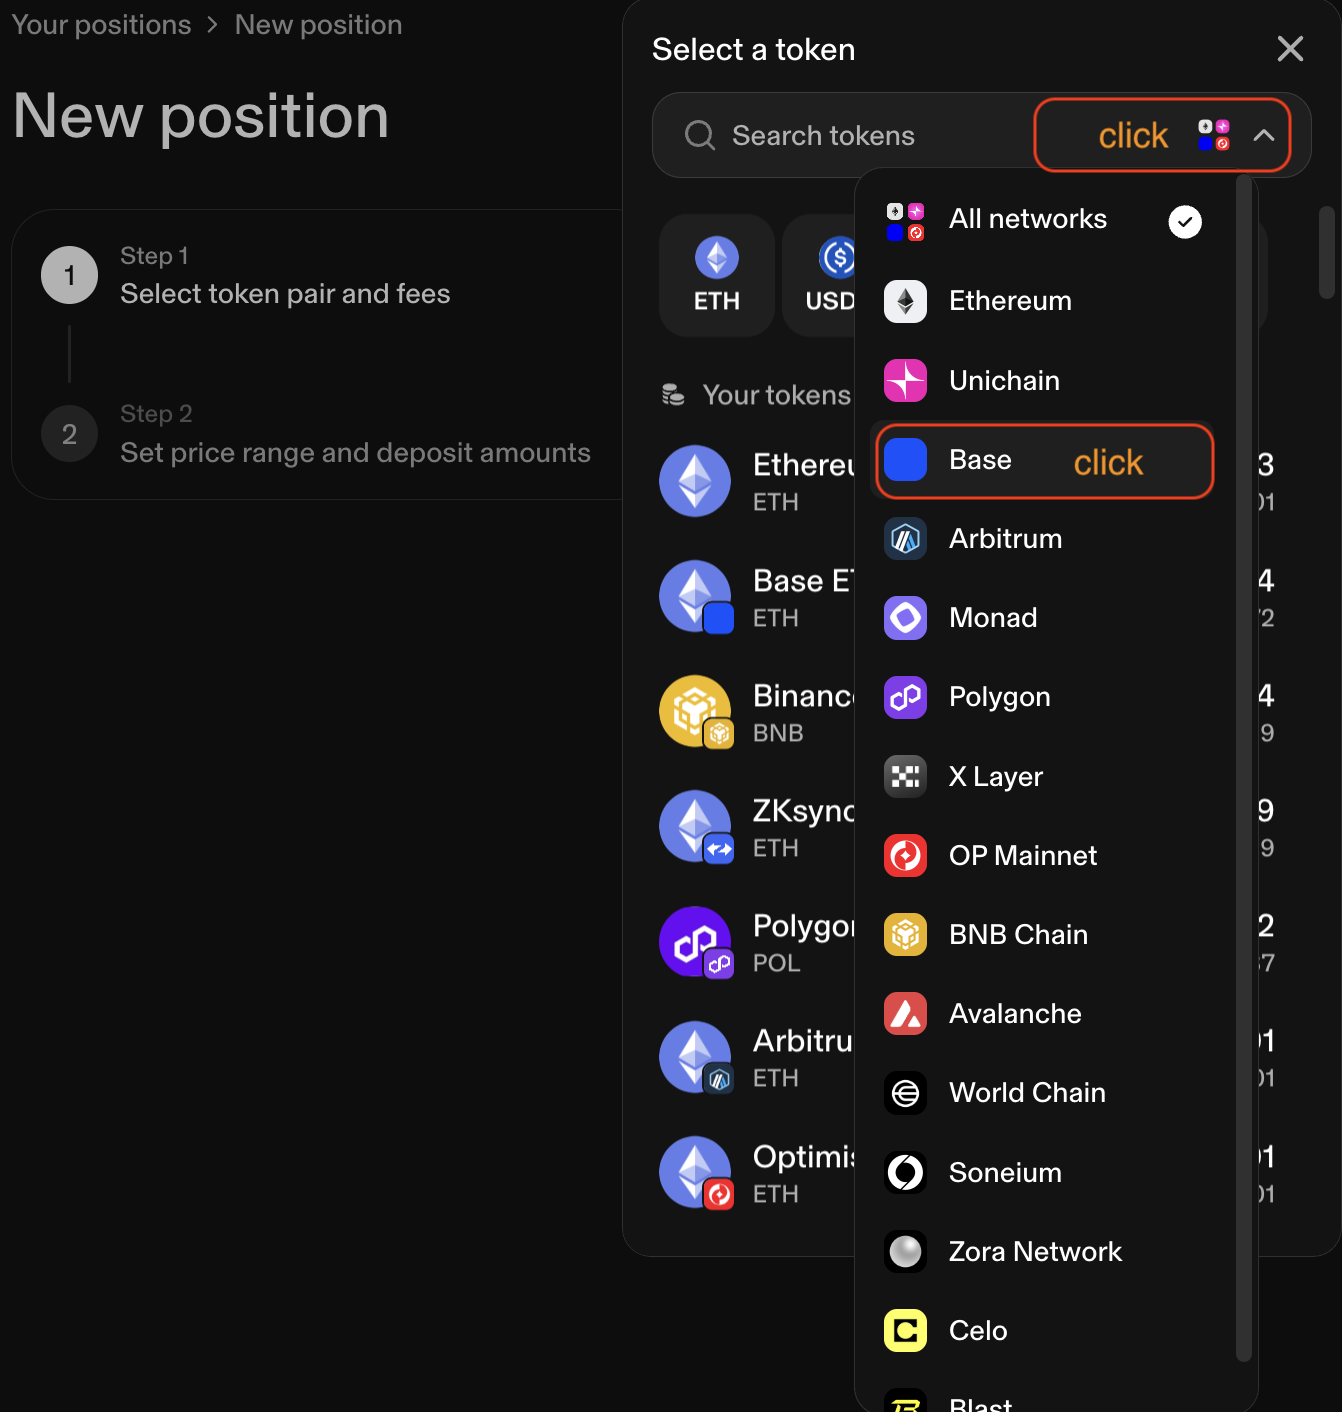
Then select cbBTC and USDC. If you see a dark blue square at the bottom-right corner of the token symbols, you’re on the right network–dark blue is the primary color of the Base brand.
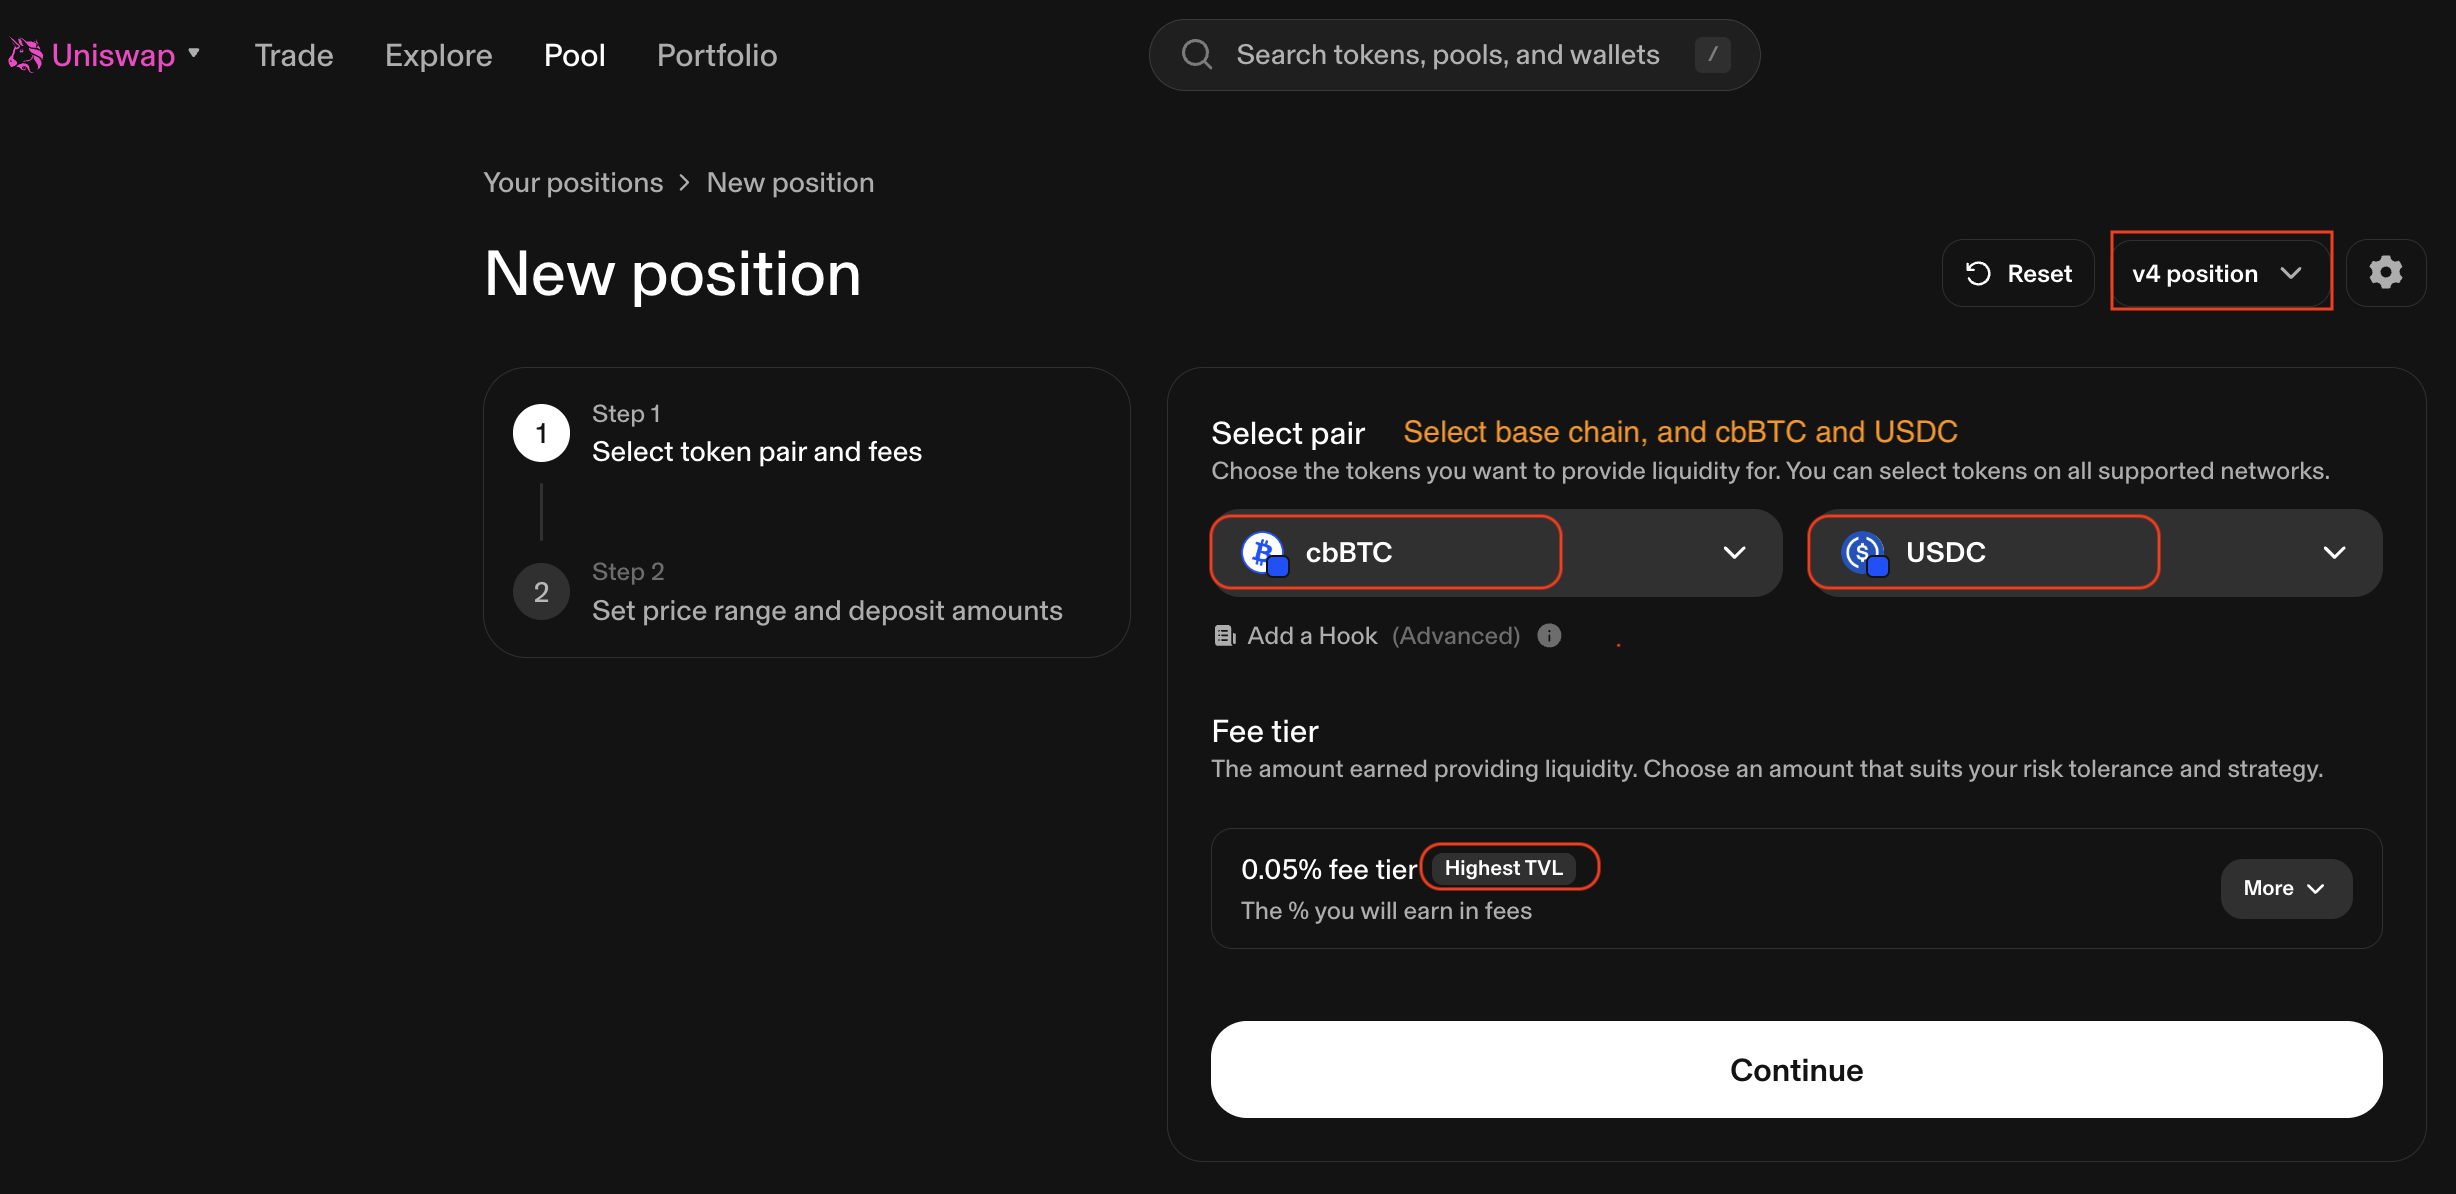
After selecting the pair, the fee tier is automatically set to the one with the
highest TVL (Total Value Locked–the total dollar value of tokens deposited in
the pool). For example, 0.05%, which means LPs collectively earn 0.05% of every
swap’s value. Your share of those fees is proportional to how much of the pool’s
liquidity you own and how long the price stays inside your range. Stick with the
default choice and click Continue.
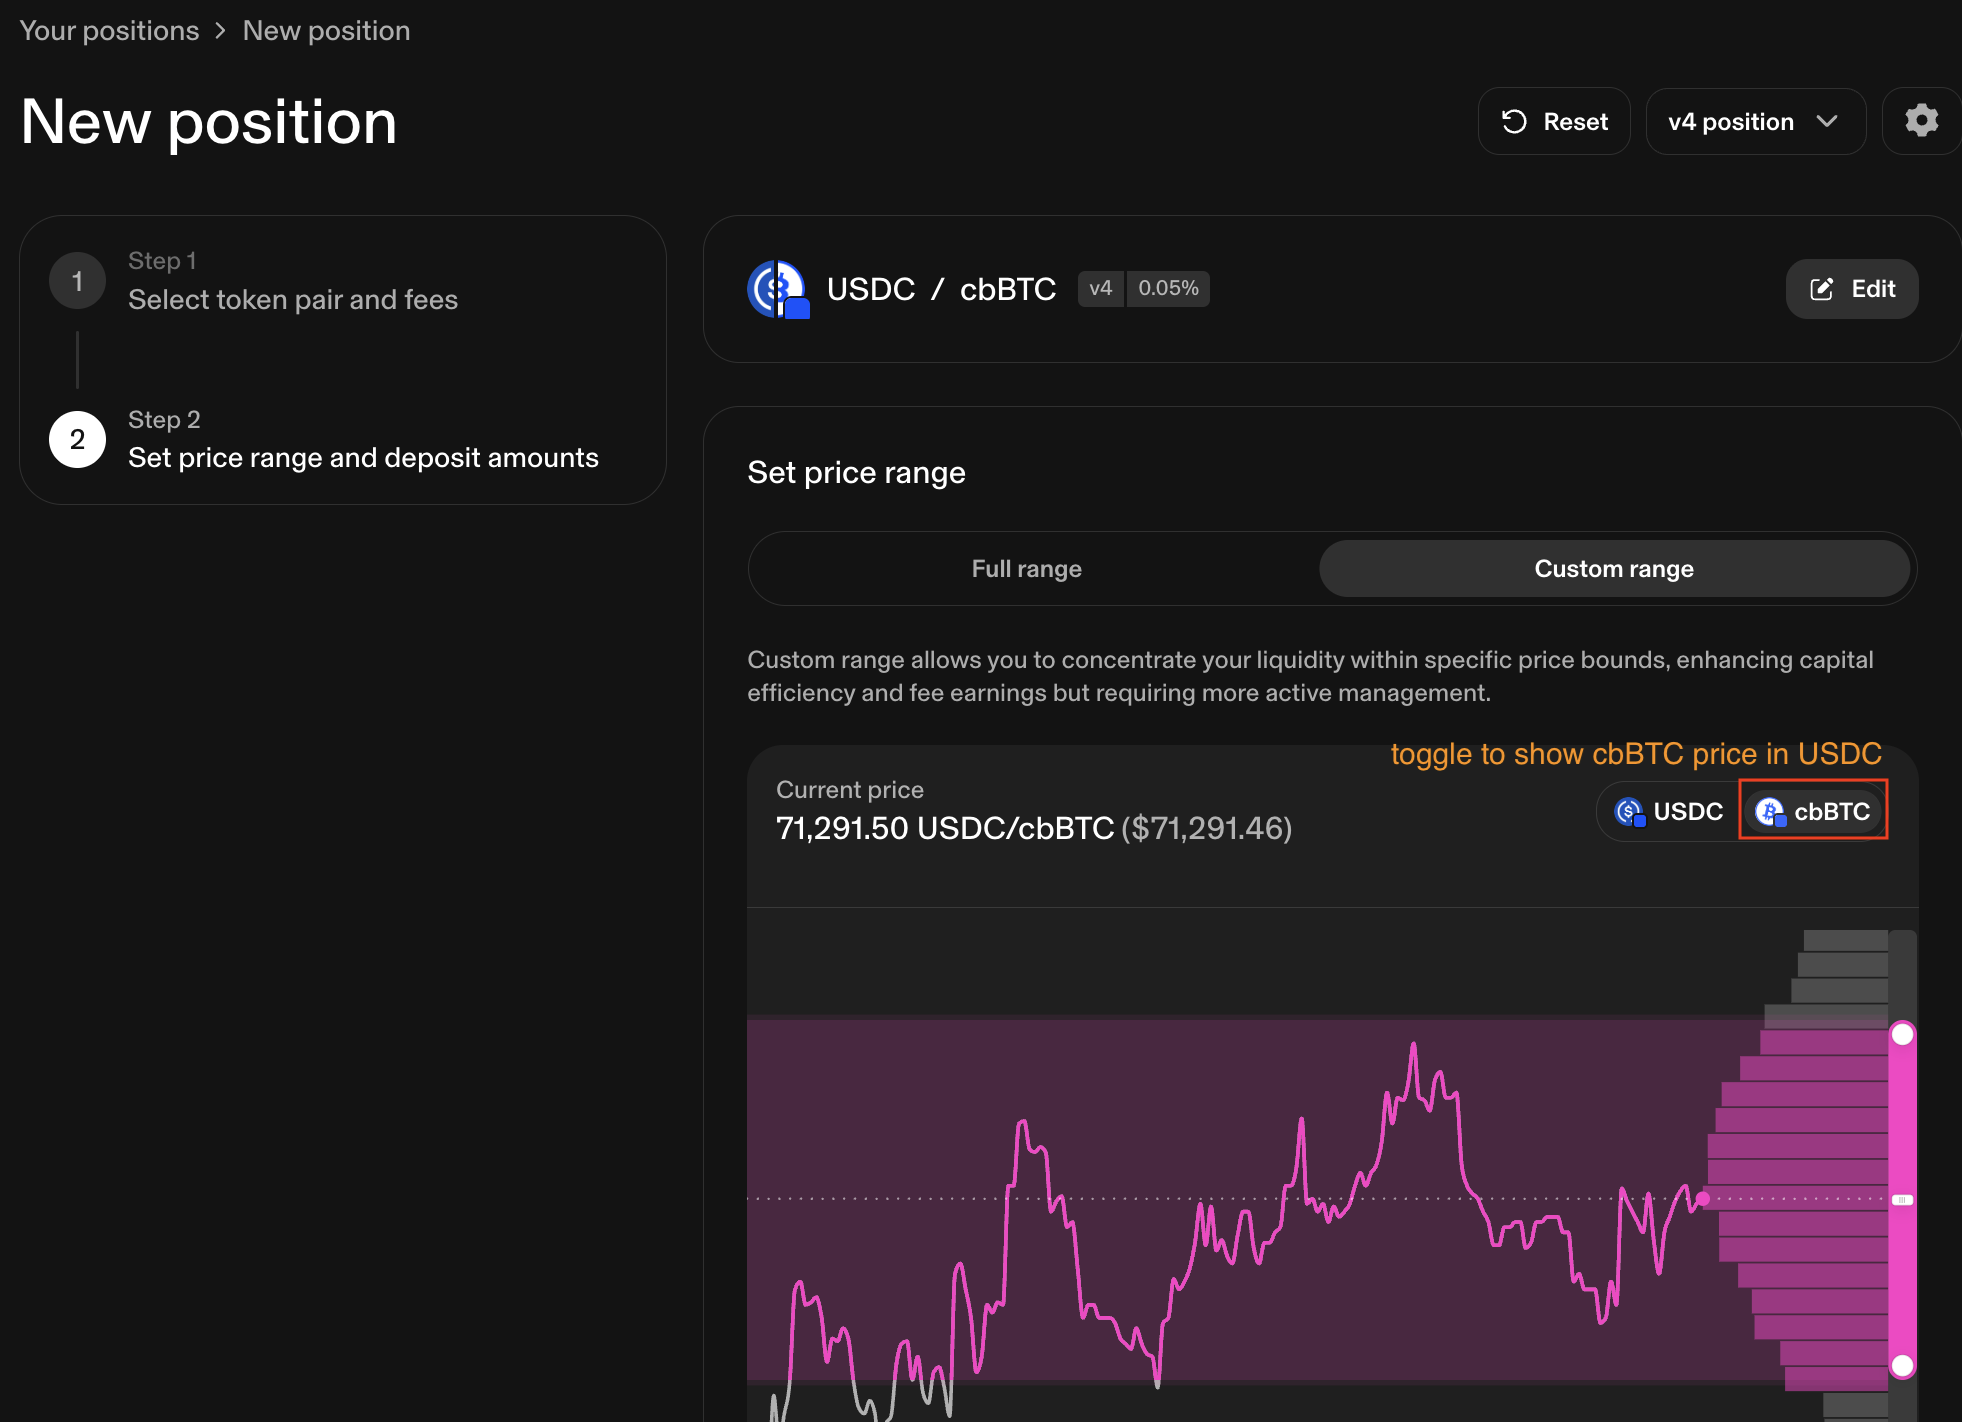
Step 3: Set price range and deposit tokens
Uniswap defaults to a price range requiring a deposit of both tokens in roughly
equal dollar amounts. If the UI shows prices as tiny decimals with many leading
zeros, toggle the cbBTC button to display the price of cbBTC in USDC–easier
to read.
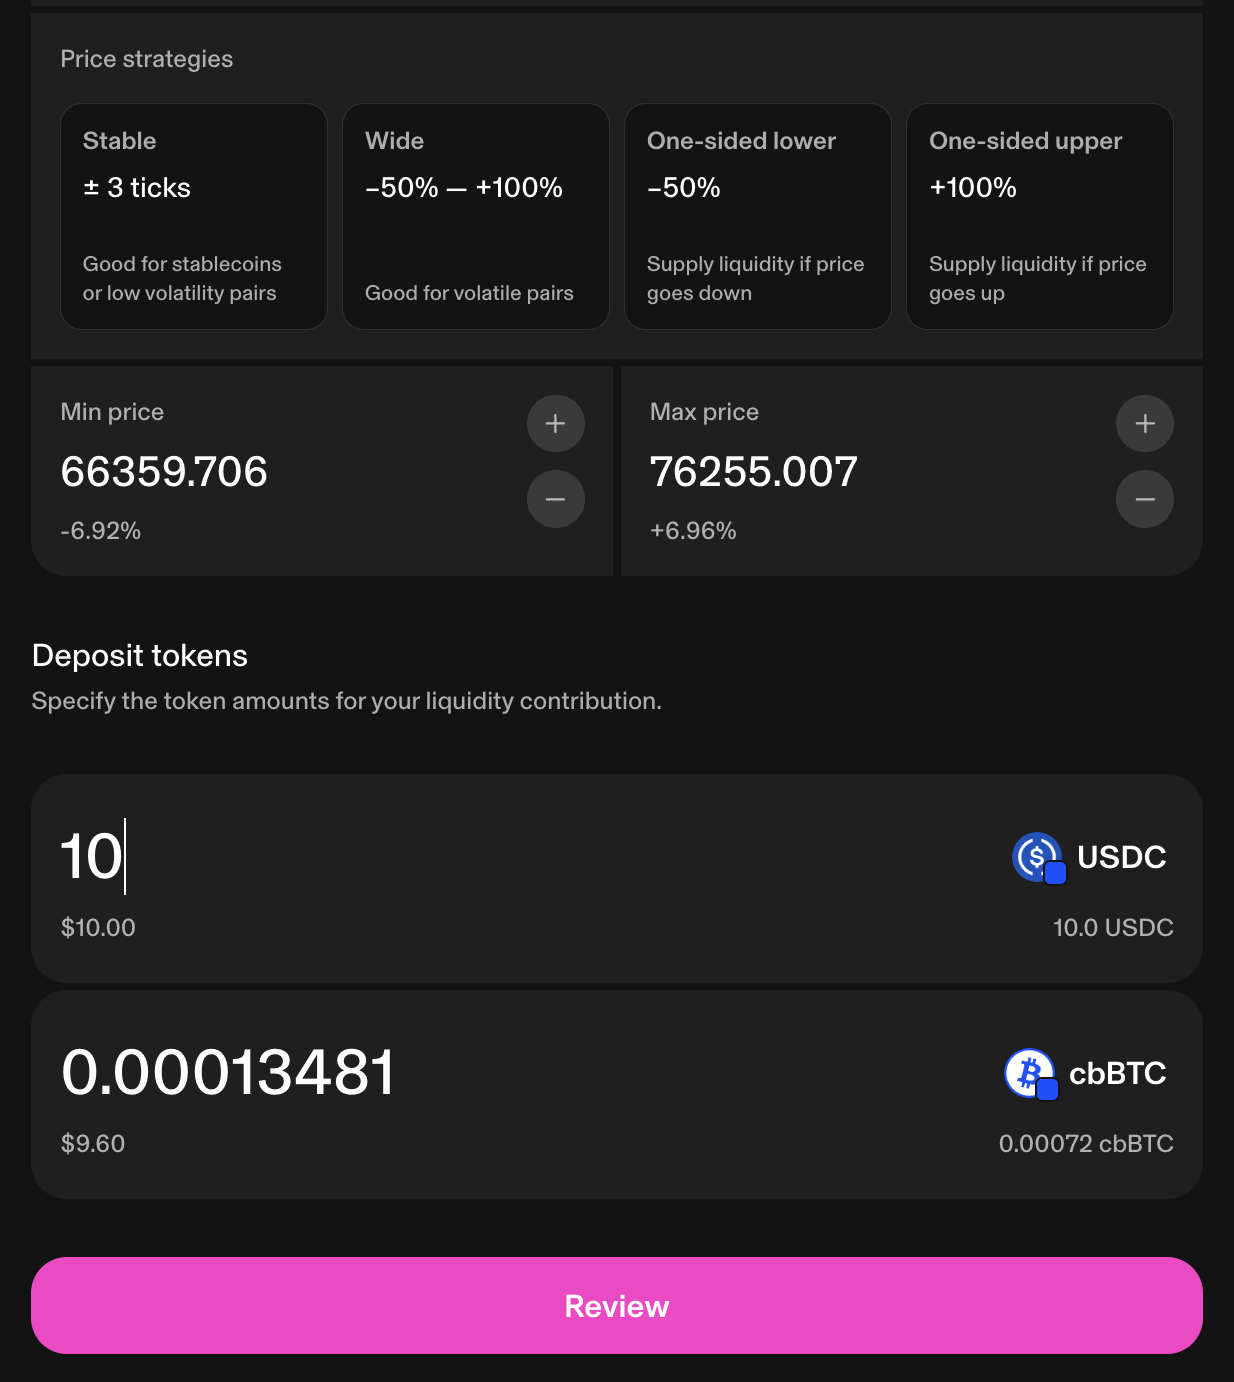
Use the default price range without any changes. Hover over the USDC input box
and click Max to enter all 10 USDC. The UI automatically calculates and fills
in the corresponding amount of cbBTC.
Click Reivew. A confirmation window shows the position configuration–min price,
max price, and token amounts. Double-check these numbers before proceeding.
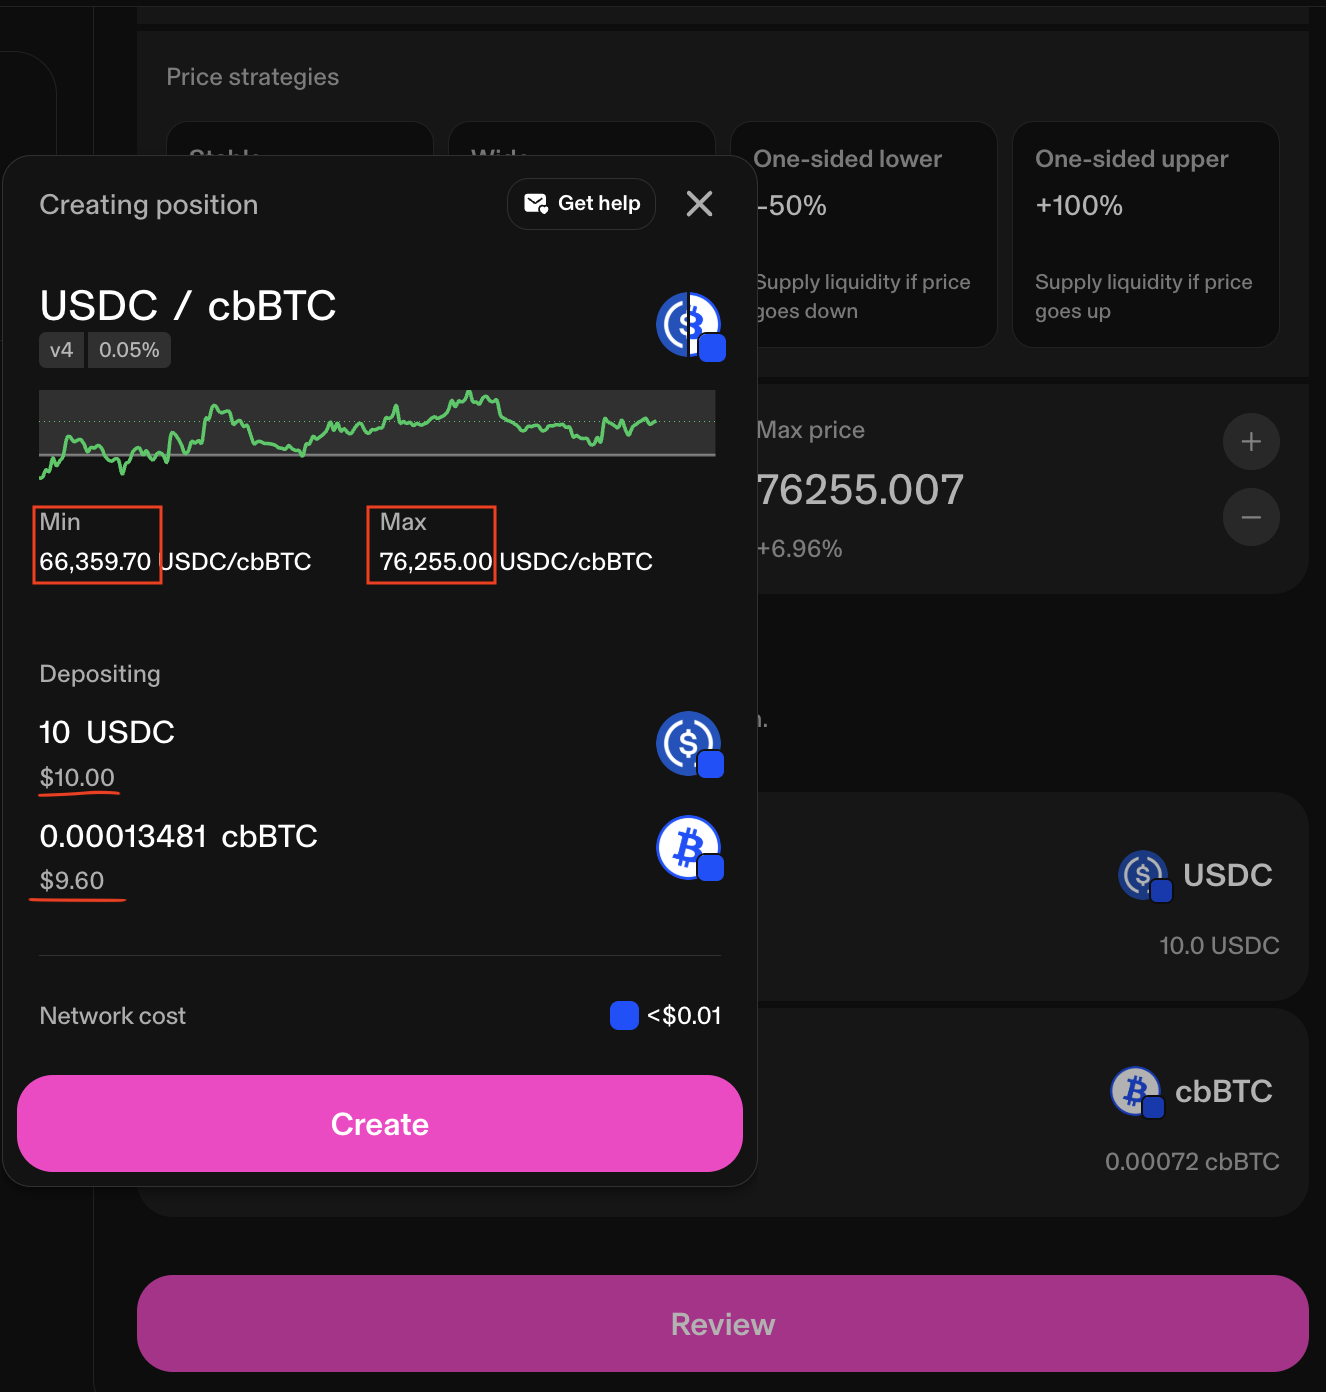
Click Create. Rabby wallet pops up asking you to sign two token approval
transactions–one for USDC and one for cbBTC.
🔒 Security: Token Approvals
When you first interact with a smart contract, you’ll be asked to allow it to “spend” your tokens. By default, some wallets set this approval to ‘unlimited’—-meaning the smart contract could theorectically use all of your approved tokens at any time. It’s a good habit to set approval amounts to exactly what you need for the transaction, and to regularly revoke approvals afterward. You can revoke approvals directly from Rabby wallet.
After the two approvals, sign a final transaction to send the tokens to the pool. In return, your wallet receives a non-fungible token (NFT)–a unique on-chain record that proves ownership of your position. The page then refreshes to show the newly opened position.
🔒 Security: Smart Contract Risk
Your tokens are now held by Uniswap’s smart contracts, not in your wallet. Uniswap is one of the most audited and battle-tested protocols in DeFi, but all smart contracts carry some residual risk of undiscovered bugs. Keep amounts small until you’re comfortable with smart contract risk and how LP positions behave.
You can also see your position on DeBank: https://debank.com/profile/[YourWalletAddress]. Replace [YourWalletAddress] with your actual wallet address.
🛠 Tools: DeBank
DeBank (https://debank.com) is a DeFi portfolio management tool where you can see your crypto holdings across various protocols on EVM-compatible chains. You can also look up historical transactions there. Wallet connection is not required.
Step 4: Record token outflows
It’s a good idea to record the amount of tokens–both liquidity tokens and gas
tokens–that left your wallet. Record them as negative numbers because they are
outflows from your wallet. In a spreadsheet, create three columns: sent USDC,
sent cbBTC, and sent ETH to record the amount of tokens sent to the pool and
the amount of ETH spent as gas.
🛠️ Tools: Position Tracker
Instead of building from scratch, clone the “Quickstart” tab of this Google Sheets template: https://docs.google.com/spreadsheets/d/1WZ1XYo0KaGX-e_et1Y05sRvtClhJ6D3bOuldSoq0Gcc/edit?usp=sharing.
Go to DeBank, click the Transactions tab, and select Base chain. Find the
token approval and deposit transactions for your position.
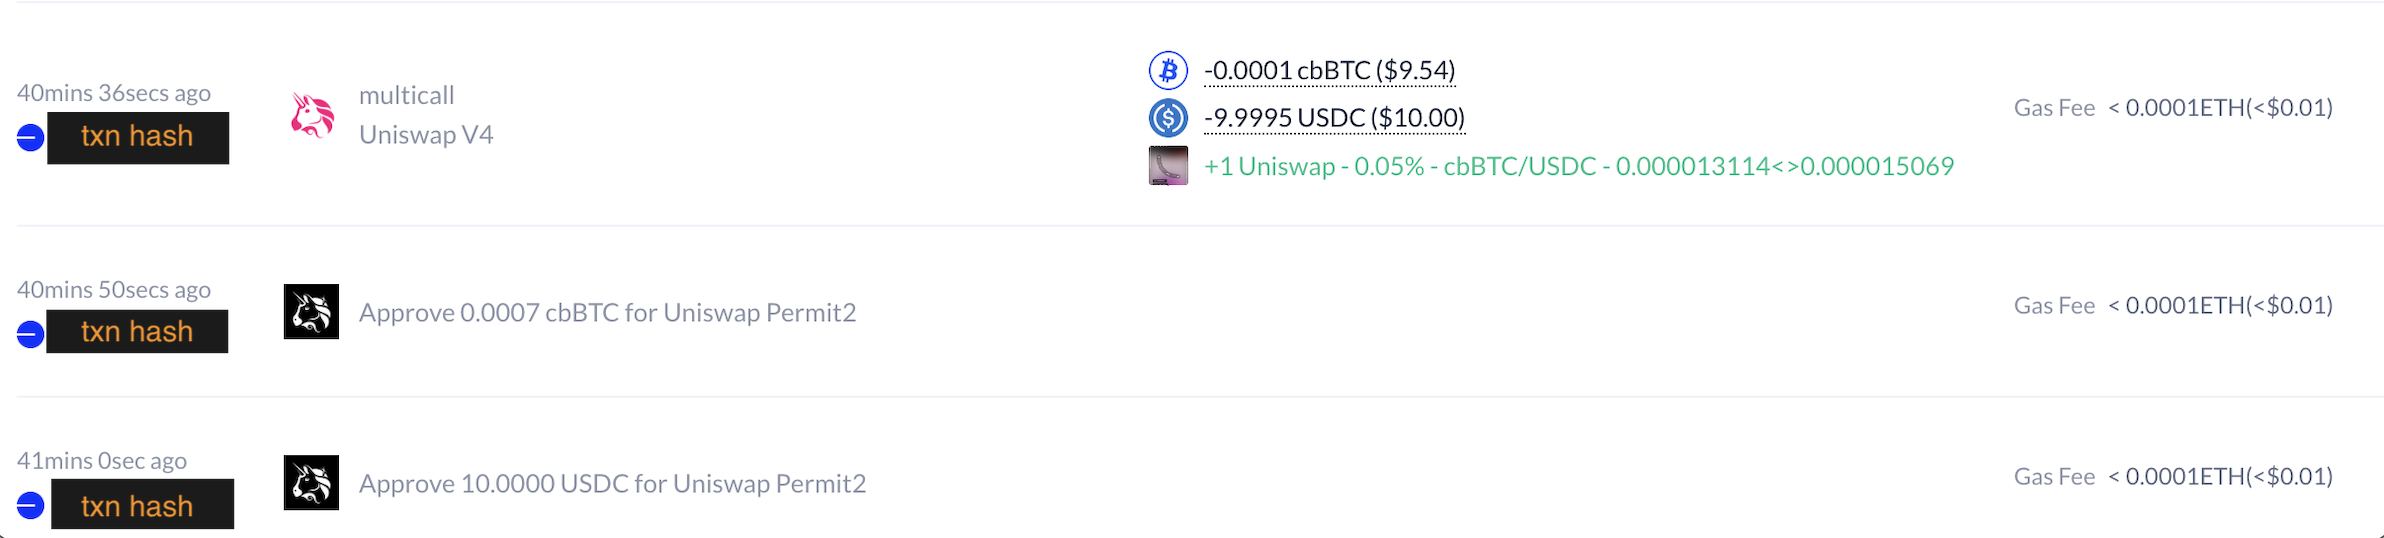
Click the hash of each token approval transaction. This takes you to Basescan, where you can find exactly how much ETH was spent on gas. Also click the hash of the token deposit transaction and find its gas spend.
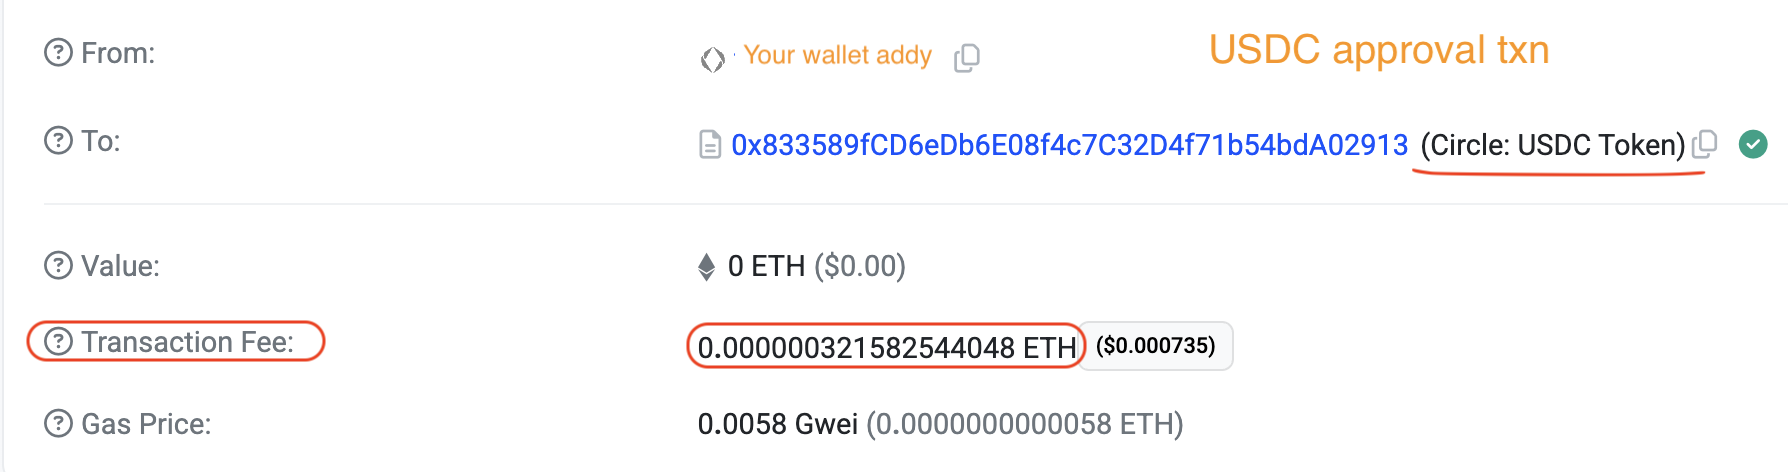
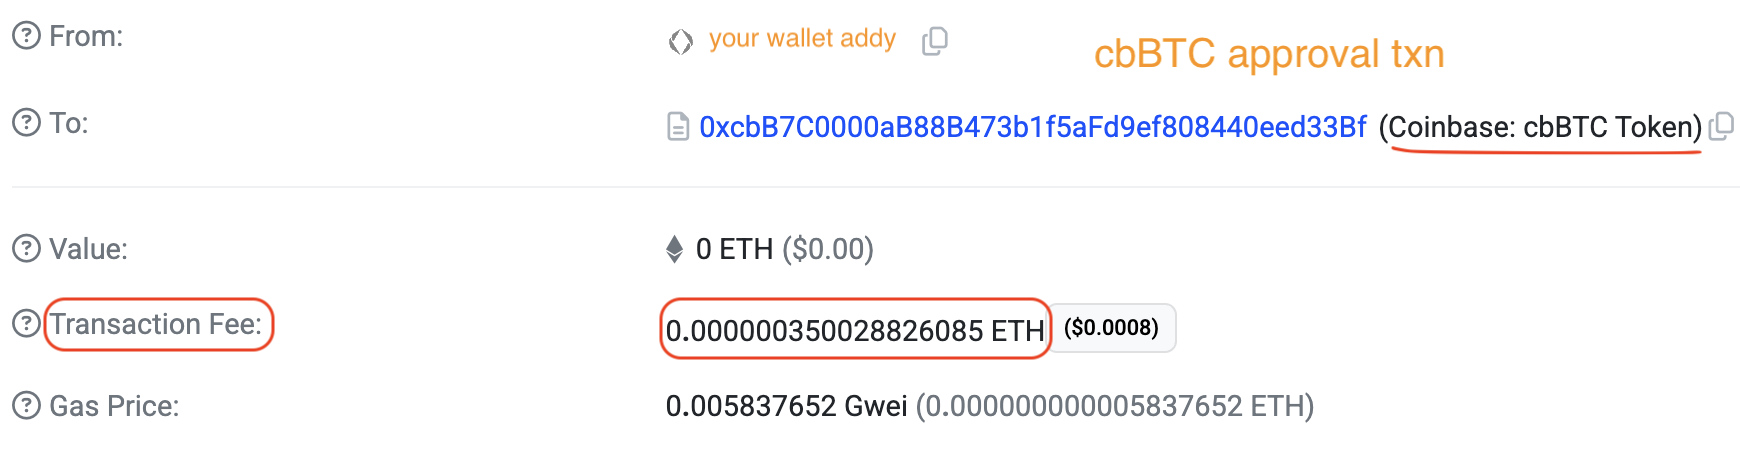

Enter these gas costs under sent ETH one by one as negative numbers and add them up.
![]()
![]()
On the deposit transaction’s Basescan page, find exactly how much USDC and cbBTC
were sent from your wallet to the Uniswap v4 pool.
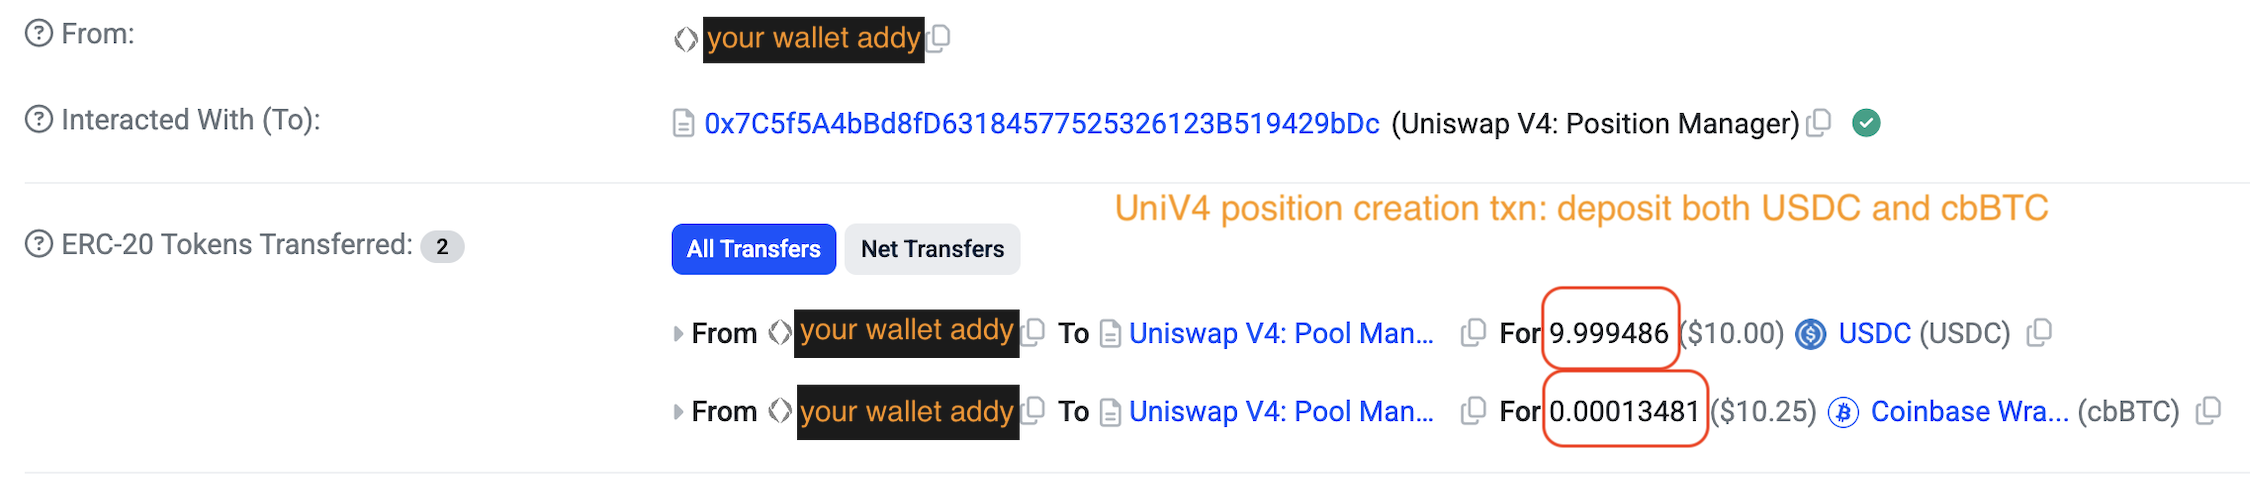
Enter them as negative numbers under sent USDC and send cbBTC respectively.
![]()
Step 5: Monitor your position
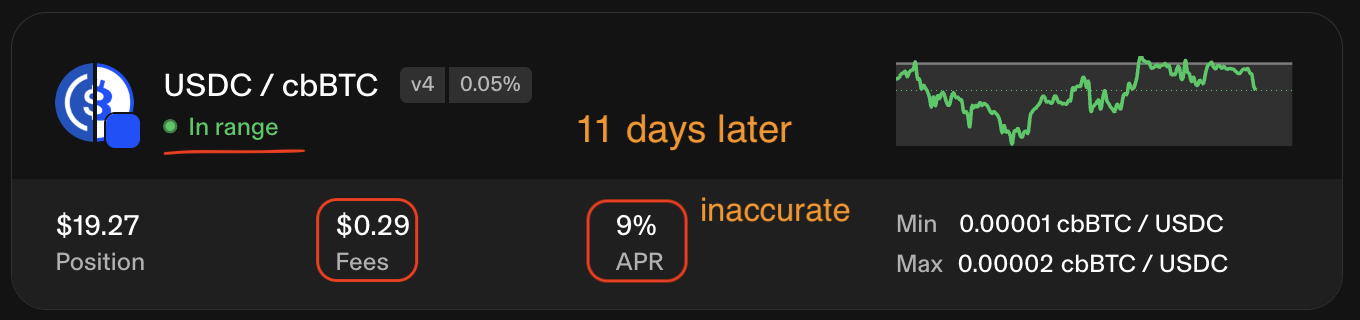
A freshly opened position shows 0 fees on Uniswap. Ignore the APR figure–it is not accurate.
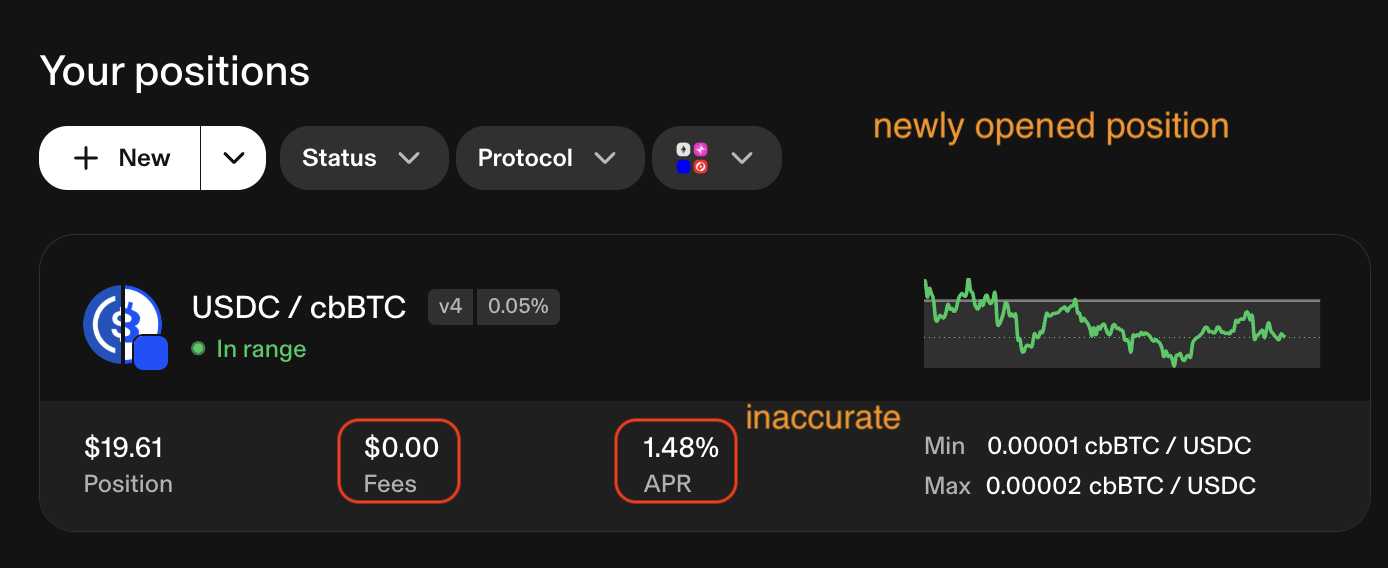
You can use DeBank to monitor your position without connecting your wallet–newly opened positions appear there almost immediately.
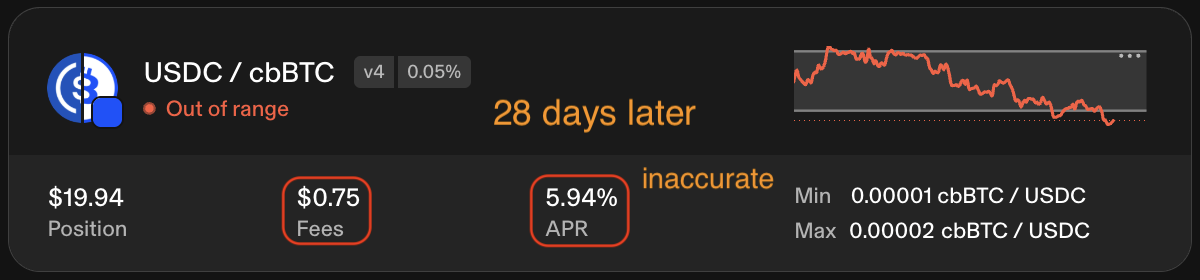
Or log back into Uniswap from time to time to see how much your position has earned. For example, our v4 demo position earned 29 cents after 11 days and 75 cents after 28 days.
To measure the yield, calculate fee APR using this formula:
\[ \text{Fee APR} = (\text{Fees Earned} ÷ \text{Liquidity Value}) × (365 ÷ \text{Days Open}). \tag{1.1} \]
For example, our v4 demo position had an initial liquidity value of $19.61. After 28 days, the price of cbBTC rose above the upper bound of its range, converting the position to 100% USDC worth $19.94. The position earned $0.75 in fees. We can calculate its fee APR in two ways:
- Based on the initial value: ($0.75 ÷ $19.61) × (365 ÷ 28) = 49.86%
- Based on the final value: ($0.75 ÷ $19.94) × (365 ÷ 28) = 49.03%
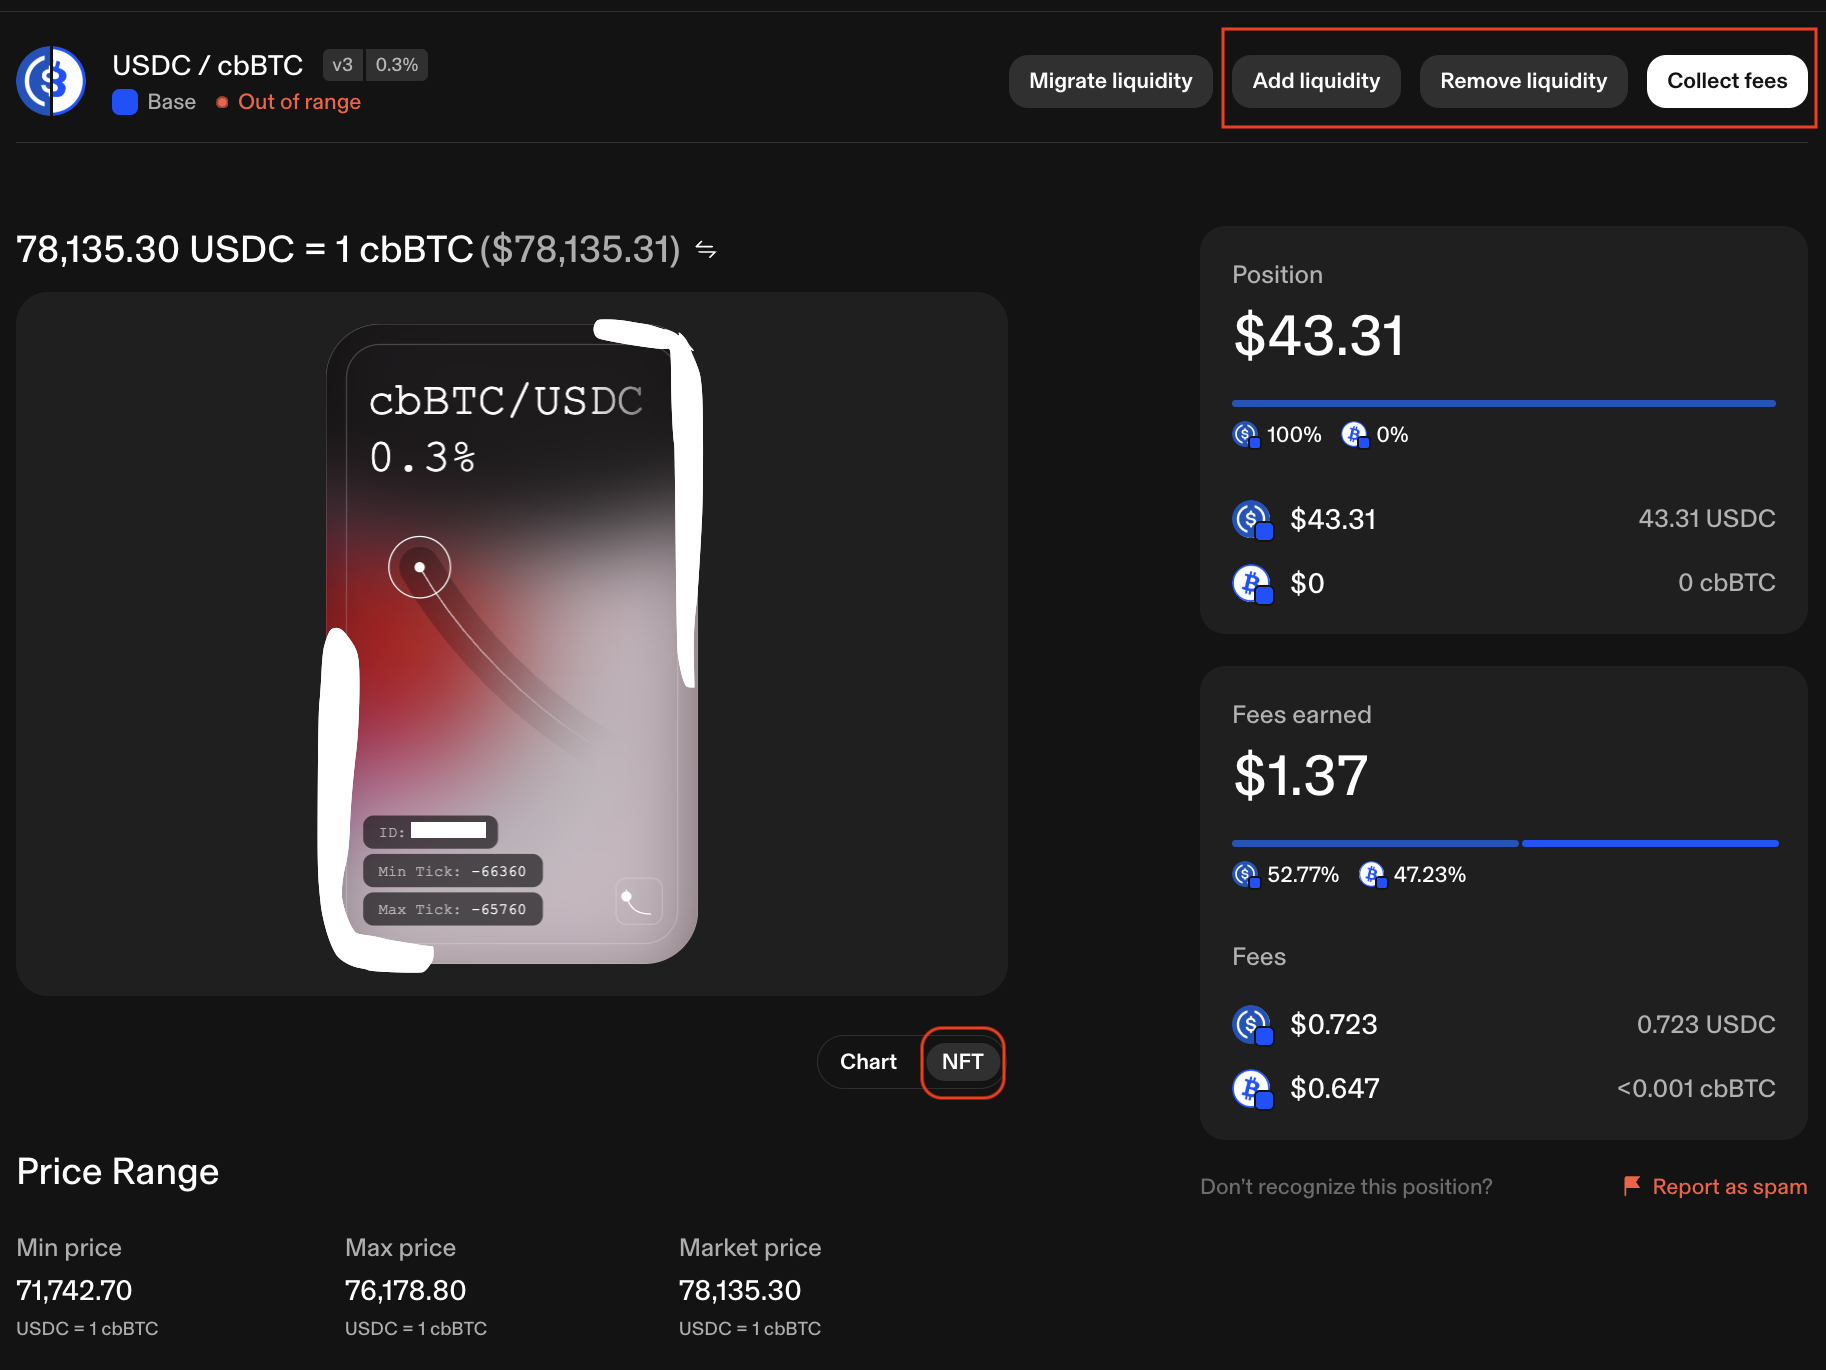
We’ll dive into the calculation of various performance metrics in a later chapter. For now, click on the position to open its management page. From there you can:
Add liquidity: Deposit more tokens into the existing position.Remove liquidity: Withdraw tokens from the position and claim fees in a single transaction.Collect fees: Claim fees without removing your liquidity.
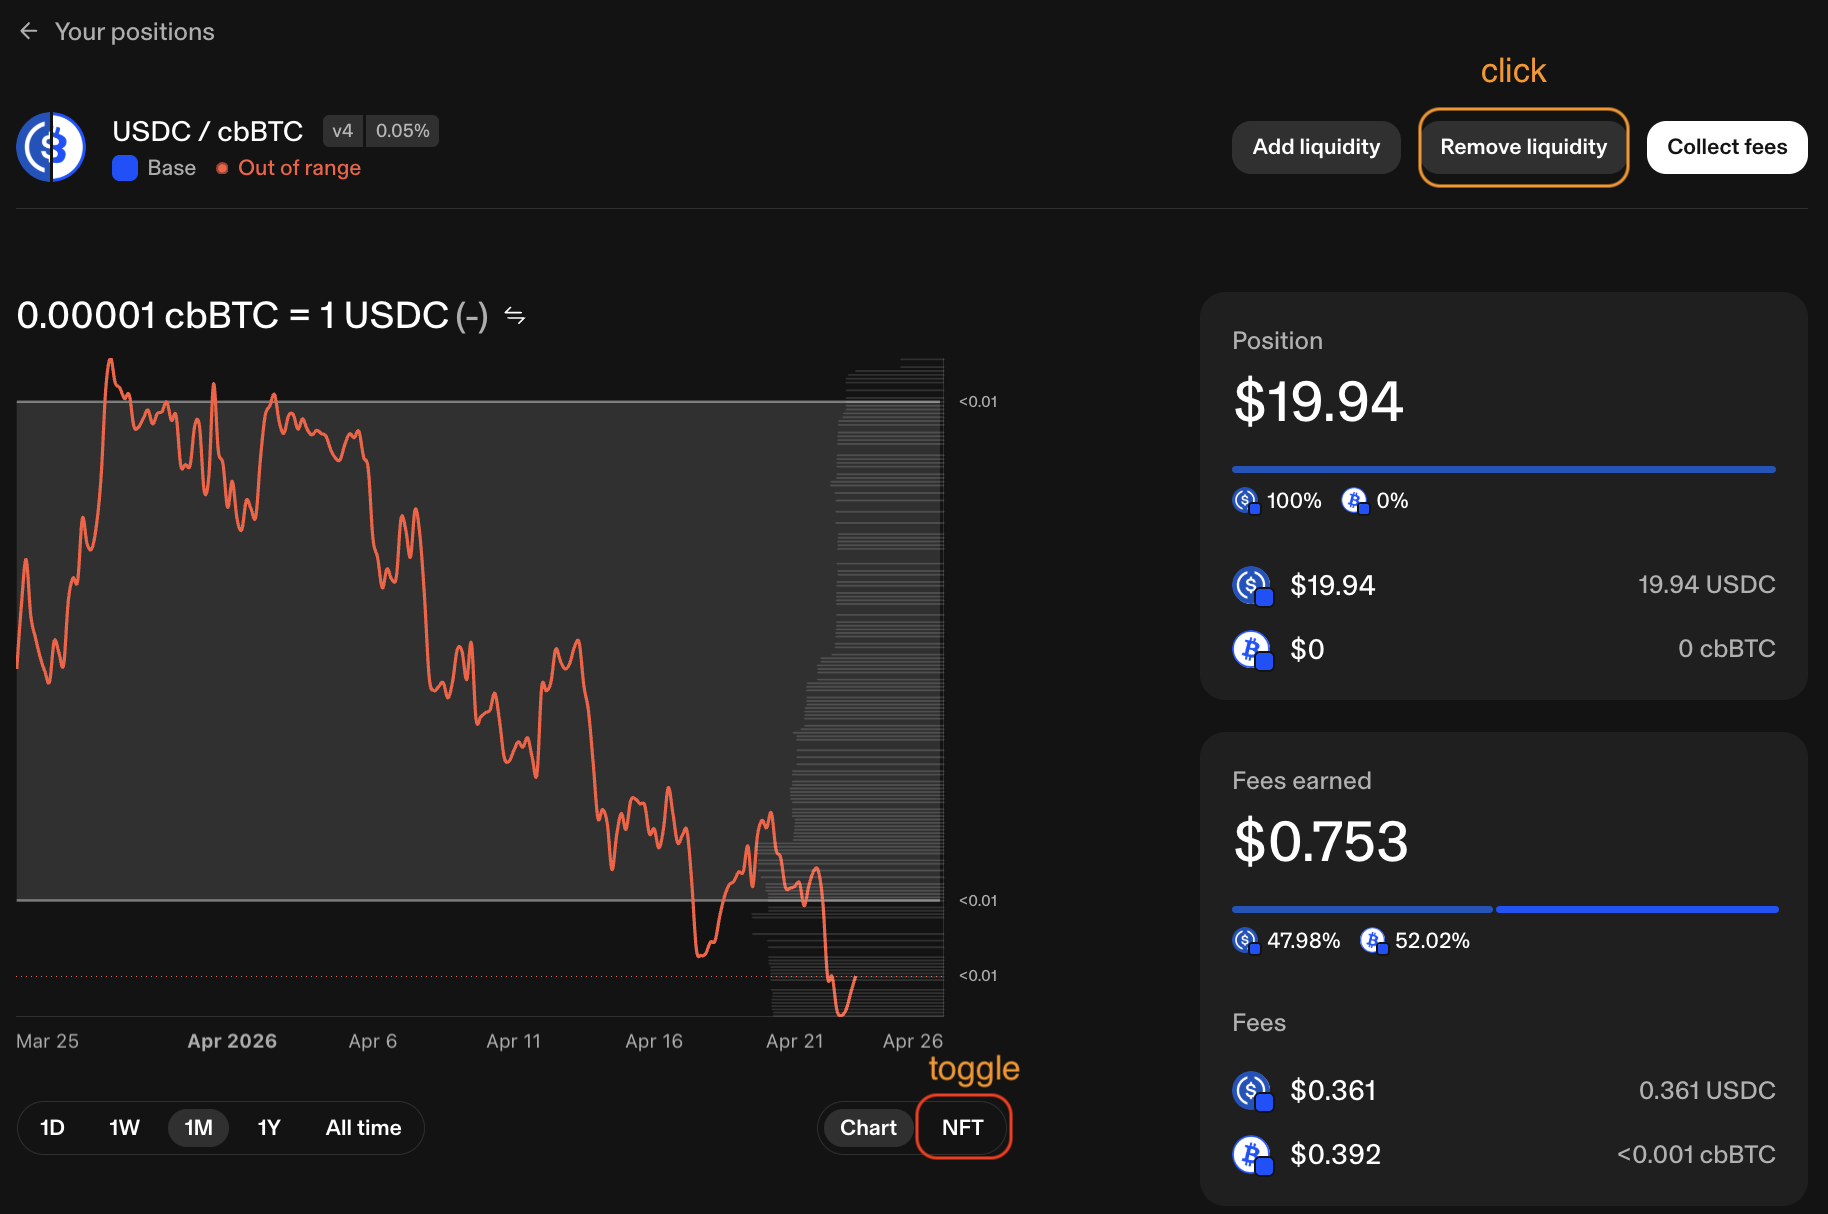
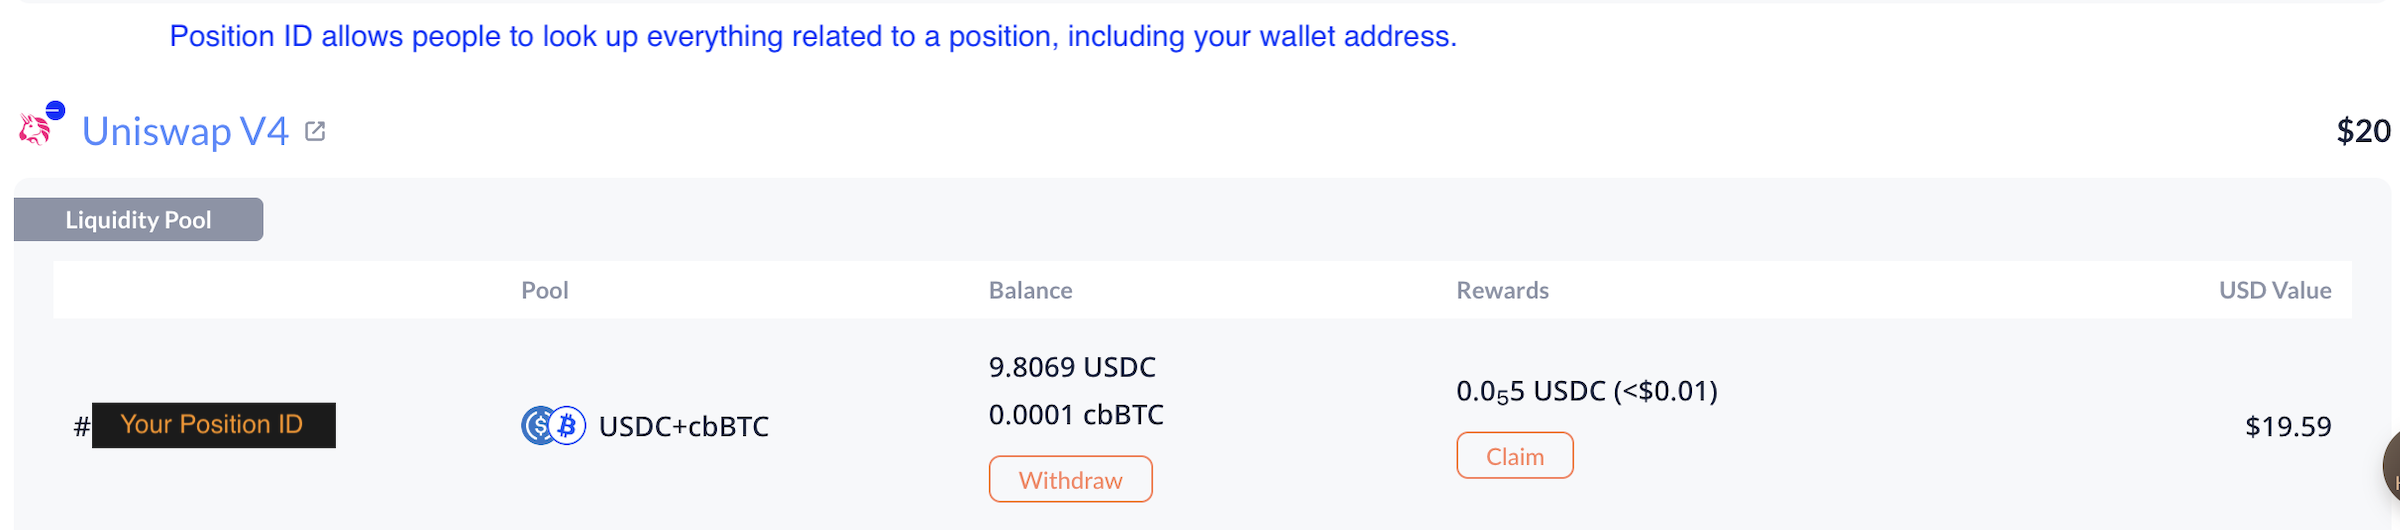
You can also toggle NFT (next to Chart) to see the NFT that represents your
position. Its numeric ID–the position ID–appears on the NFT image and at the
end of the URL: https://app.uniswap.org/positions/v4/base/[PositionID].
Because blockchain data is public, anyone can look up your position (and wallet
address) by its ID. Don’t share your position ID under your real name if you
want to stay anonymous.
🔒 Security: Position NFT
Your LP position’s NFT is stored in your wallet. Do NOT sell it on NFT marketplaces (such as OpenSea) or burn it–doing so irreversibly surrenders your liquidity. You can transfer the NFT to another wallet address you control on the same chain, but there are almost no good reasons to do this in practice. If you are curious, experiment with a position worth only a couple of dollars first.
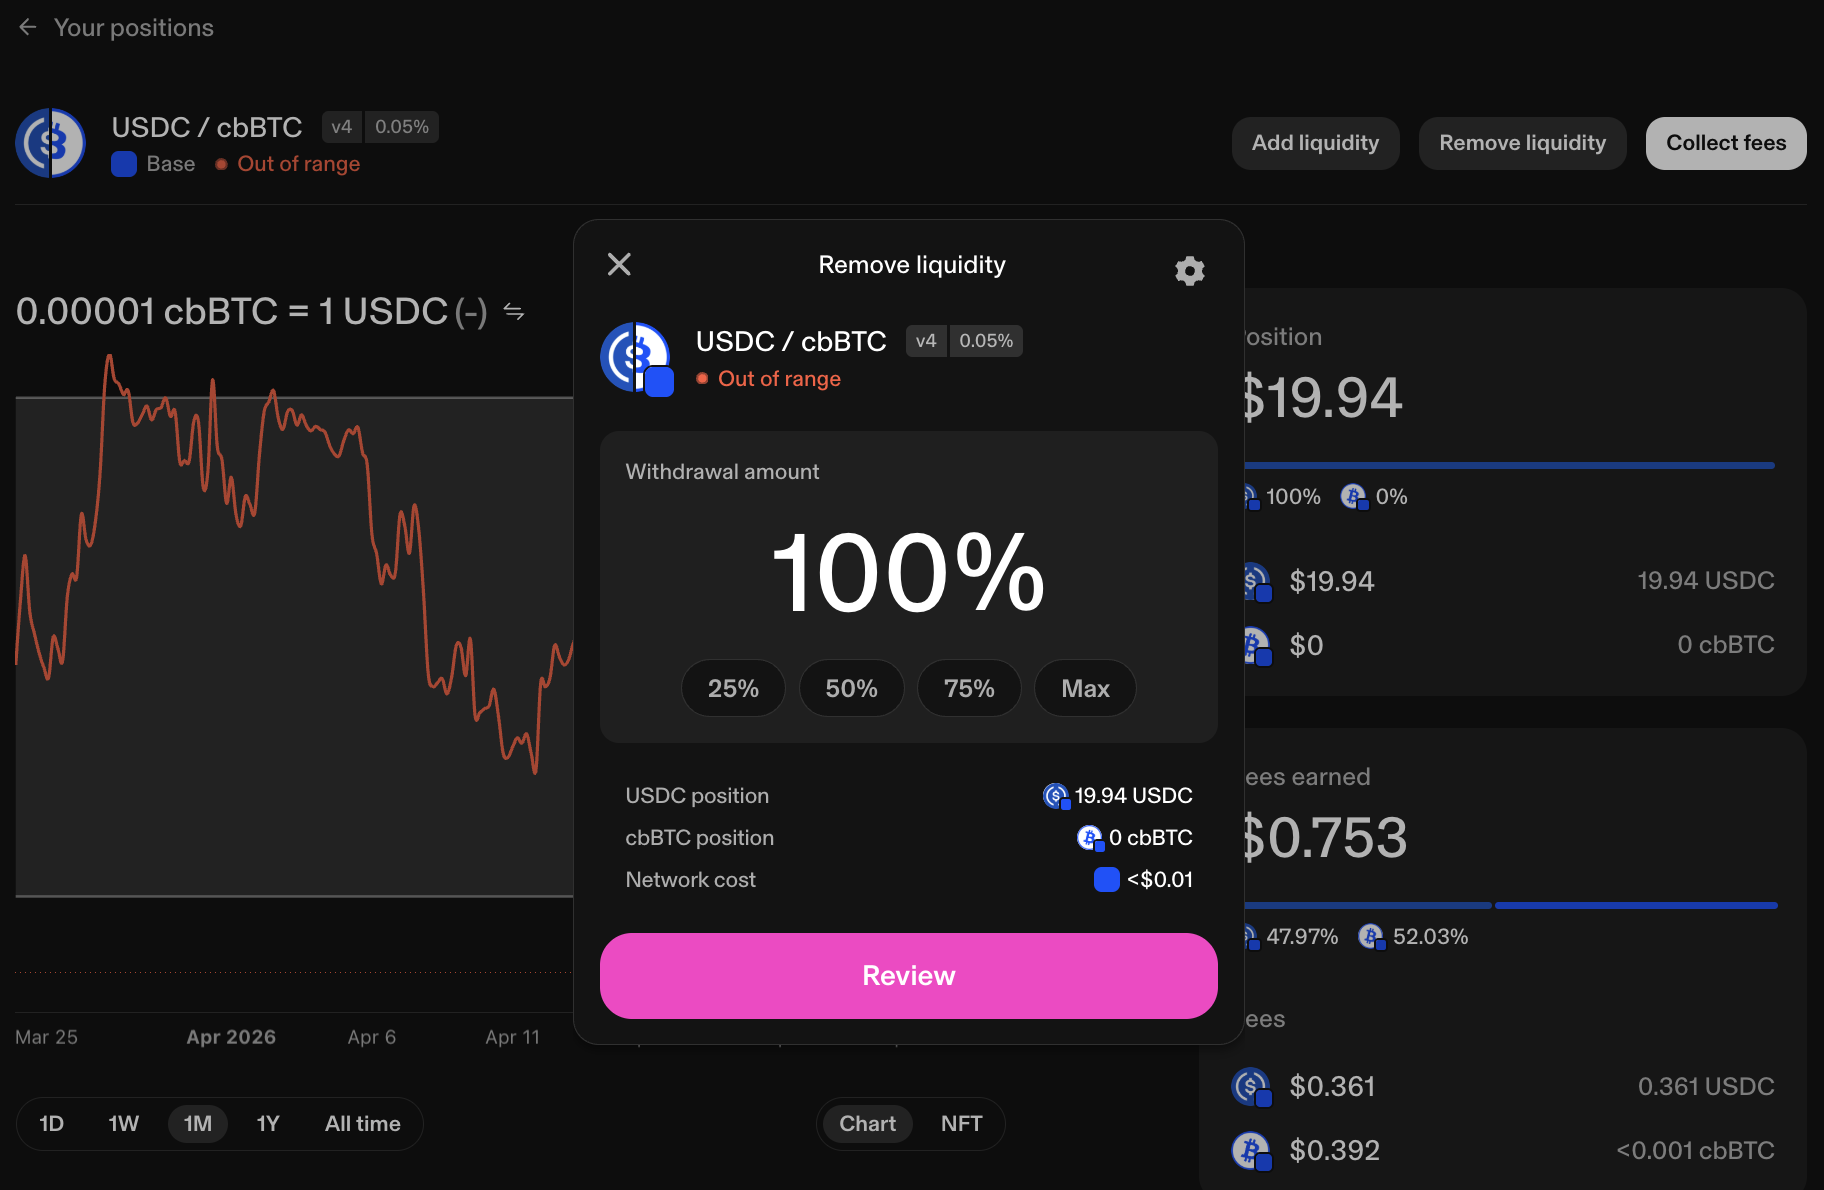
Step 6: Close your position
Let’s close our demo position since the price has moved outside its range and
it’s no longer earning fees. Click Remove liquidity, select 100%, then click
Review and Confirm.
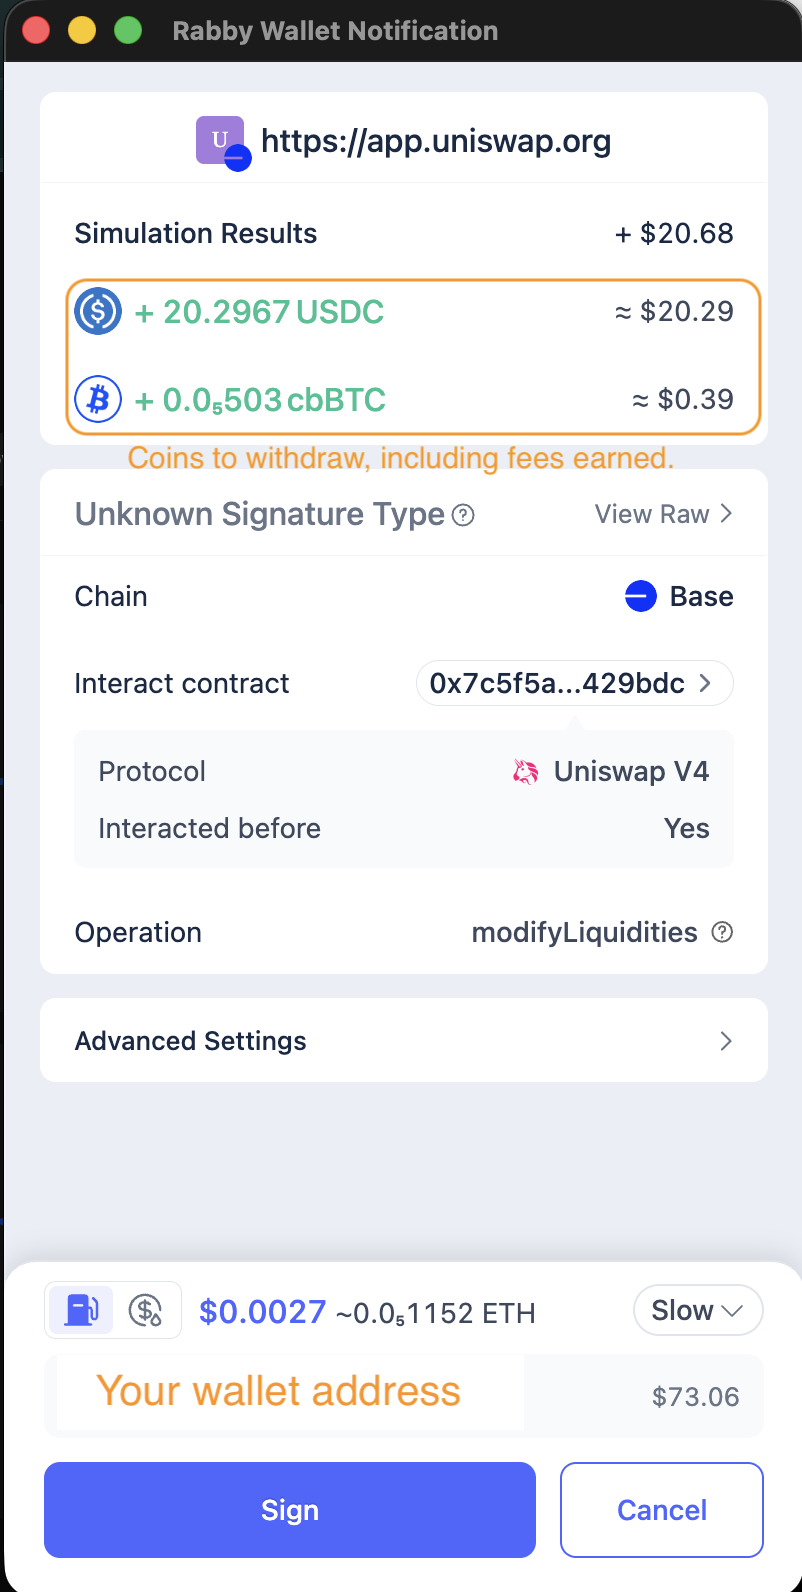
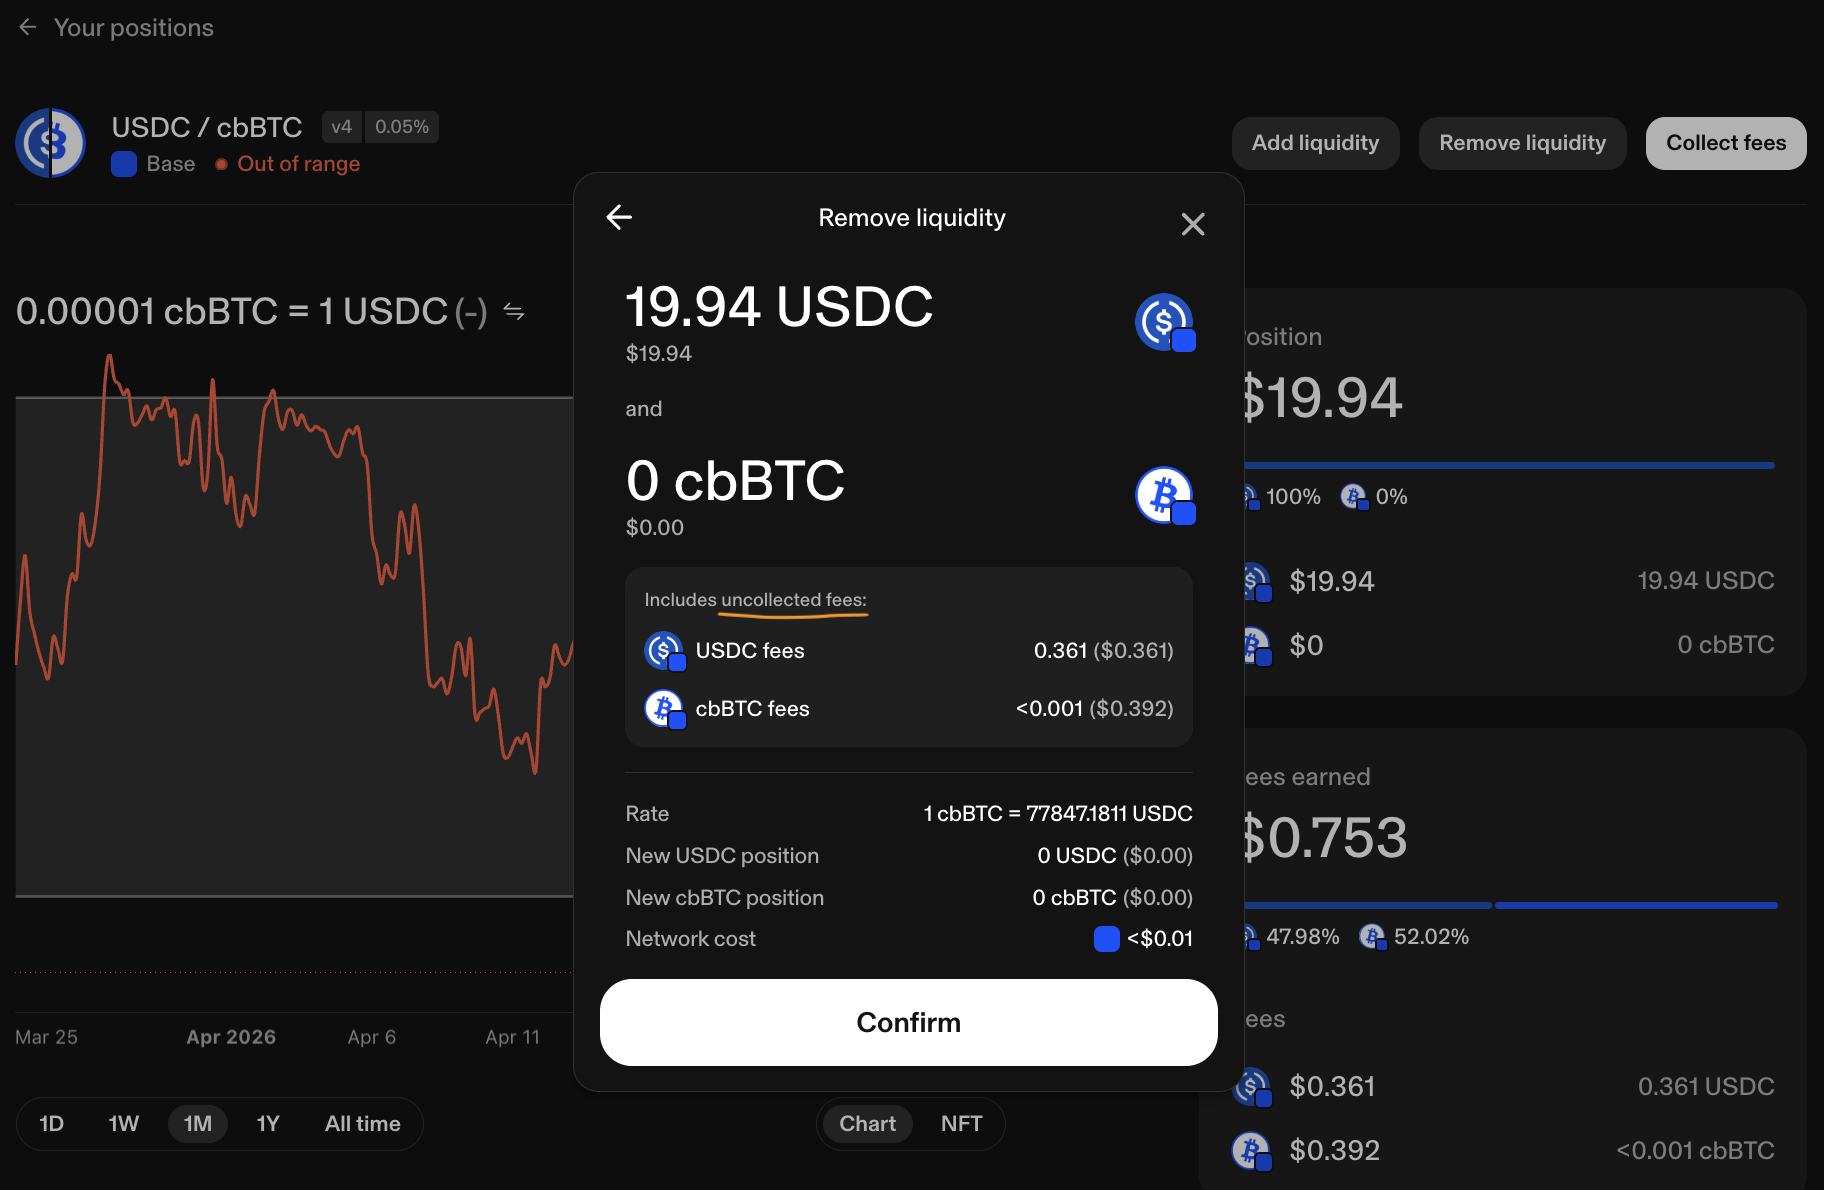 Rabby will show the total USDC and cbBTC to be returned to your wallet, including
both your liquidity tokens and any earned fees. Sign the transaction to finalize
the withdrawal.
Rabby will show the total USDC and cbBTC to be returned to your wallet, including
both your liquidity tokens and any earned fees. Sign the transaction to finalize
the withdrawal.
Step 7: Record token inflows
Record the amount of tokens your wallet receives after each fee claim or
liquidity withdrawal. In some DEXes on some chains you may also receive a gas
token refund upon position closure; record that too. These are inflows into your
wallet, so record them as positive numbers. In the same spreadsheet, create
three new columns: withdrew USDC, withdrew cbBTC, and withdrew ETH.
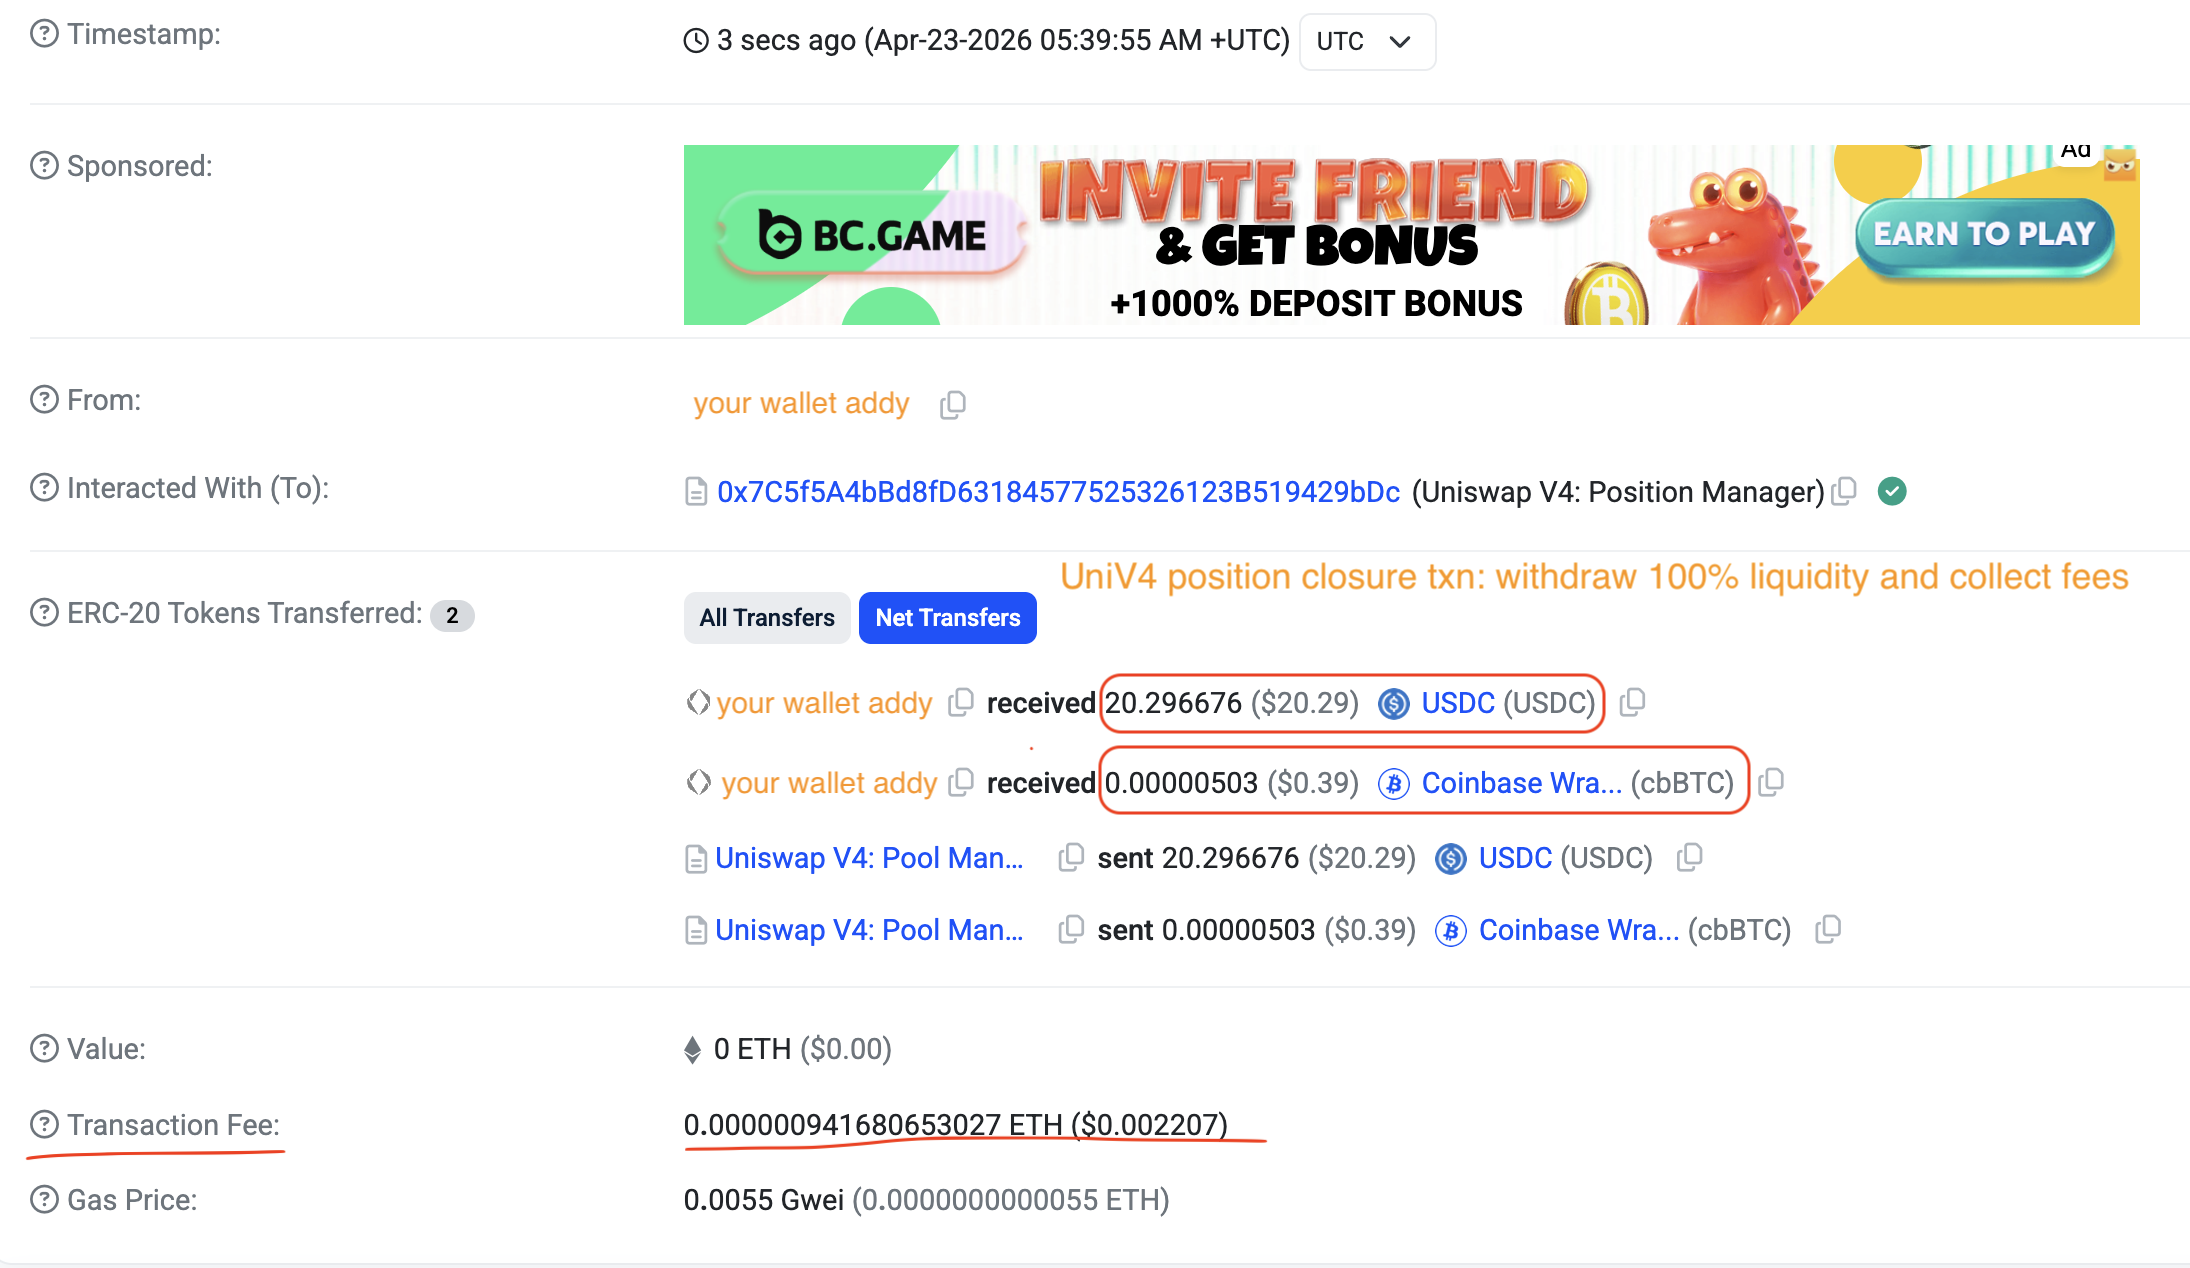
Go to DeBank (Transactions tab, Base chain) and find the liquidity removal
transaction you just signed.
 Click its hash to open the transaction details page on Basescan.
 Add the ETH gas spend as a negative number under
 sent ETH.
![]()
The total ETH spent should be tiny.
![]()
Enter 0 under withdrew ETH–there is no gas refund after closing a Uniswap LP
position on Base.
![]()
Find the amounts of USDC and cbBTC returned to your wallet and record them under
withdrew USDC and withdrew cbBTC as positive numbers.
![]()
Step 8: Calculate token net flows
Because we recorded token inflows and outflows, we can now easily calculate
token net flows. In the same spreadsheet, create two columns: delta USDC and
delta cbBTC, where:
delta USDC = sent USDC + withdrew USDCdelta cbBTC = sent cbBTC + withdrew cbBTC
Similarly, create a delta ETH column:
delta ETH = sent ETH + withdrew ETH.
![]()
![]()
For example, the two-sided demo Uniswap v4 position cost only a tiny amount of ETH and effectively sold 0.00012978 (~0.0001) cbBTC for 10.30 USDC, resulting in an effective sale price of $79,365.
1.2 Uniswap V3 LP Position
The v4 position we created was two-sided–we deposited two tokens across a range straddling the current price, so it started earning fees right away. In this section we’ll do something different: a one-sided position, where you deposit only one token and set the range entirely above or below the current pool price. One-sided positions don’t earn fees until price enters the range, but they’re often easier to build strategies around–we’ll see why in later chapters. For now, let’s create a one-sided cbBTC-USDC position on Uniswap v3 with the remaining cbBTC in Rabby wallet.
Step 1: Visit Uniswap’s website
🔒 Security: UI Phishing
As before, type the URL directly into your browser—-never click links from search engines, social media posts, or messages.
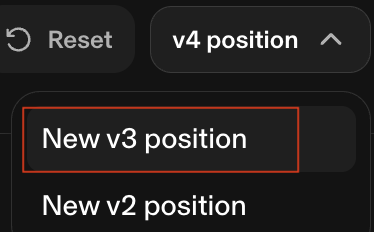
Go to https://app.uniswap.org/positions. Click + New or New Position. The
pool selection page opens defaulting to v4. Change it to New v3 position using
the toggle at the top right.
Step 2: Select token pair and fee tier
Select Base as the network and choose cbBTC and USDC.
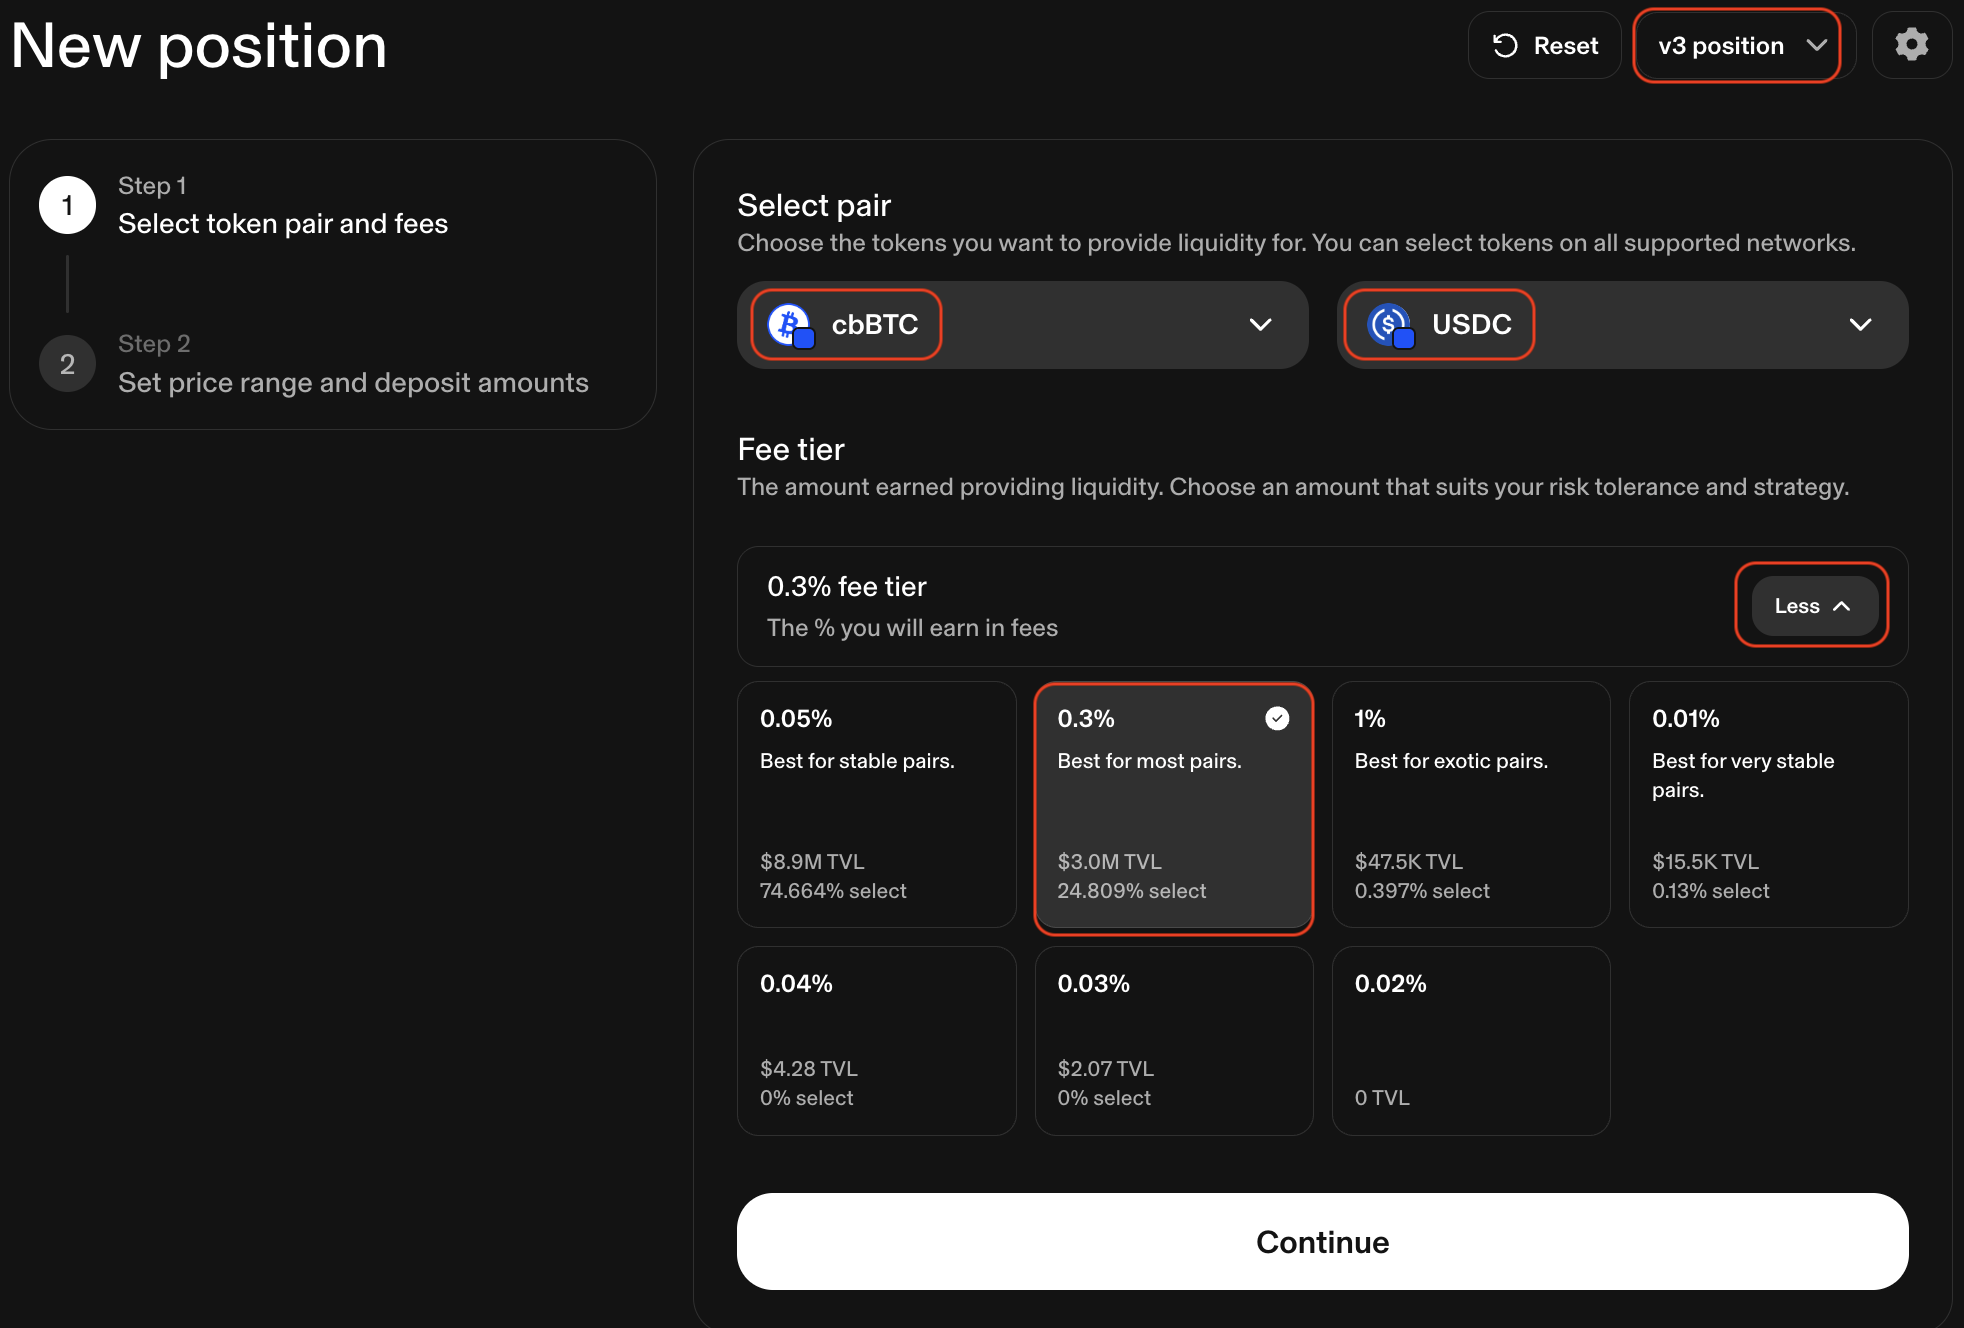 The default fee tier is 0.05% (highest TVL). Click
 More to expand and select
the 0.3% fee tier instead. For a one-sided position placed above the current
price, 0.3% earns more per swap than 0.05%—-a reasonable trade-off since we’re
targeting a specific directional move rather than capturing continuous volume.
Click Continue.
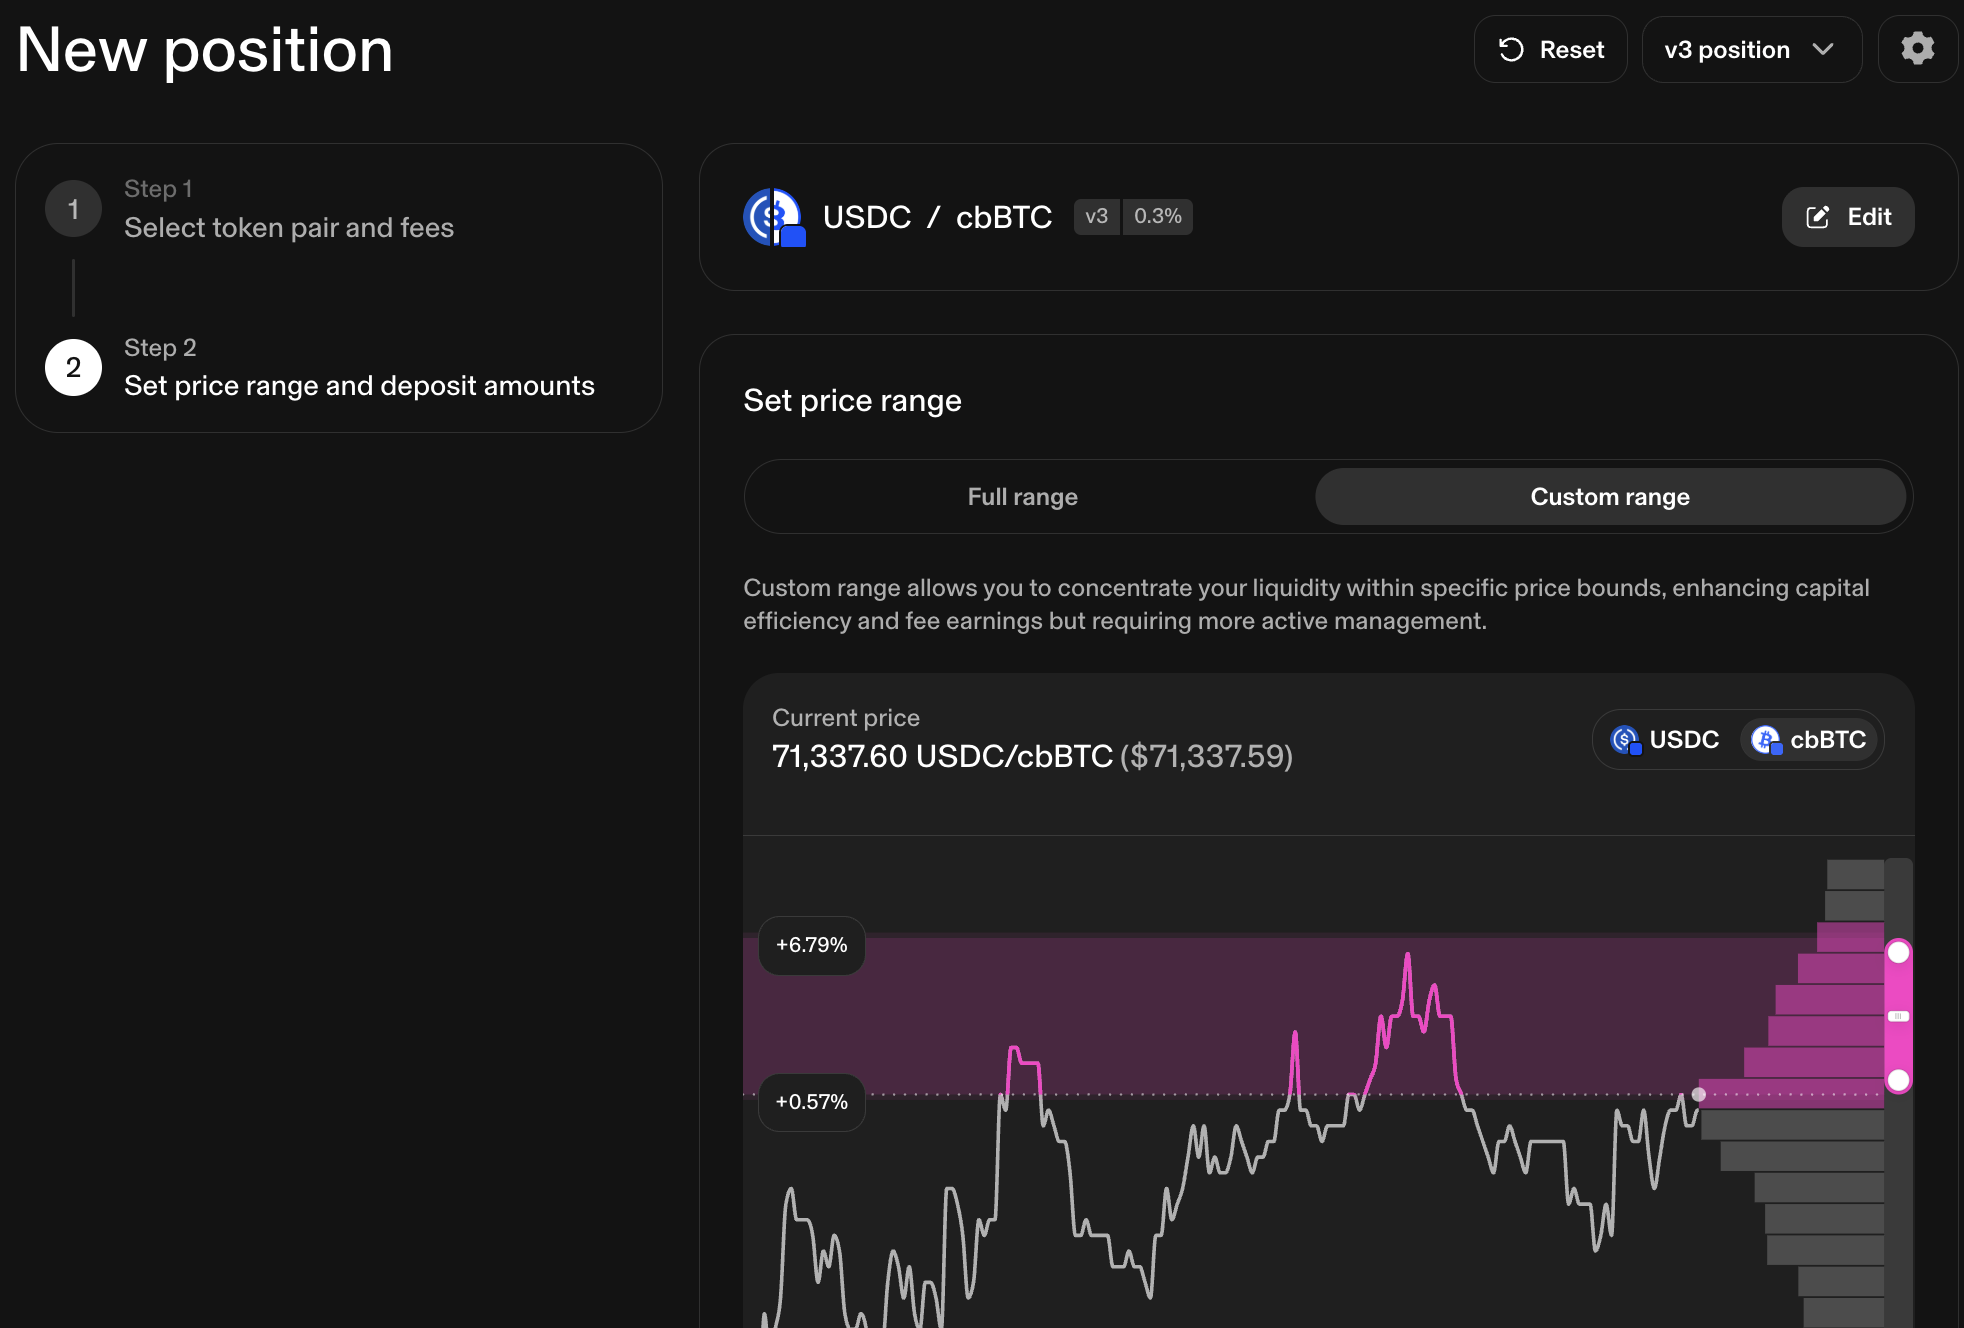
Step 3: Set a one-sided price range and deposit token
If prices display as tiny decimals, toggle the cbBTC button for easier reading.
Uniswap defaults to a symmetric two-sided range. To go one-sided, move the lower price bound up to just above the current price. This makes the USDC input box disappear—-only cbBTC is needed, because your entire range sits above the current price. The position starts earning fees when cbBTC’s price rises into the range.
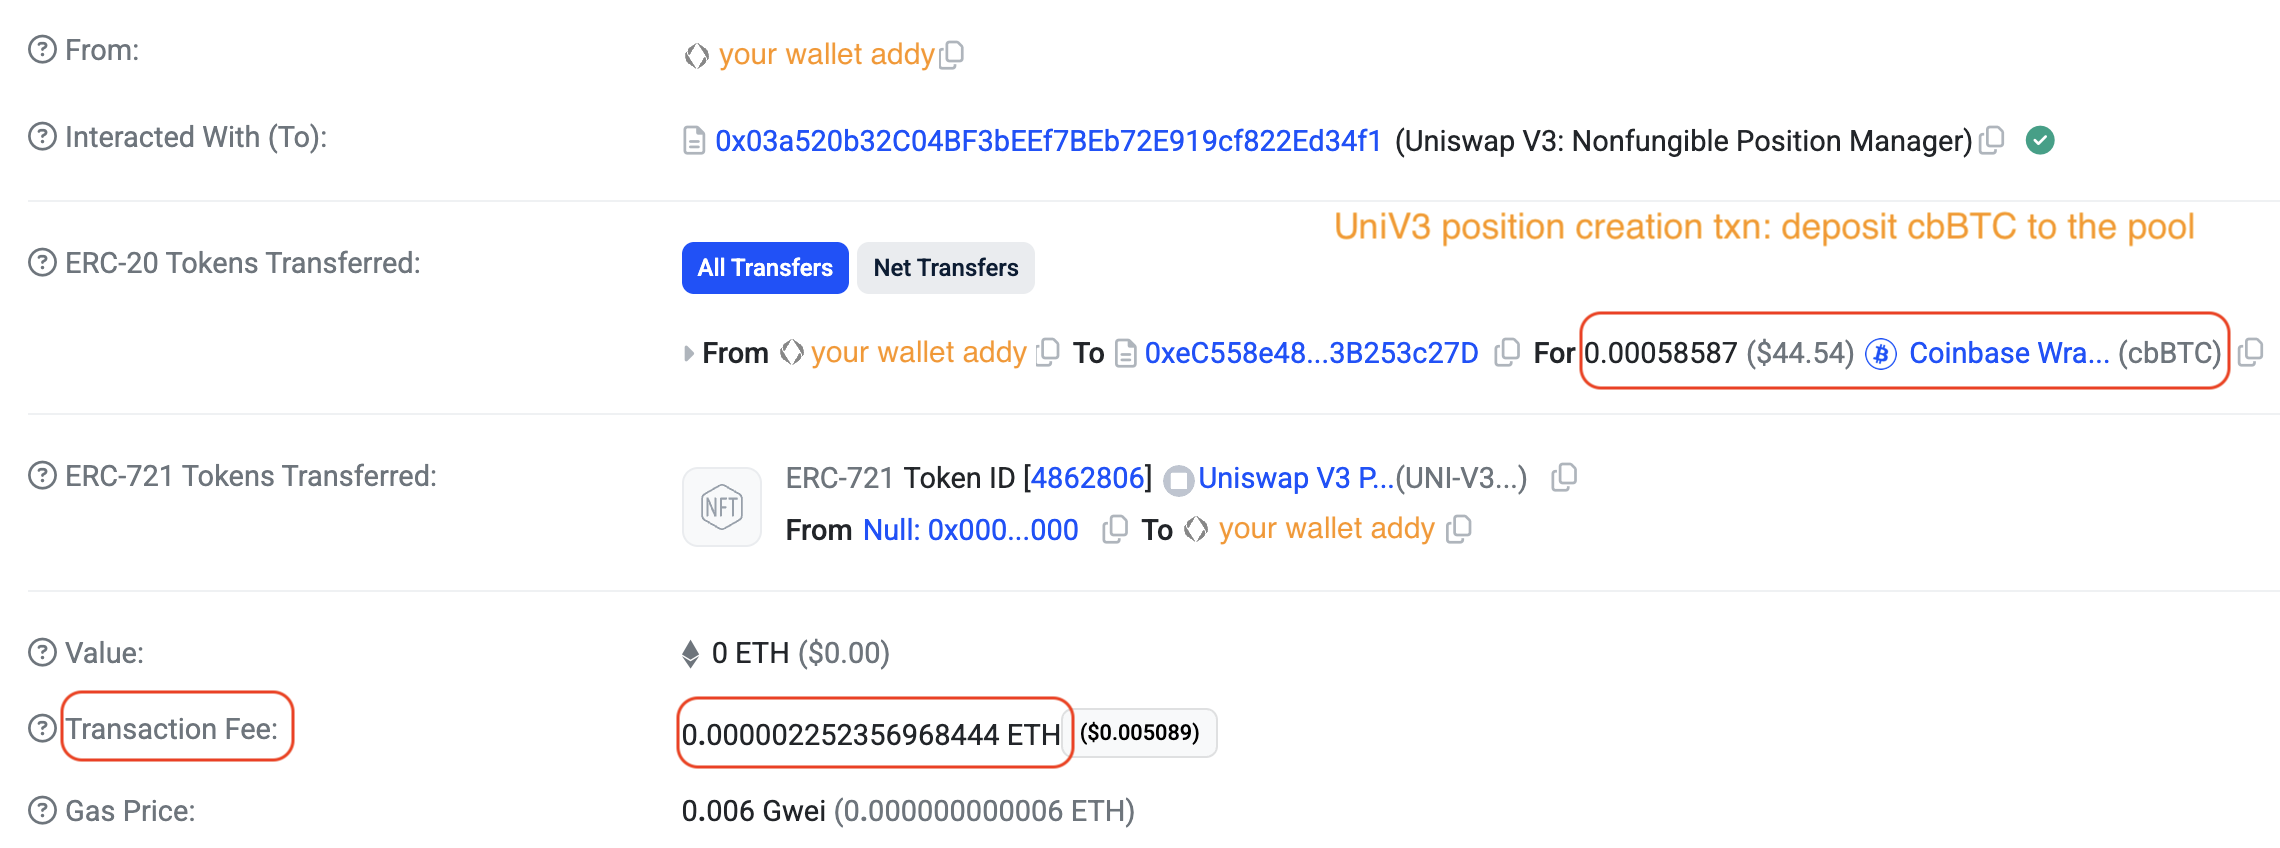
Click Max to deposit all remaining cbBTC. Click Reivew and confirm the min
price, max price, and cbBTC amount. In the demo, I deposited 0.00058587 cbBTC in
the range $71,742.7 - $76,178.8, with the pool price slightly below $71,742.7.
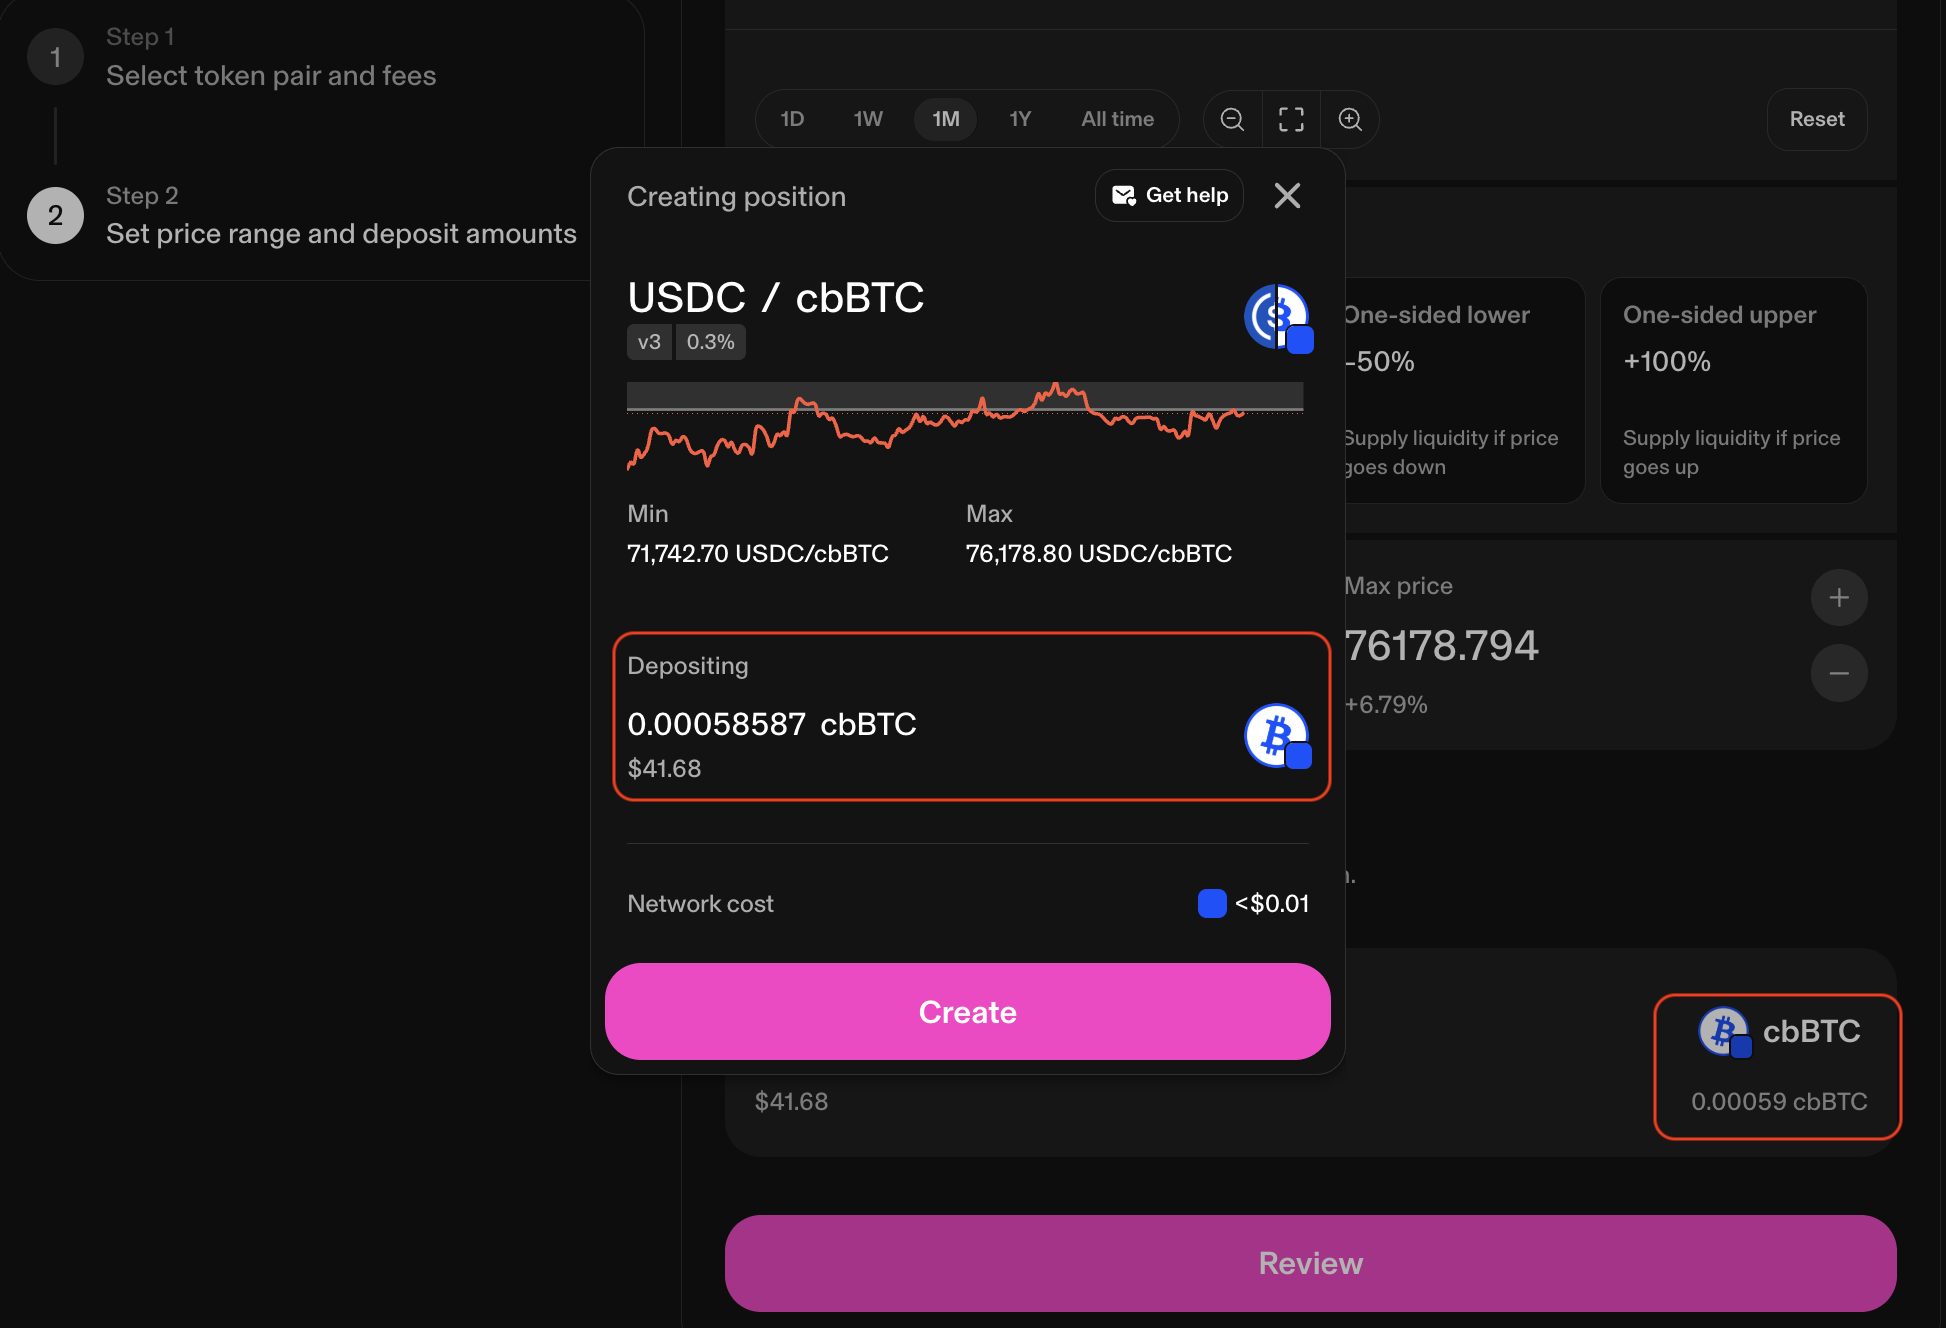
Click Create. Rabby will ask you to approve cbBTC spending and then sign the
deposit transaction. Your cbBTC will be sent to the pool, and an NFT representing
the LP position will be returned to your wallet.
🔒 Security: Token Approvals
This is a new contract (v3), so you’ll see another approval request for cbBTC. Set the approval amount to exactly what you need–not unlimited. The same caution applies as with v4: unlimited approvals leave your tokens exposed.
If you want to check whether you’ve granted unlimited approvals in the past–including which tokens, protocols, or smart contracts are involved–you can do so in Rabby. Revoke any unlimited approvals immediately.
Step 4: Record token outflows
Open the Google Sheets template mentioned before and copy the “Quickstart” tab.
Go to DeBank -> Transactions tab (https://debank.com/profile/[YourWalletAddress]/history) -> Base chain to locate the cbBTC approval and deposit transactions.

Click each transaction hash to open its detail page on Basescan. Find how much ETH was spent on gas and how much cbBTC was sent to the pool.
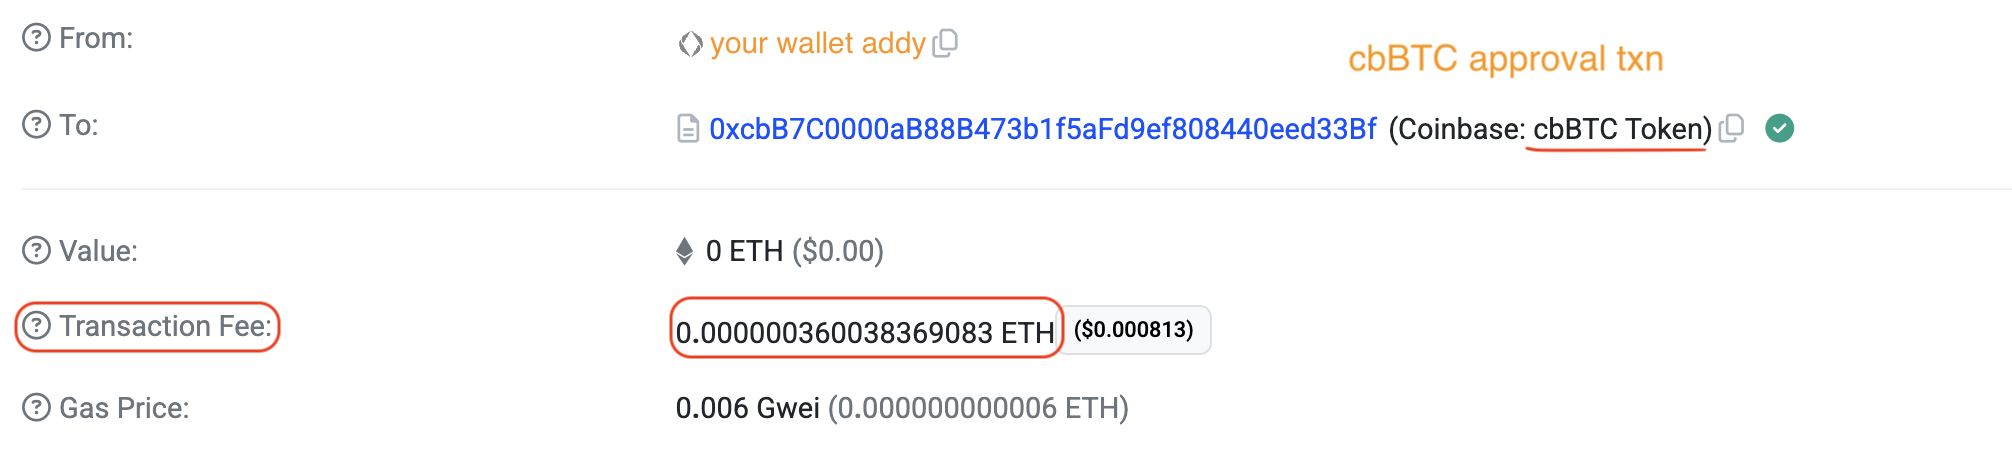
Record gas expenses under sent ETH as negative numbers.
![]()
![]()
Record the cbBTC deposit amount under sent cbBTC as a negative number. Enter 0
under sent USDC–this is a one-sided position and no USDC was deposited.
![]()
Step 5: Monitor your position
Your position will show “Out of range” right after creation because its range sits above the current price. It earns no fees until cbBTC’s price climbs into its range.

You can monitor your position on DeBank without connecting your wallet.
You can also periodically log into Uniswap to check your position and calculate its fee APR using formula (1.1).
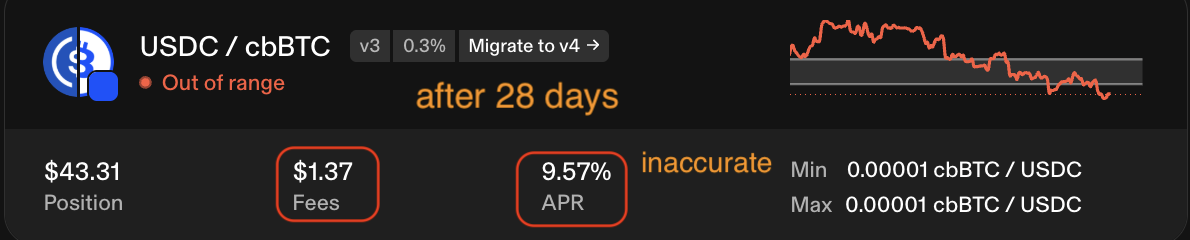
For example, our demo v3 position earned $1.37 in fees over 28 days, with liquidity starting at $41.68 and ending at $43.31. We can calculate its fee APR in two ways:
- Based on the initial value: ($1.37 ÷ $41.68) × (365 ÷ 28) = 42.85%
- Based on the final value: ($1.37 ÷ $43.31) × (365 ÷ 28) = 41.24%
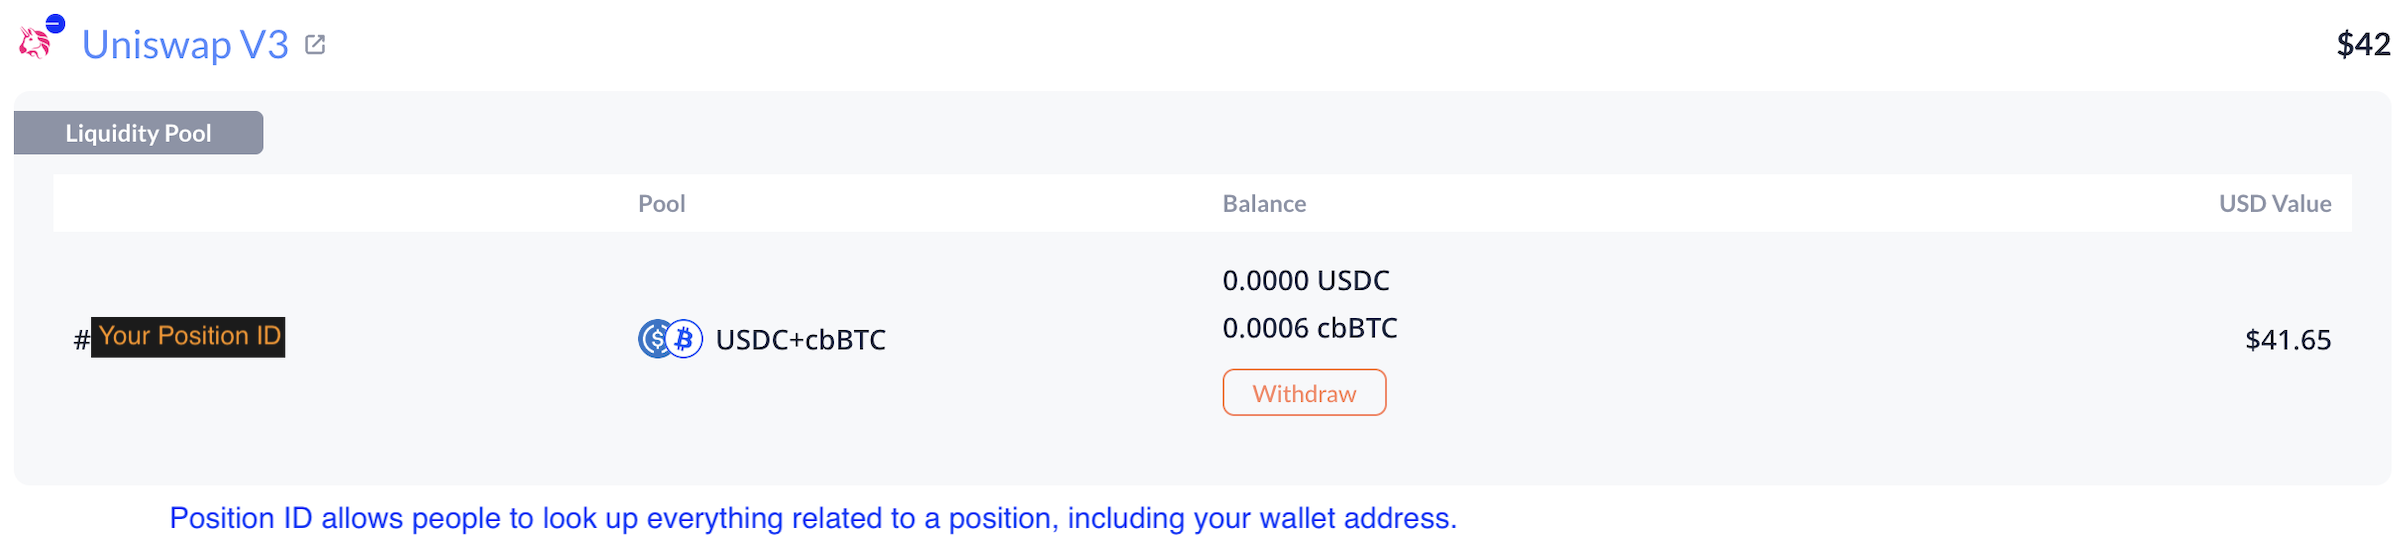
You can find the position ID on the NFT image or at the end of the URL: https://app.uniswap.org/positions/v3/base/[PositionID]. Don’t share it under your real identity. Also, don’t sell or burn the NFT–doing so permanently surrenders your liquidity position.
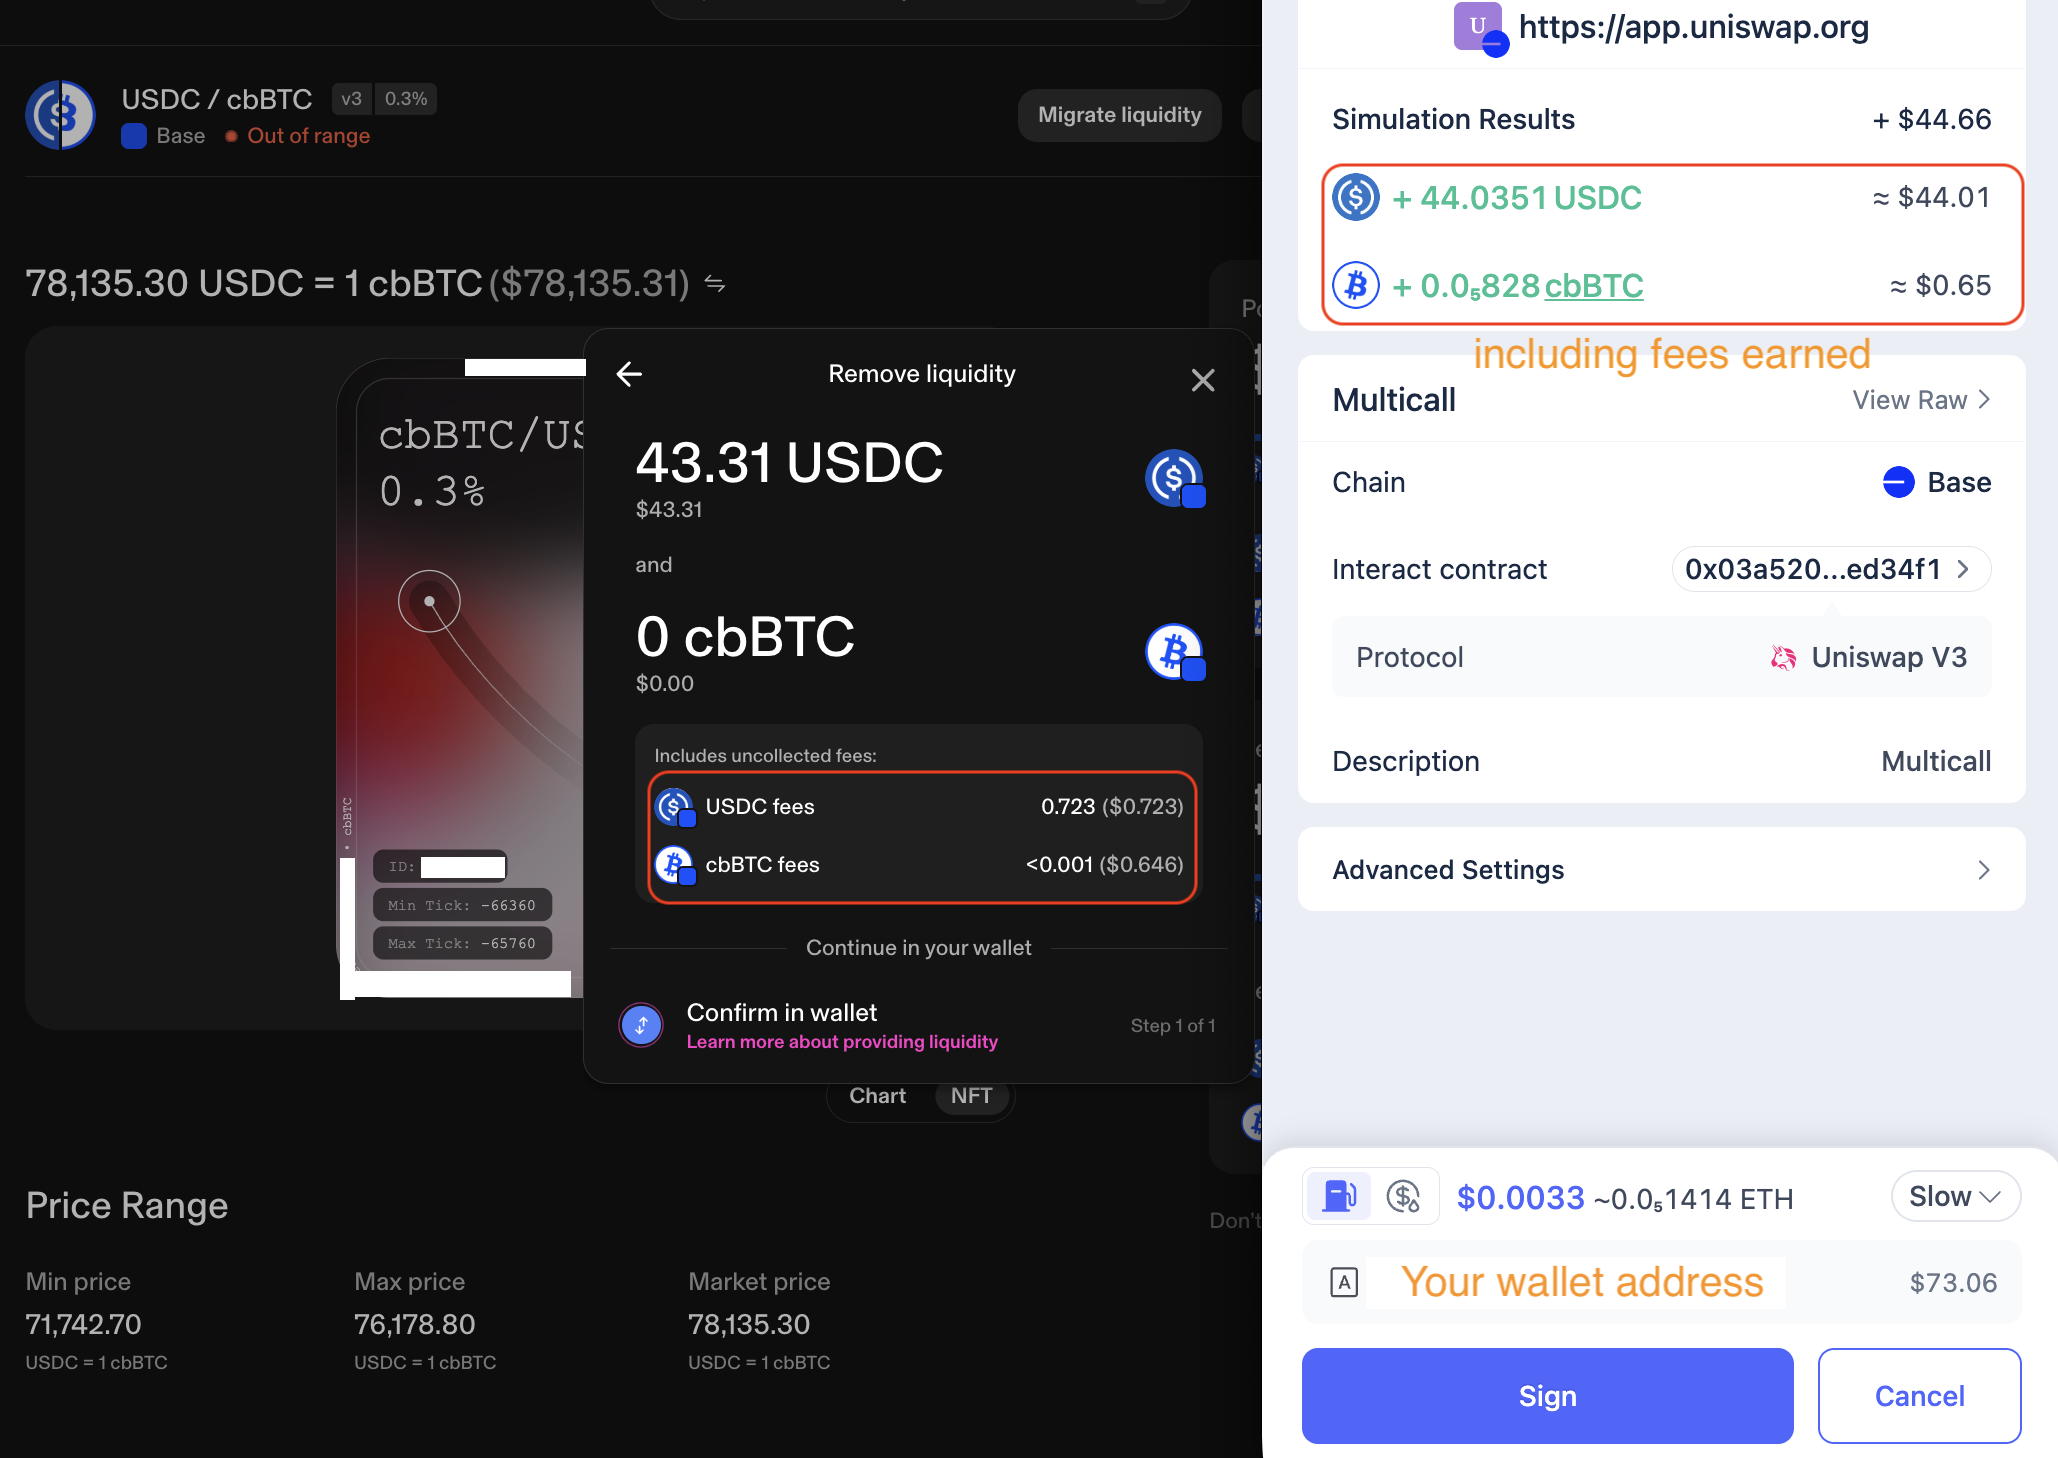
Step 6: Close your position
After a slow 28-day grind, the price of cbBTC finally rose above the upper limit of our demo position’s range, converting the position from 100% cbBTC to 100% USDC. Rather than waiting for a retracement, I closed the position by withdrawing 100% of the liquidity. Any unclaimed fees were also collected in the same transaction–no separate claim was needed.
Step 7: Record token inflows
Record tokens returned to your wallet after each fee collection or liquidity withdrawal. Record any gas token refund too. These are inflows into your wallet, so record them as positive numbers.
Go to DeBank (Transactions tab, Base chain) to find the liquidity removal transaction.

Click its hash to open the transaction details page on Basescan.
 Add the transaction fee (ETH amount) under
 sent ETH as a negative number.
![]()
![]()
Enter 0 under withdrew ETH–no ETH gas refund is issued when closing a Uniswap
LP position.
![]()
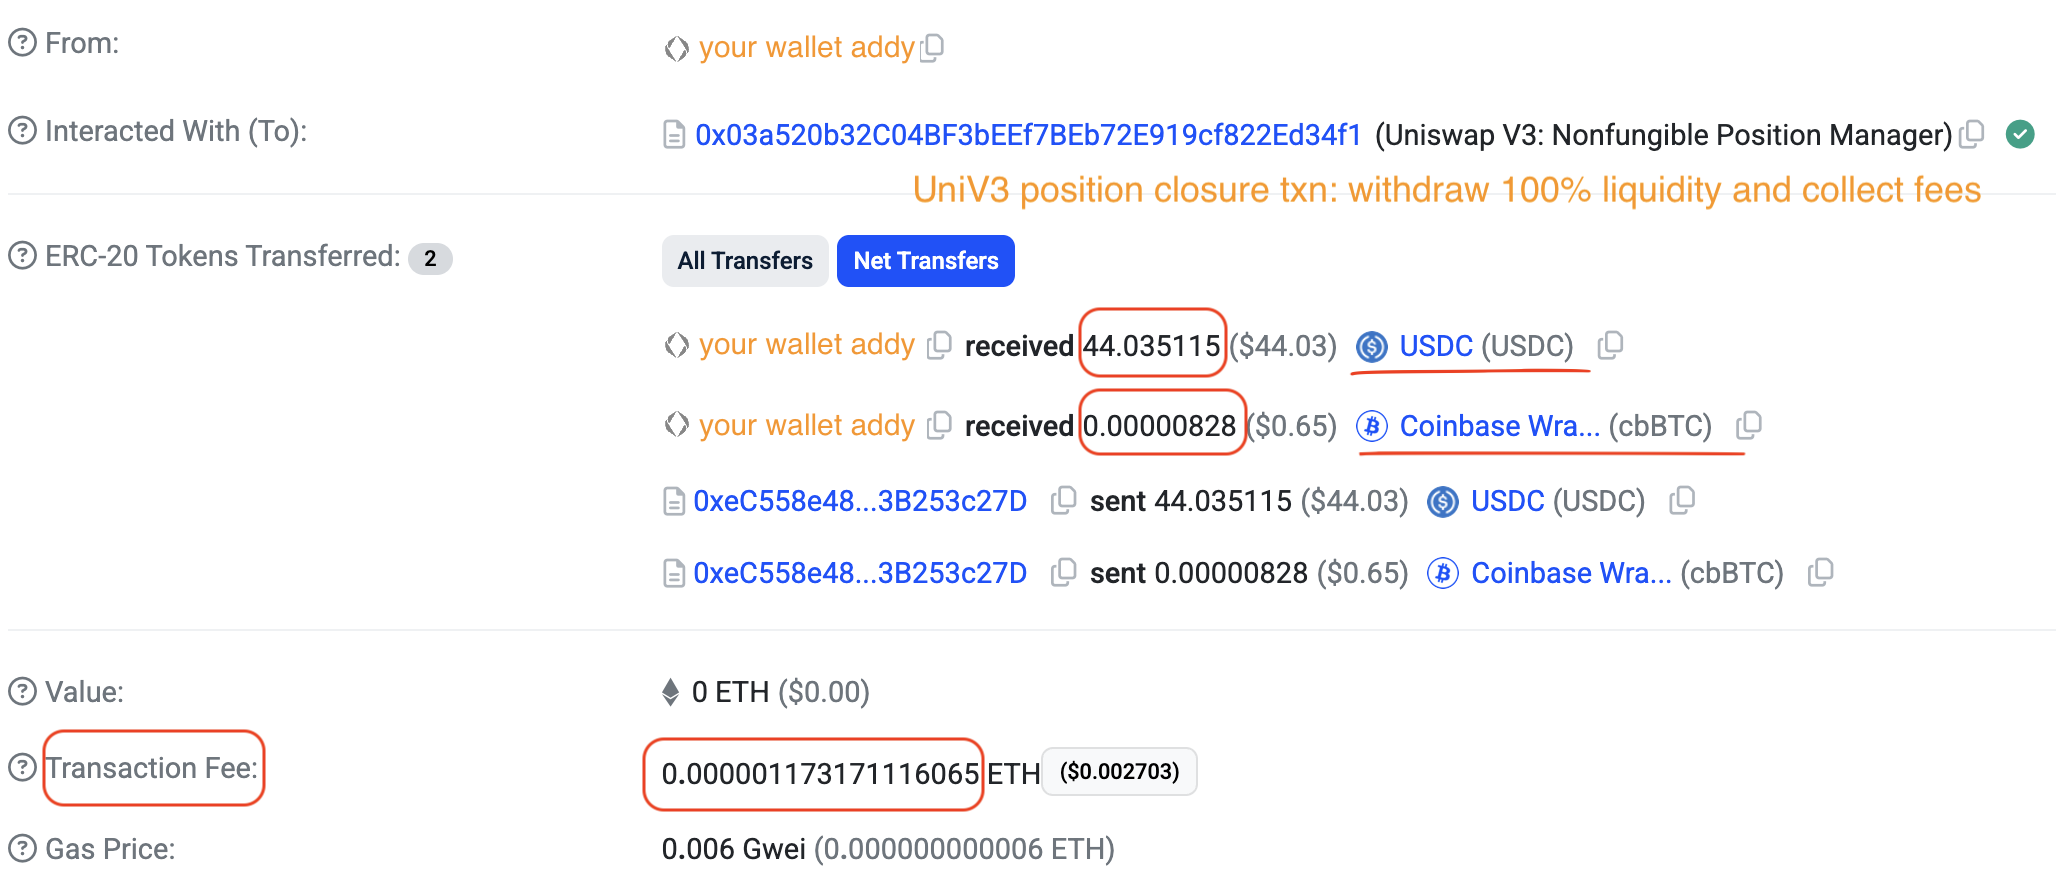
Find the amounts of USDC and cbBTC returned to your wallet and record them
under withdrew USDC and withdrew cbBTC as positive numbers.
![]()
Step 8: Calculate token net flows
You can easily calculate token net flows using the inflows and outflows you
recorded earlier. In the same spreadsheet, create two columns: delta USDC
and delta cbBTC, where:
delta USDC = sent USDC + withdrew USDCdelta cbBTC = sent cbBTC + withdrew cbBTC
Similarly, create a delta ETH column:
delta ETH = sent ETH + withdrew ETH.
![]()
![]()
For example, the one-sided demo Uniswap v3 position cost only a tiny bit of ETH and effectively sold 0.00057759 (~0.0006) cbBTC for 44.04 USDC, resulting in an effective sale price of $76,248.
1.3 Meteora DLMM LP Position
Meteora is a DEX on Solana. Unlike Uniswap, it distributes liquidity across discrete bins instead of continuous curves, and it offers features such as skewed liquidity distribution and dynamic fees.
With the $25 of cbBTC in your Phantom wallet, let’s open a one-sided cbBTC-USDC position in one of Meteora’s DLMM (Dynamic Liquidity Market Maker) pools.
Step 1: Visit Meteora’s website
🔒 Security: UI Phishing
As of April, 2026, the legitimate URL is https://app.meteora.ag/. Cross-check it against Meteora’s official Twitter/X account and Discord server before visiting. Type the URL directly into your browser—-never click links from search engines, social media posts, or messages.
Go to https://app.meteora.ag/pools and enter the Solana cbBTC contract address (see Table 1.1) in the token search box to filter for pools containing cbBTC.
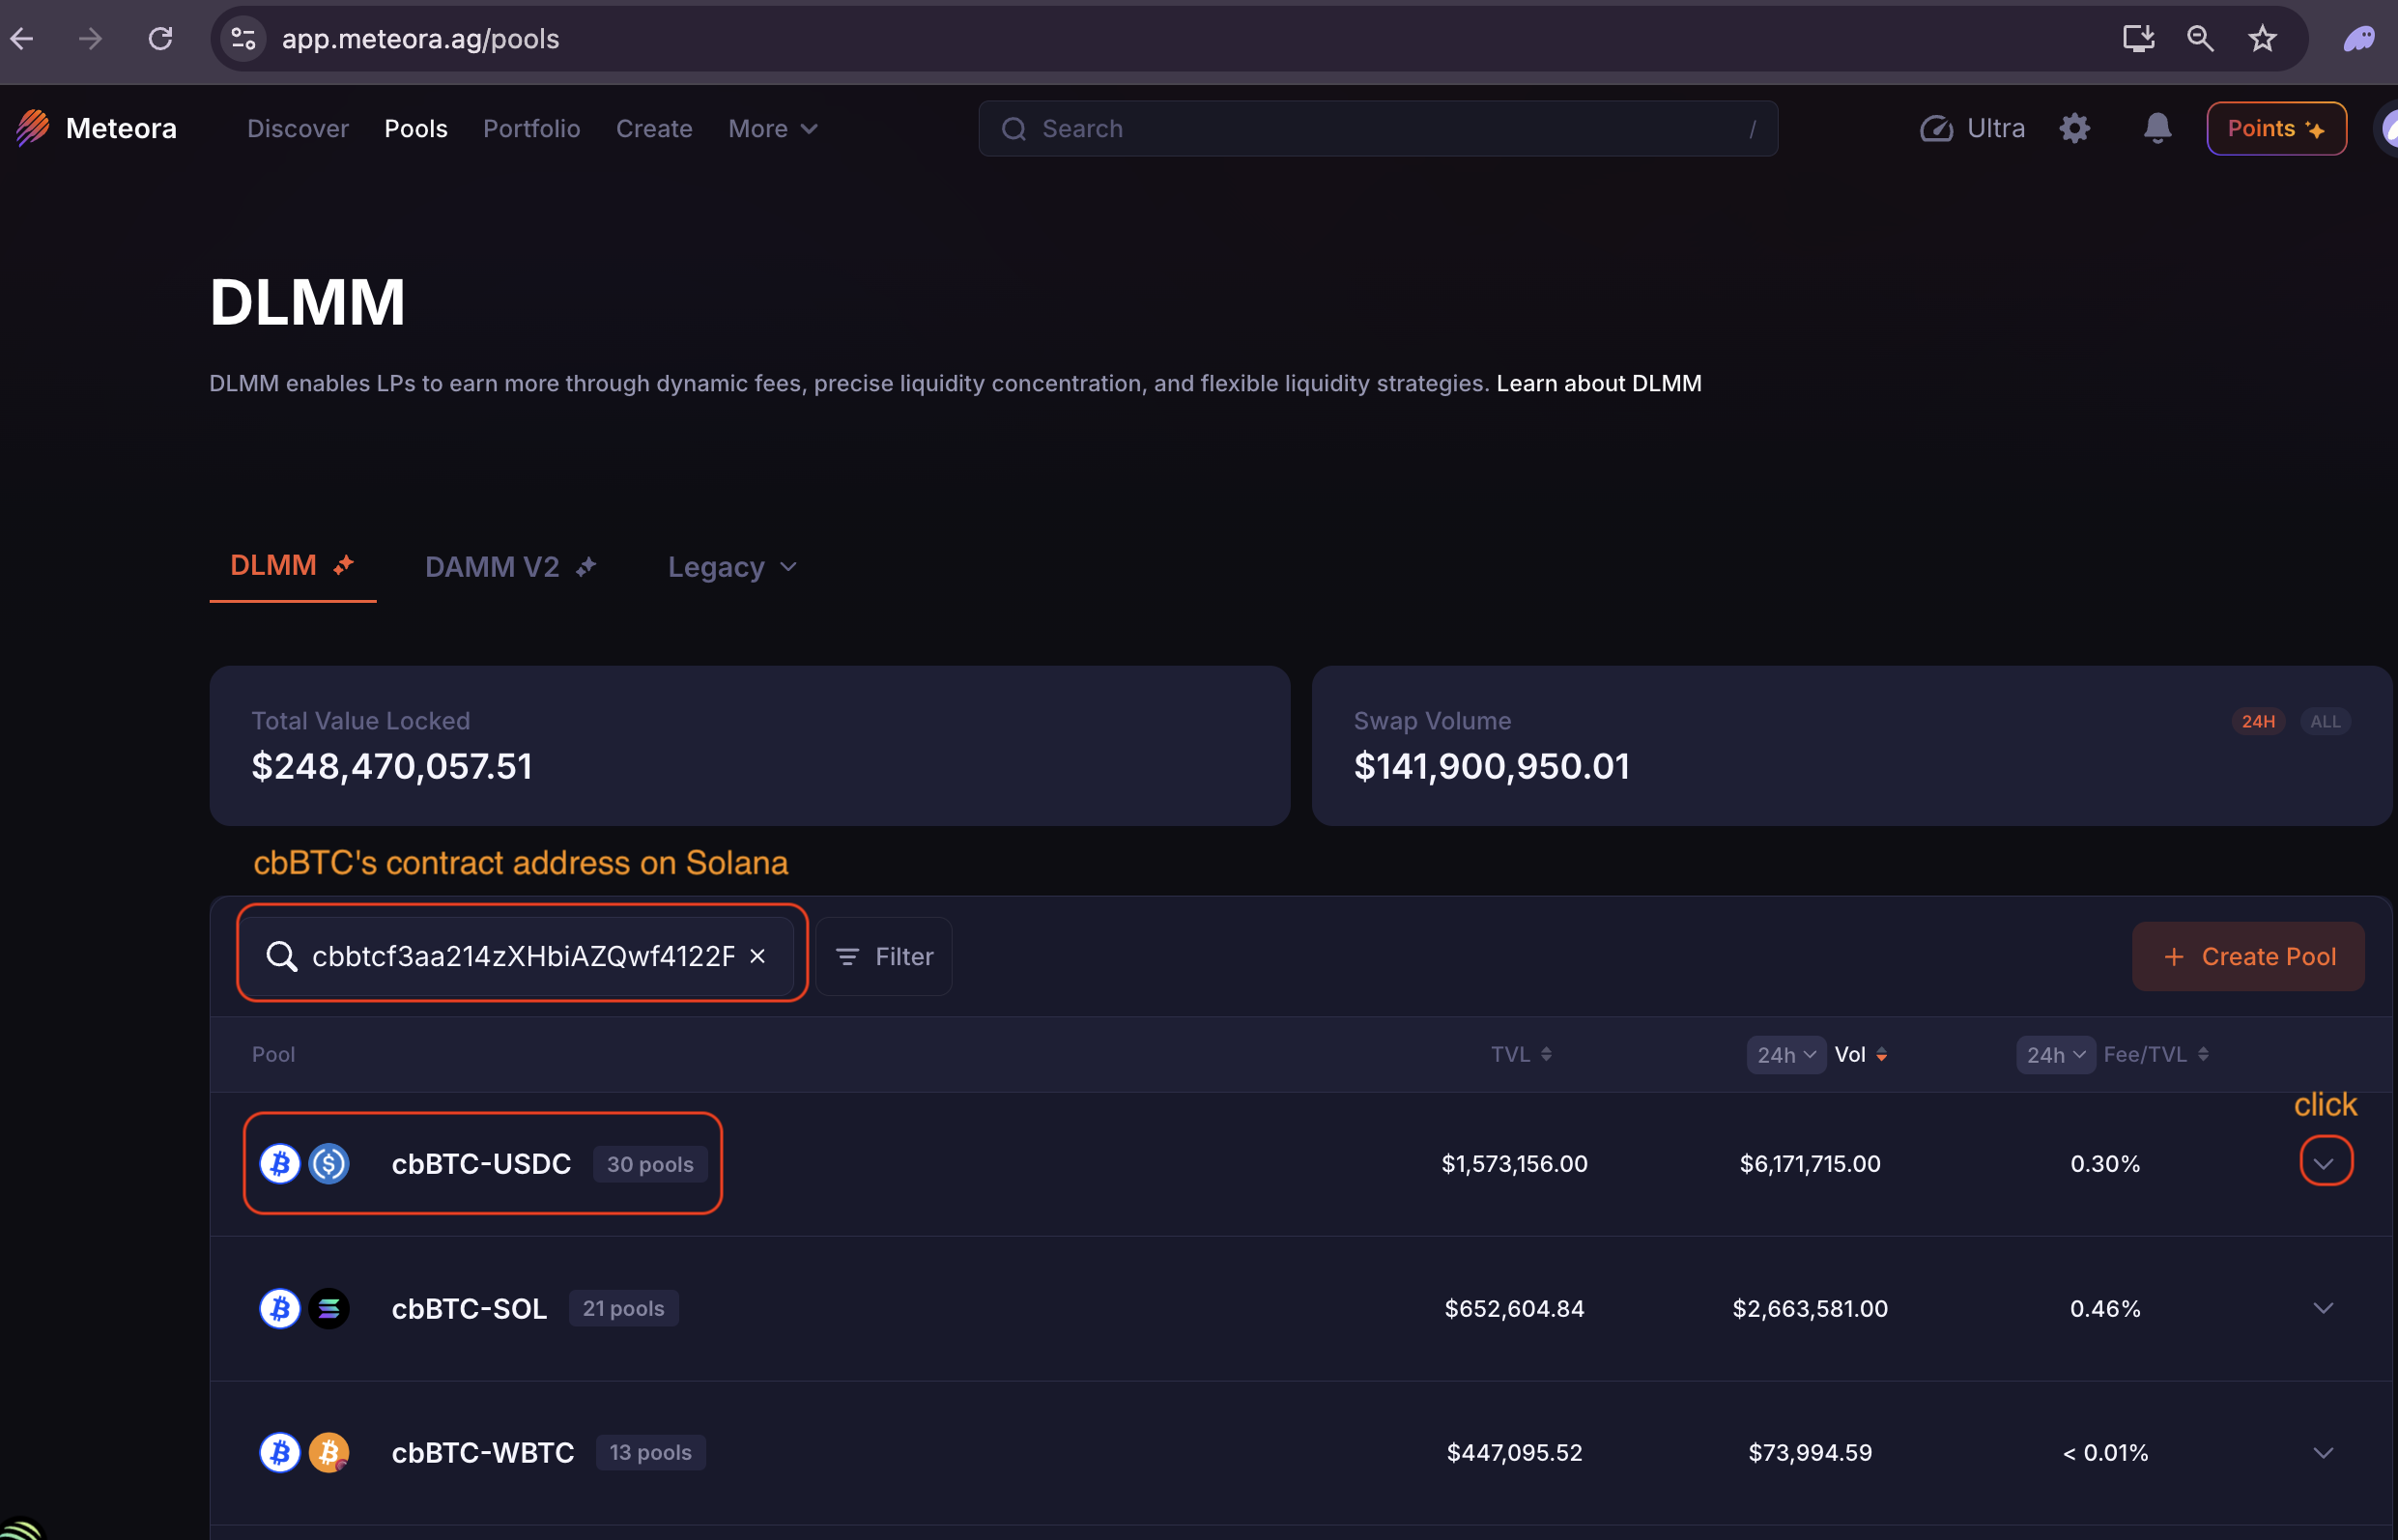 Focus on cbBTC-USDC pools and click the drop-down arrow to see all configurations.
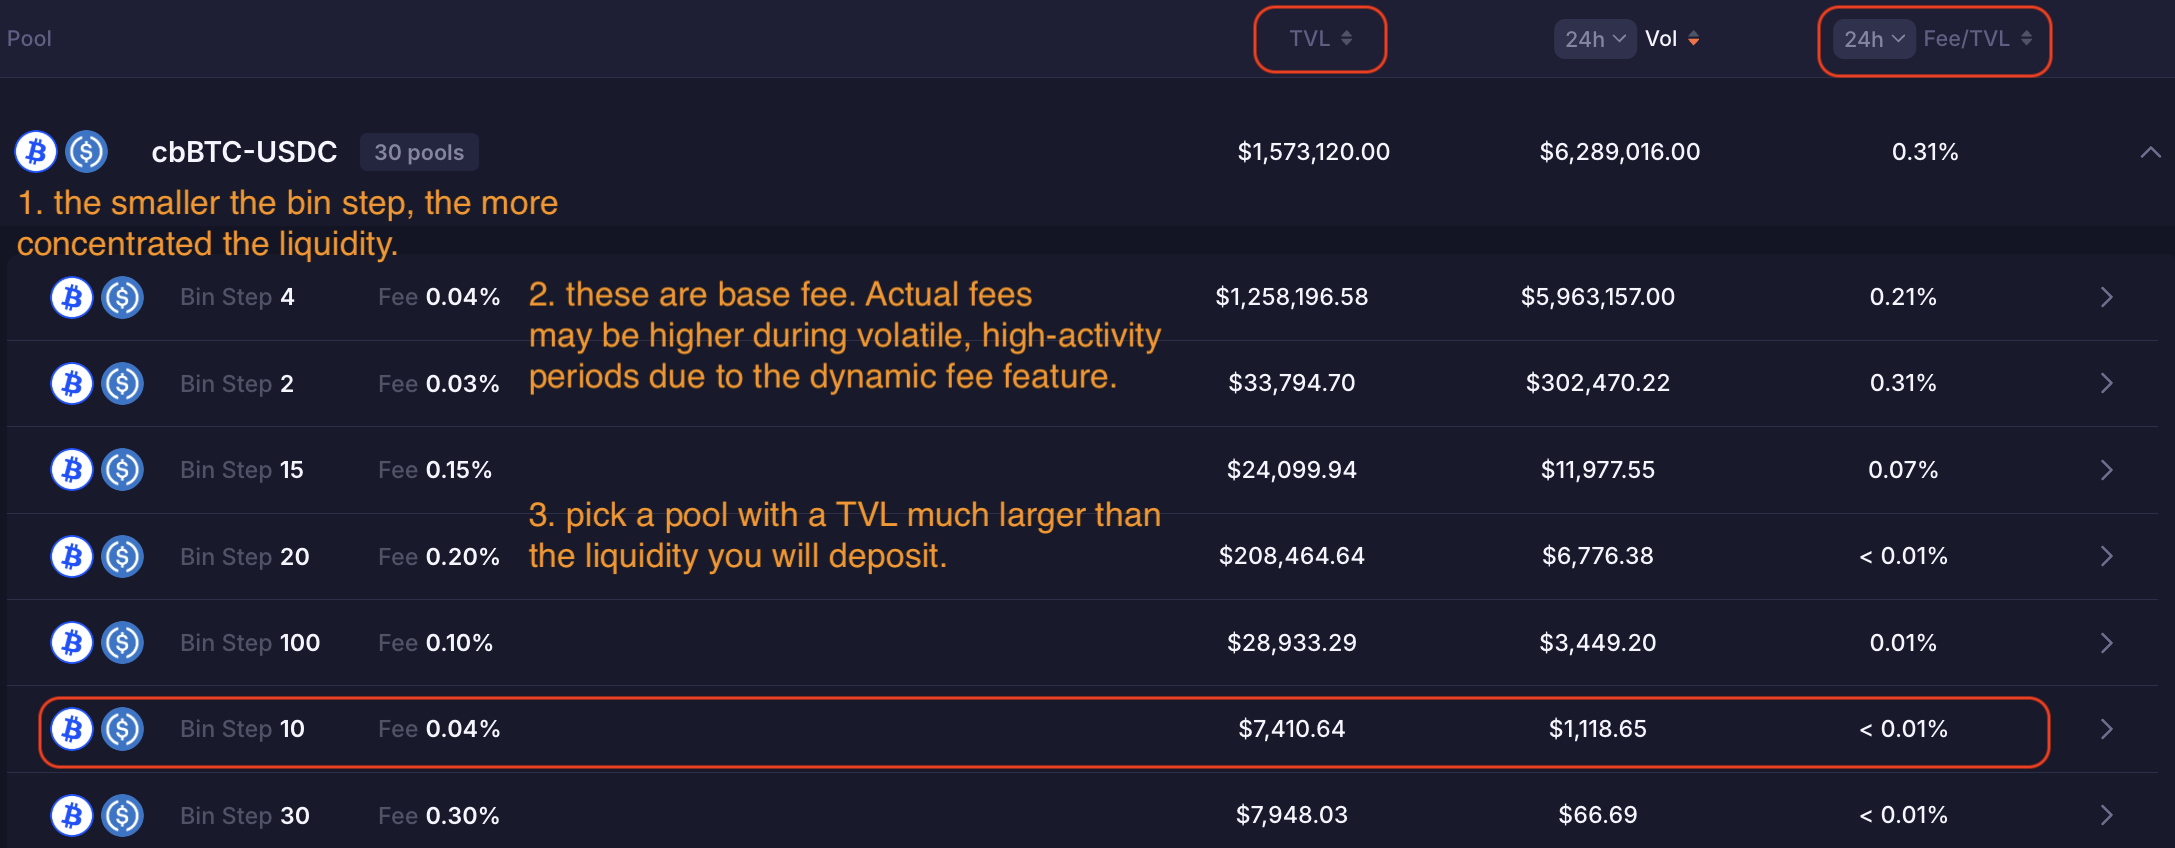
Notice that:
- Pools with smaller bin steps tend to have higher yields (a.k.a. Fee/TVL).
- Pools with bigger TVL and lower base fees tend to have higher trading volume.
- Pools with higher trading volume tend to have higher yields.
This suggests that when all else is equal, it’s better to pick pools with bigger TVL, smaller bin steps, and lower base fees.
Step 2: Choose pool configuration
Keep in mind that metrics such as TVL, volume, and Fee/TVL are constantly changing
and may improve or deteriorate over time. For example, the 10-bin-step, 0.04%
fee configuration may be a strong choice one month (screen below) and a poor one
the next (screen above), while another configuration–such as the 15-bin-step,
0.15% fee configuration–may be the opposite.
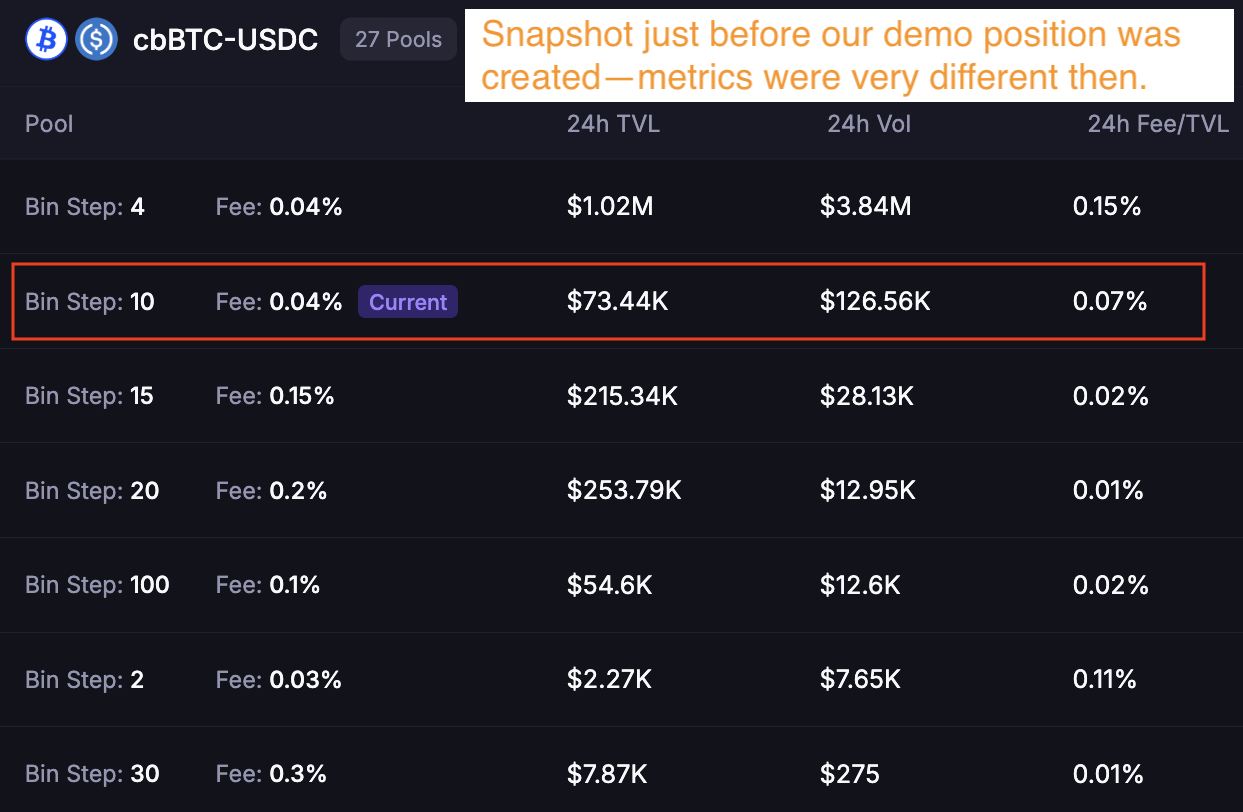
We must choose based on current metrics because we cannot predict future conditions.
I chose the 10-bin-step, 0.04% fee configuration for the demo position because it was a strong choice at the time. If I were opening the position today, I would instead choose the 15-bin-step, 0.15% fee configuration, as its metrics are now much stronger.
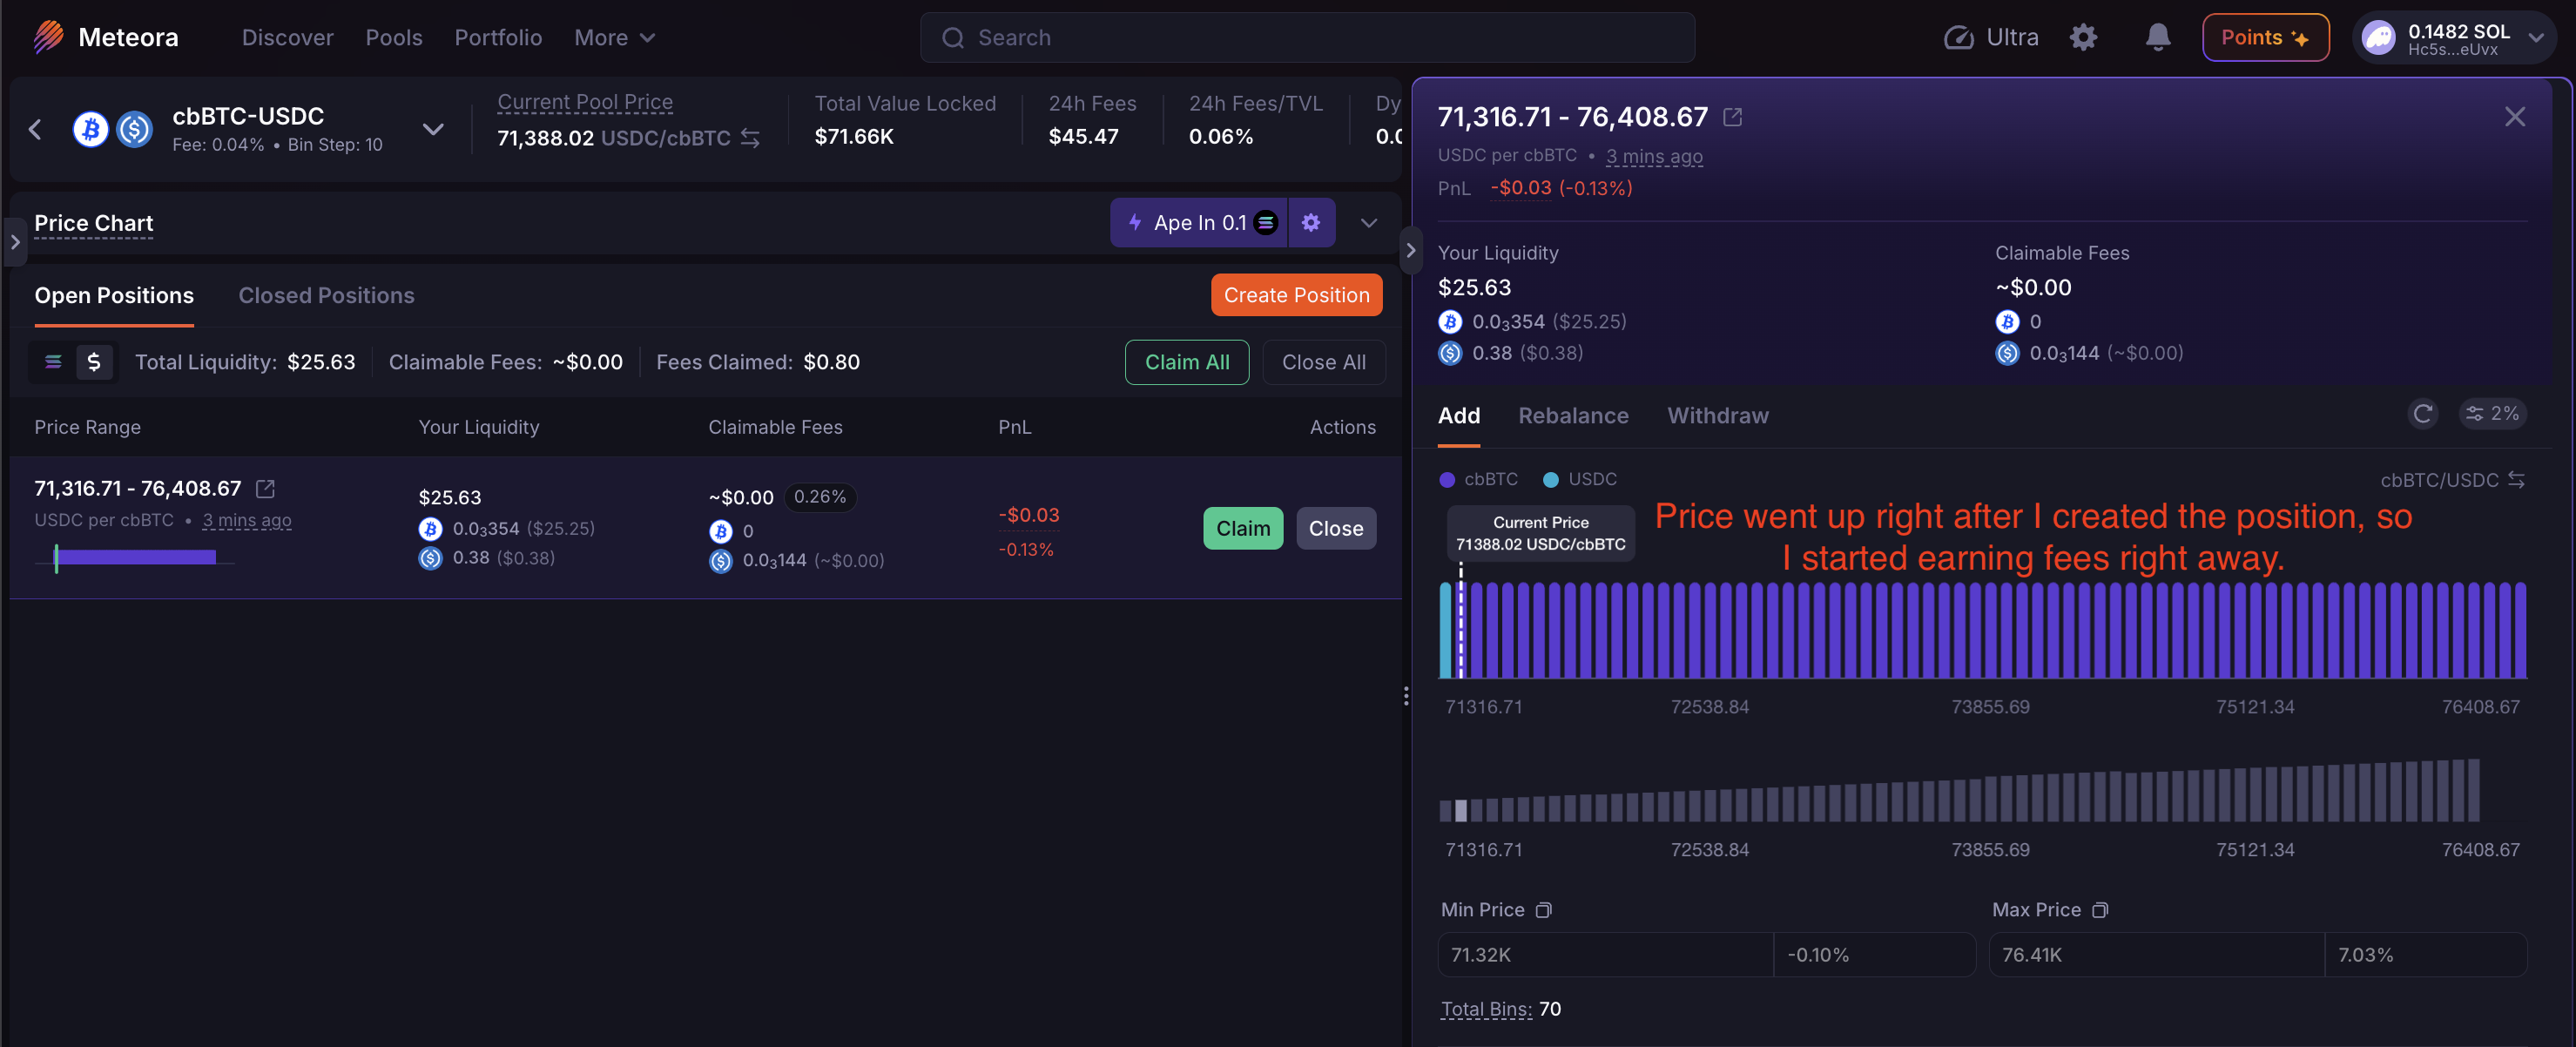
Step 3: Set a one-sided price range and deposit token
After selecting a pool configuration, the UI changes to a two-panel layout.
Focus on the right panel, specifically the Create Position tab. Click the
number below cbBTC to auto-populate the full amount to be sent to the pool.
Leave the default strategy set to Spot. Meteora automatically sets the price
range from the current price to 70 bins away. Because the range includes the
current price, your position will start earning fees immediately. Use the
default price range without making any changes.
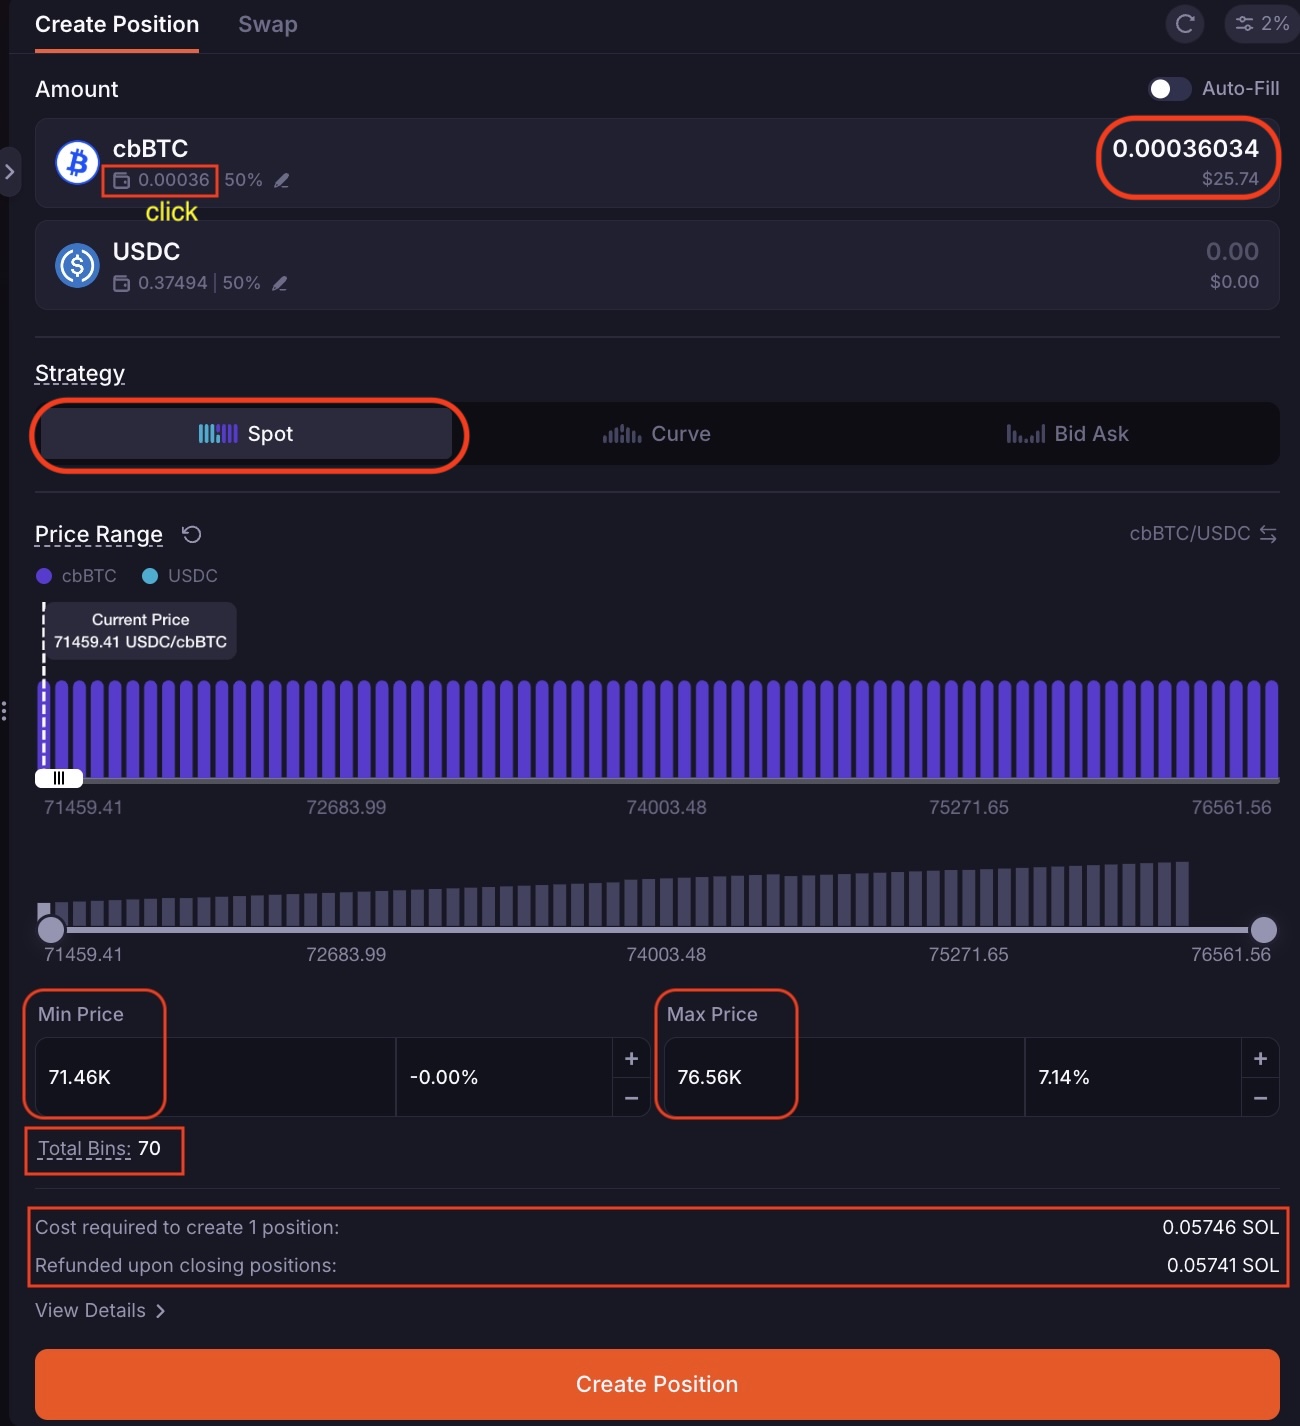
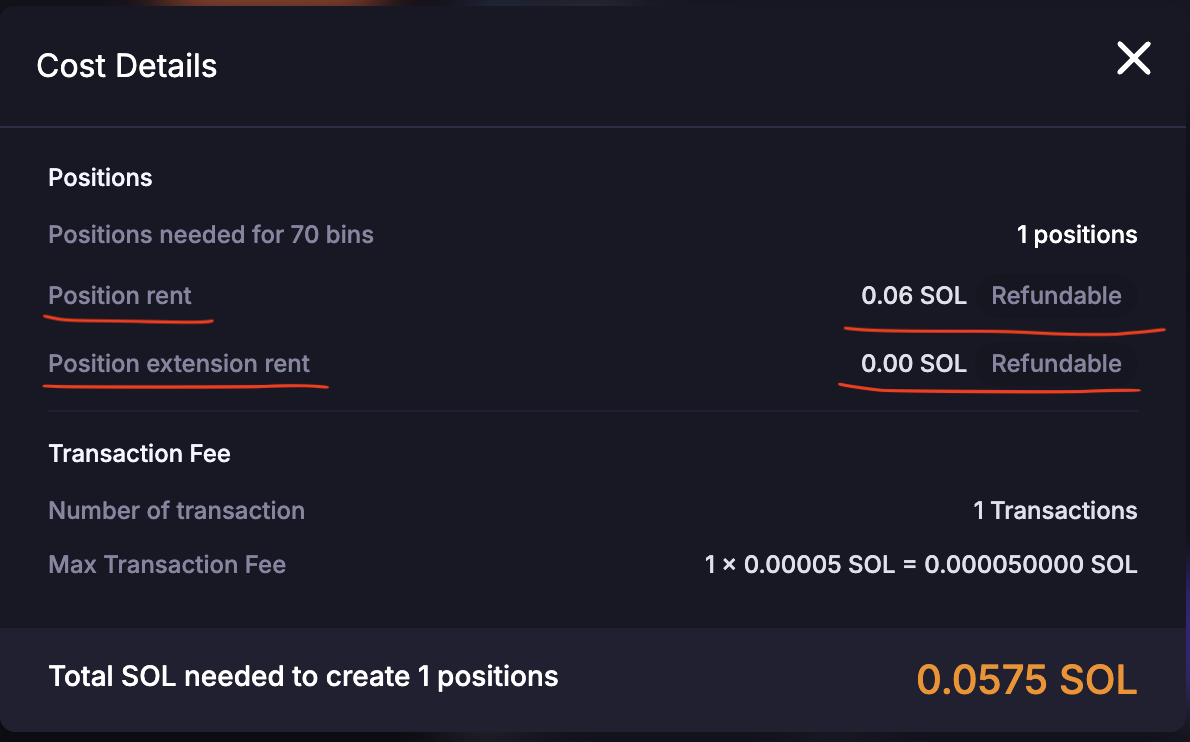
Notice the cost and refund at the bottom–you pay rent when you open a LP position on Solana, and it will be refunded after you close the position.
Click the Create Position button and sign the transaction in your Phantom
wallet. The UI then refreshes to show the position you just created.
Step 4: Record token outflows
After tokens are sent to the pool, a pop-up will briefly appear on Meteora’s page telling you the transaction was successful. It embeds a link to the token deposit transaction details page on Solscan. Click it. Alternatively, visit https://solscan.io/account/[YourWalletAddy] directly and find the transaction yourself.
Go to the Balance Changes tab, which summarizes token outflows from your wallet.
Record them in a clone of the “Quickstart” tab of the Google Sheets template.
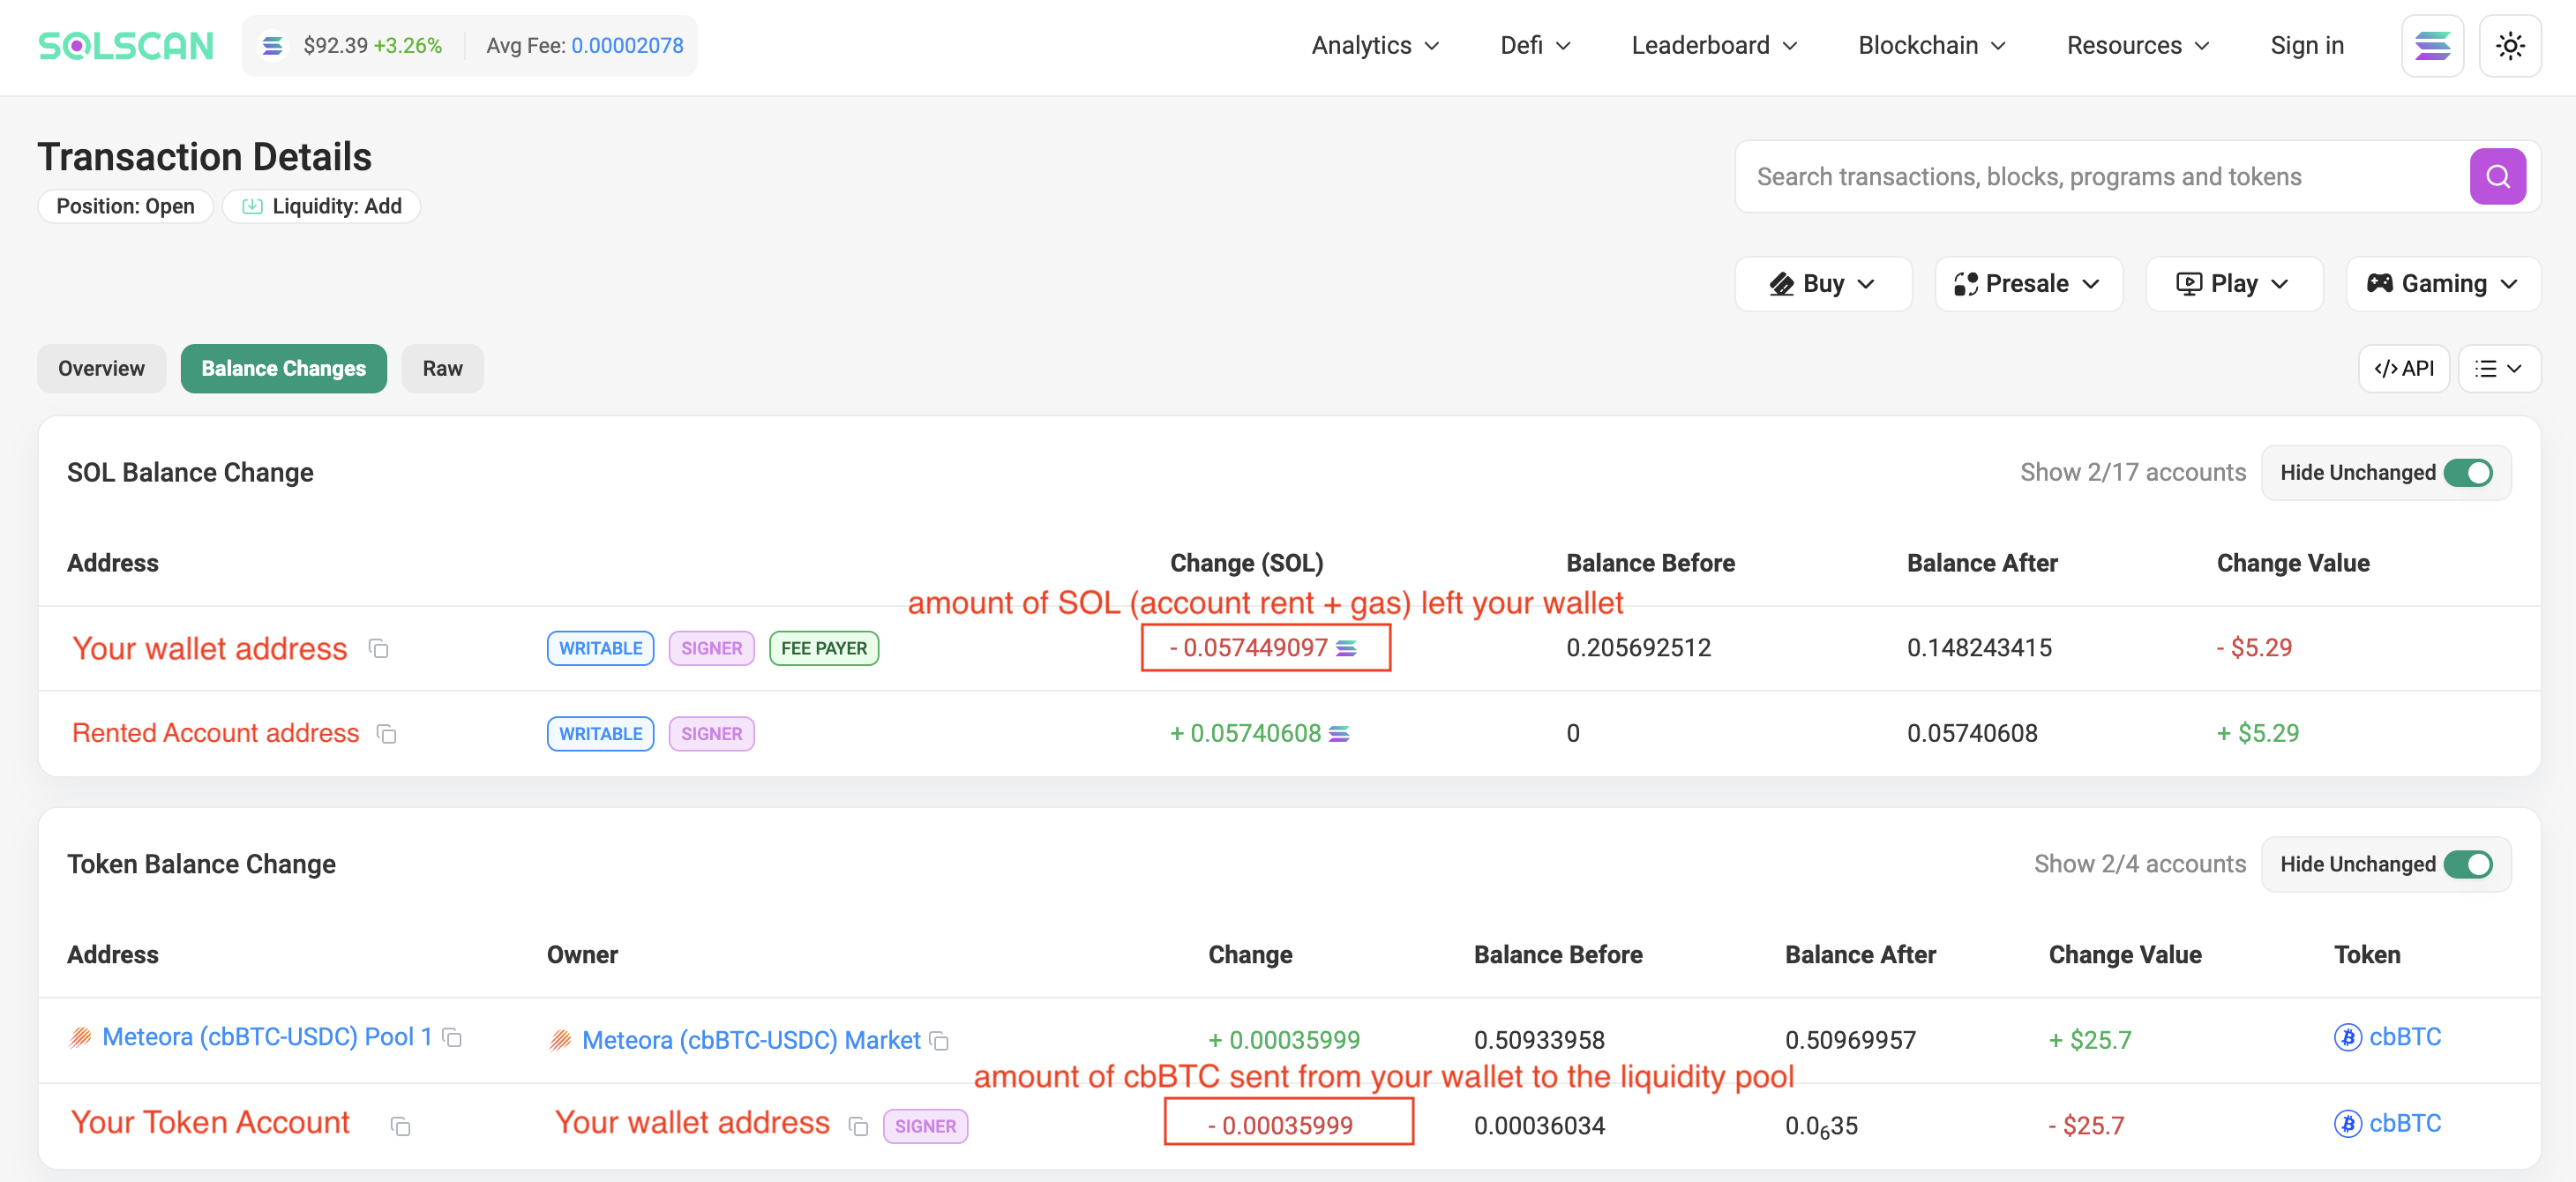
Record the change in SOL under sent SOL as a negative number. It includes both
gas and rent.
![]()
Record 0 under sent USDC since you didn’t send any USDC to the pool.
Record the change in cbBTC under sent cbBTC as a negative number.
![]()
Step 5: Monitor your position
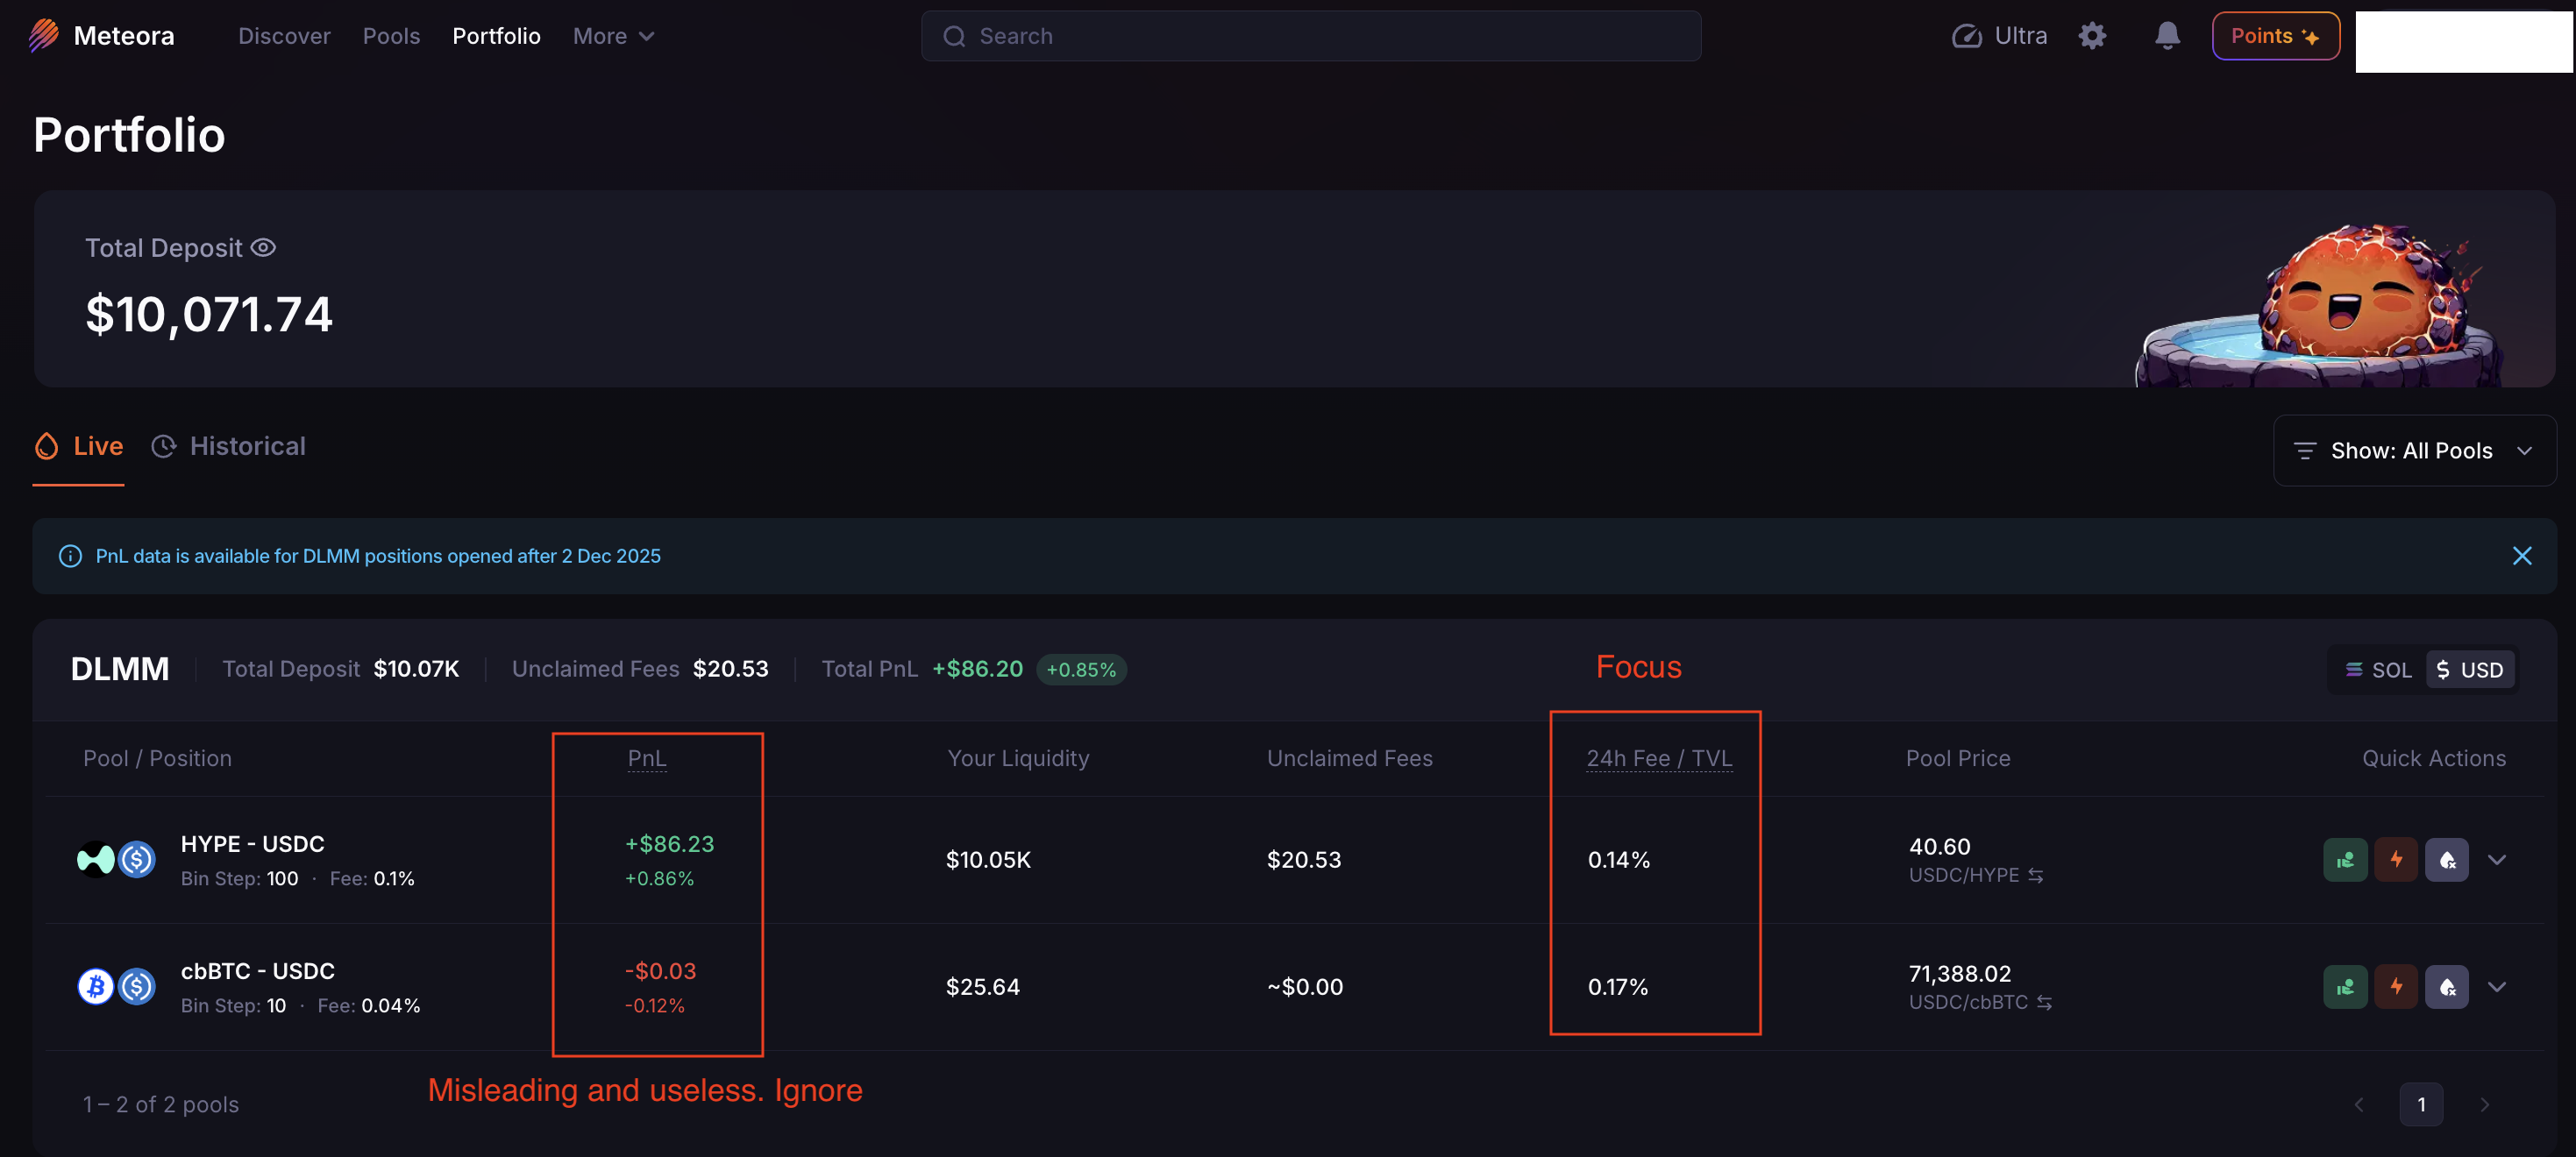
Go to the Portfolio page (https://app.meteora.ag/portfolio) to view all your
positions on Meteora.
Ignore the PnL column. While its calculation is technically valid, it reflects
a simplistic view of performance and does not align well with how LP positions
should be used as an investment vehicle. As a result, the values can be
misleading: a positive value is not always good, and a negative value can
actually be very good.
Instead, focus on the 24h Fee / TVL column, which measures the fee APR over
the past 24 hours. For example, when we created the demo position, the 10-bin-step, 0.04% fee cbBTC-USDC pool was yielding approximately 62.05% (0.17% x 365).
If the price moves outside your position’s range, a yellow warning symbol will appear next to your liquidity value. In the case of our demo position, when it first became idle, the pool was still yielding 40.15% (0.11% x 365)–high enough for me to stay the course and wait for the price to move back in range.

At any point, you can calculate your position’s fee APR since creation using formula (1.1). For example, our demo position had earned $0.73 in fees after 29 days.
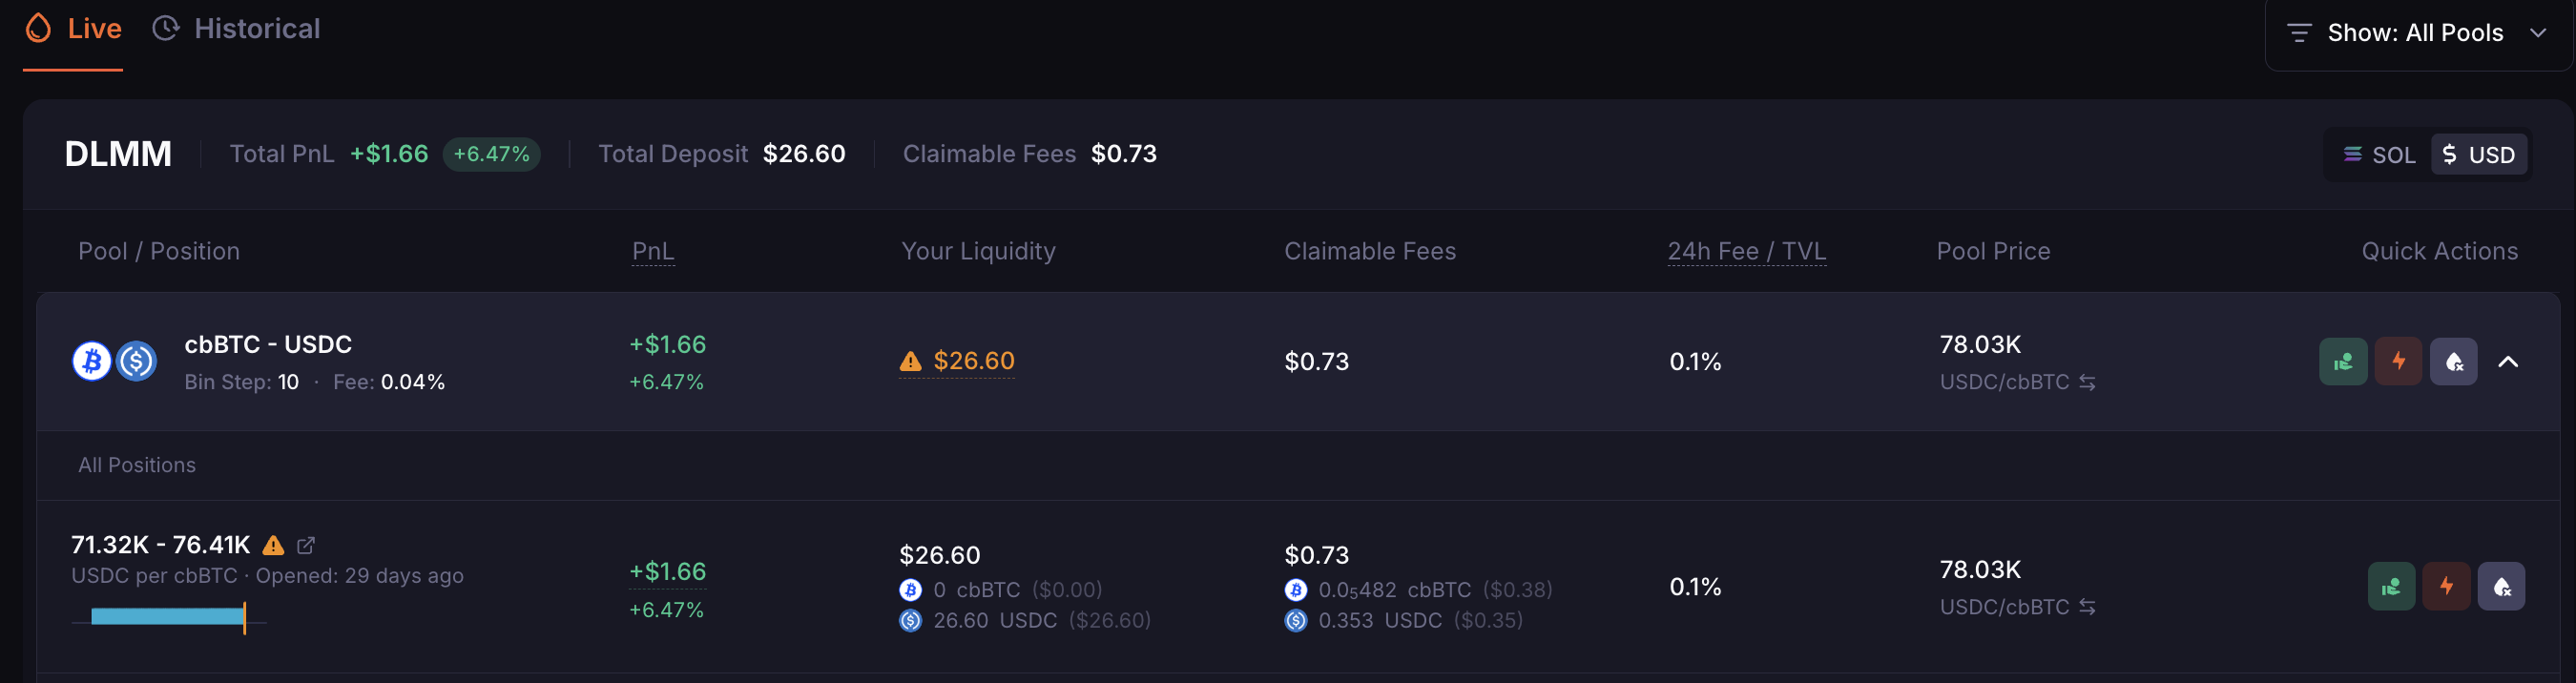
We can calculate its fee APR in two ways:
- Based on the initial value: ($0.73 ÷ $25.64) × (365 ÷ 29) = 35.83%
- Based on the current value: ($0.73 ÷ $26.60) × (365 ÷ 29) = 34.54%
Step 6: Close your position
When should you close a position? That’s something we’ll discuss later. For now,
close your position if the price has moved beyond either end of its range. For example, after the price moved upward across every bin–converting all the cbBTC
in the demo position to USDC–I clicked the Close button.
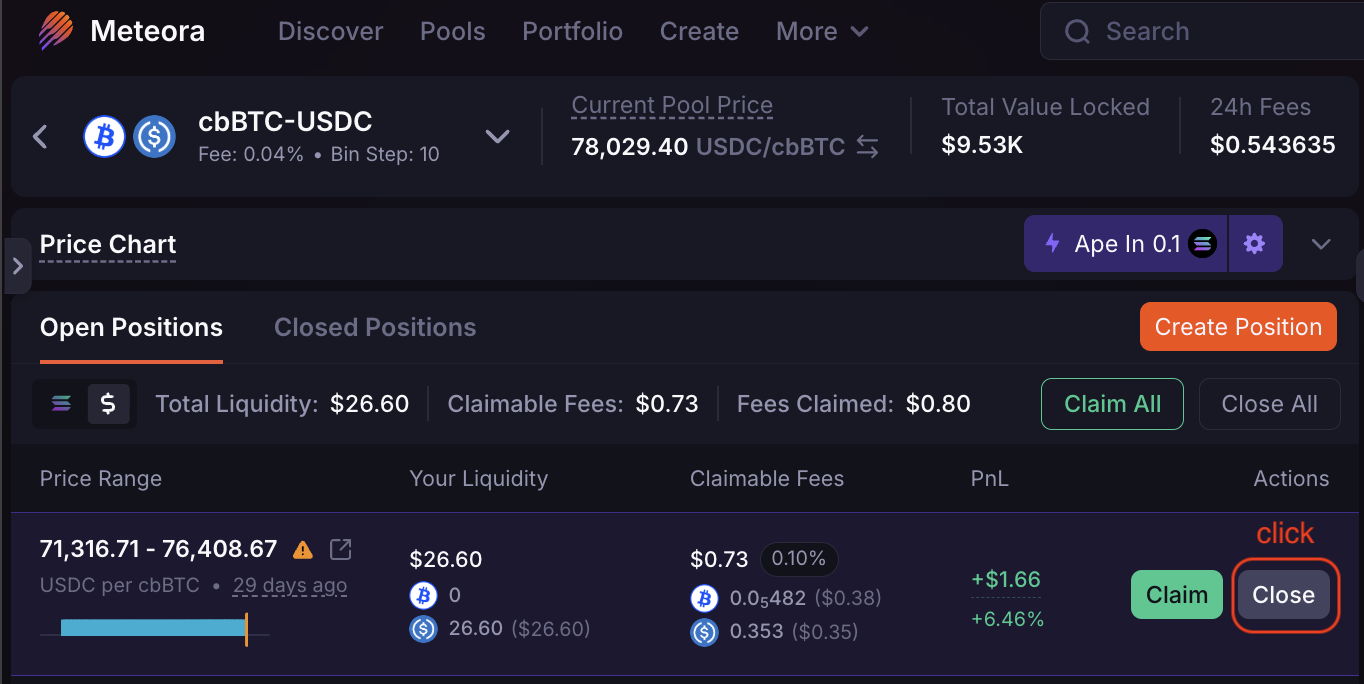 The
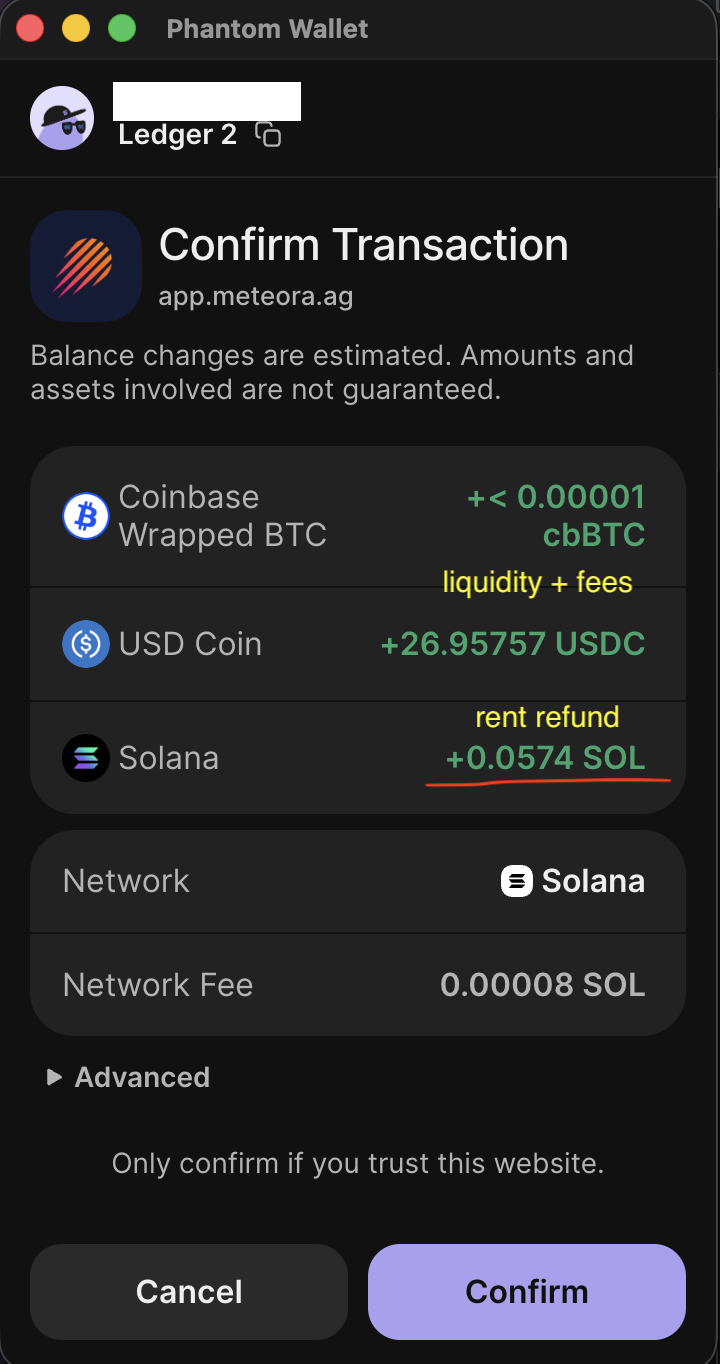
The Close button withdraws all your liquidity and collects any unclaimed fees.
Once clicked, Phantom will pop up and show all tokens to be returned to your
wallet. The SOL account rent you paid when opening the position will also be
refunded.
Step 7: Record token inflows
Once again, a pop-up will appear on Meteora’s page notifying you whether the transaction succeeded or failed. Click the link in the pop-up to view the position-closure transaction details page on Solscan. Alternatively, you can visit Solscan directly and find the transaction yourself.
Click the Balance Changes tab, which summarizes the tokens returned to your
wallet. Record these inflows in the same spreadsheet.
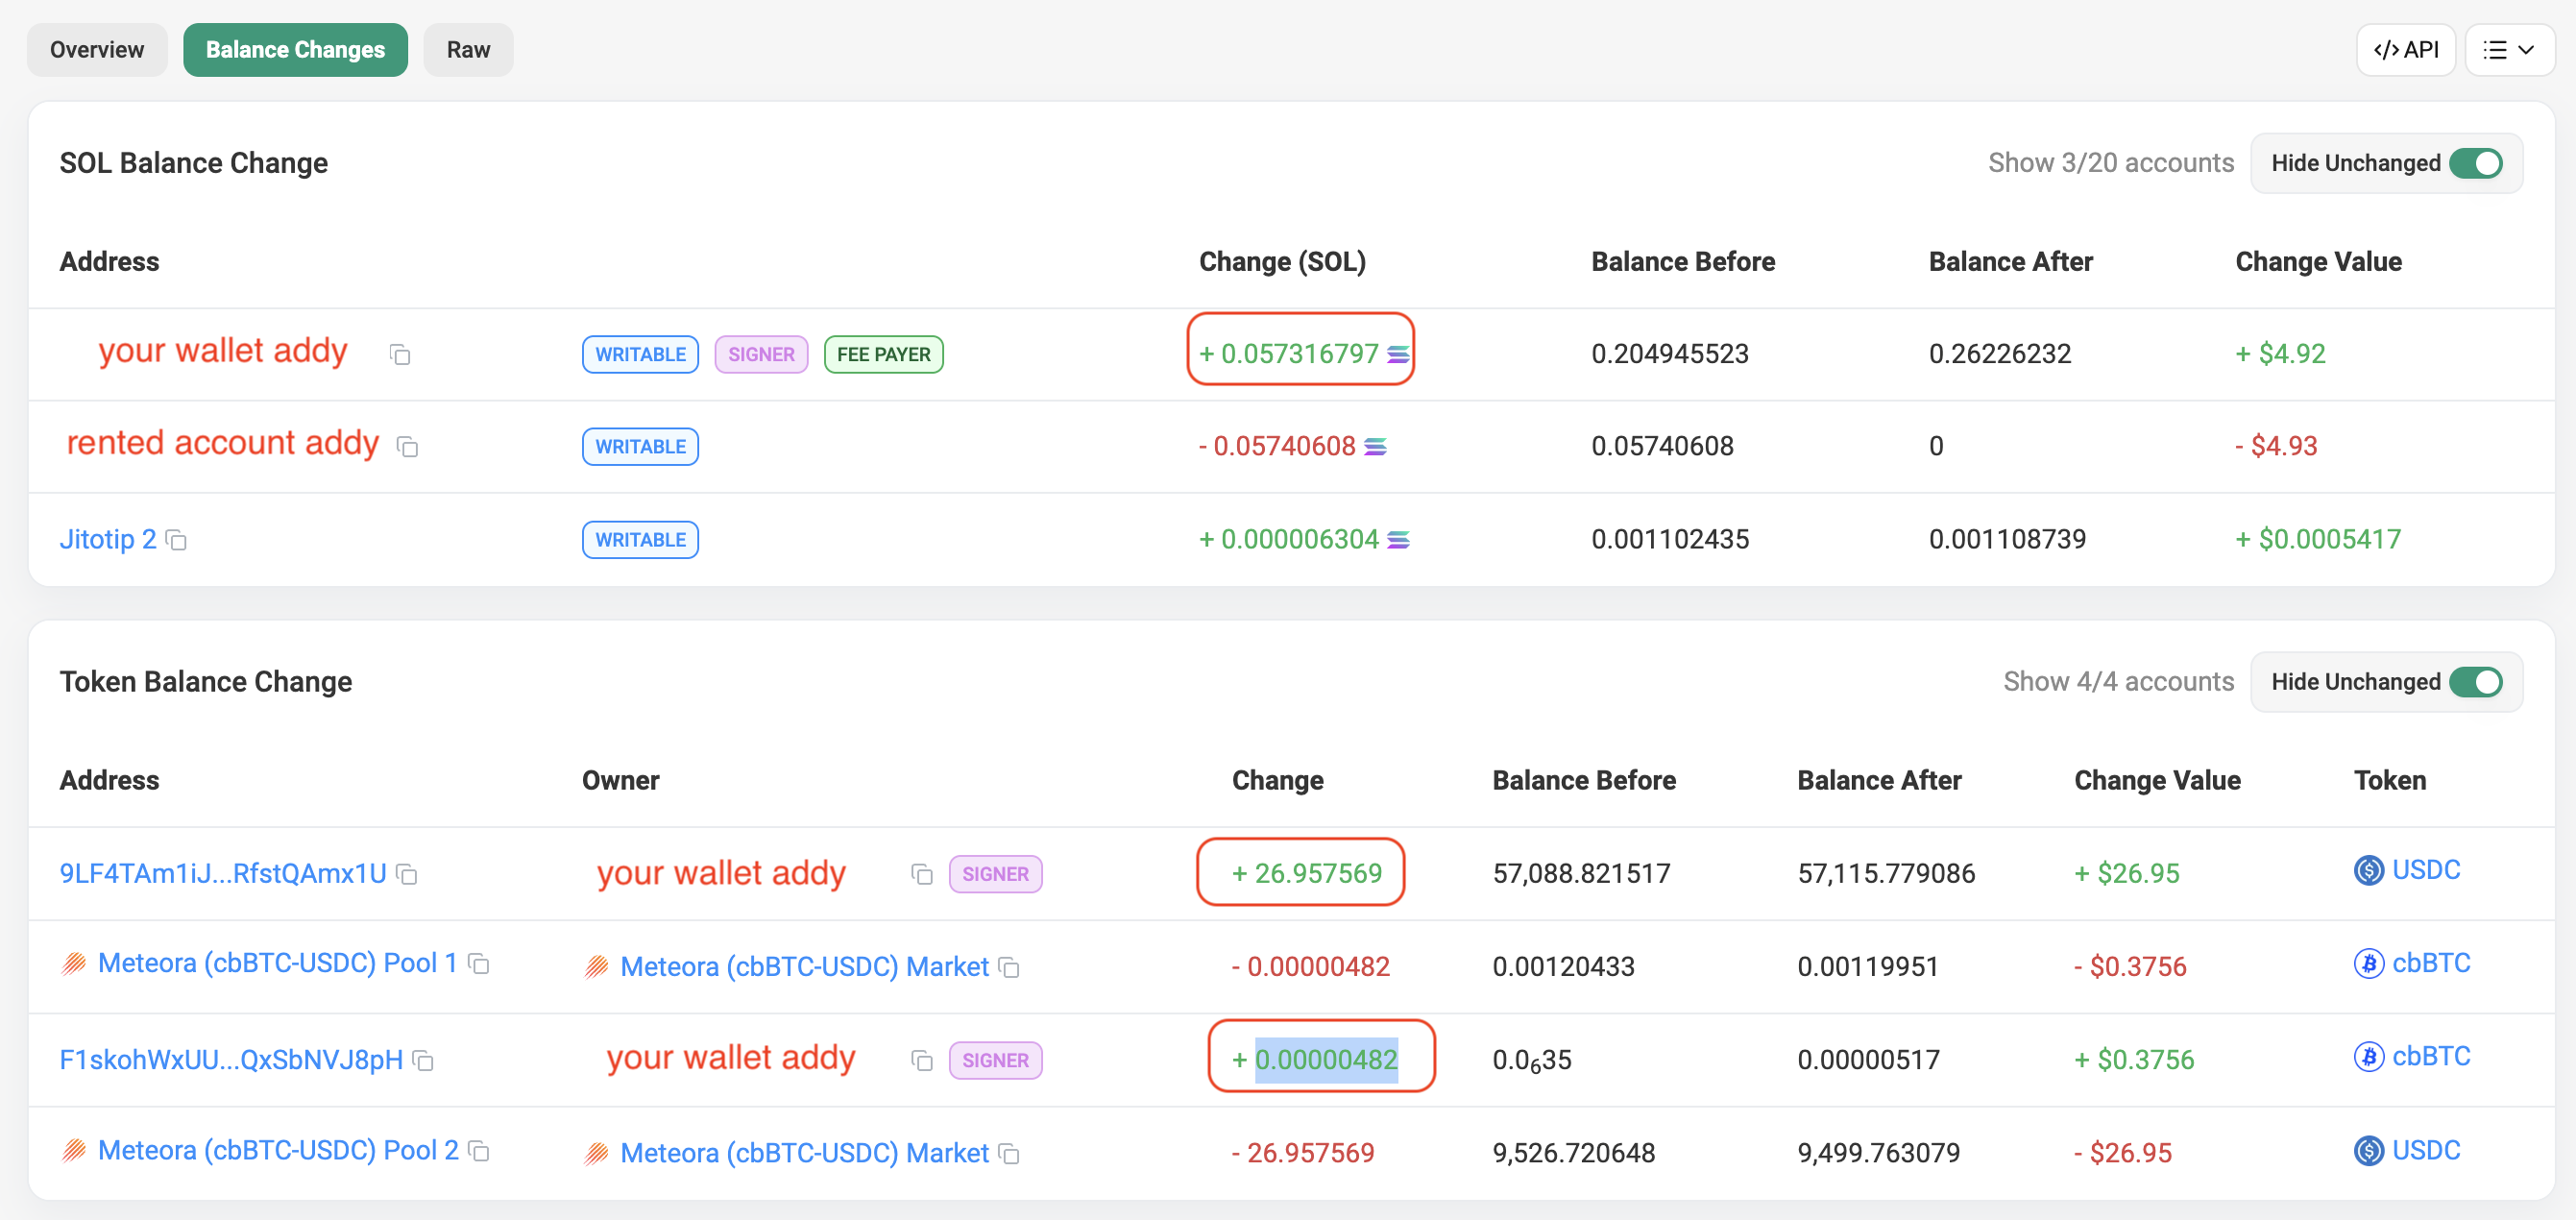
Record the change in SOL under withdrew SOL–this is the rent refund.
![]()
Record the change in USDC and cbBTC under withdrew USDC and withdrew cbBTC
respectively.
![]()
Step 8: Calculate token net flows
The purpose of recording token inflows and outflows in the previous steps is to
calculate their net flows. In the same spreadsheet, create two columns:
delta USDC and delta cbBTC, where:
delta USDC = sent USDC + withdrew USDCdelta cbBTC = sent cbBTC + withdrew cbBTC
Similarly, create a delta SOL column:
delta SOL = sent SOL + withdrew SOL.
![]()
![]()
For example, the one-sided demo Meteora position cost 0.0001 SOL and effectively sold 0.00035517 (~0.0004) cbBTC for 26.96 USDC, resulting in an effective sale price of $75,907.
1.4 Chapter Summary
You’ve just opened and closed your first concentrated liquidity positions, and started tracking their token flows. Here’s what we covered:
- Two-sided vs. one-sided positions: Two-sided positions deposit both tokens and contain the current price–they earn fees immediately. One-sided positions deposit a single token above or below the current price–they earn fees only when price enters the range, and function like a limit order in the meantime.
- Fee APR: Annualized return from swap fees. Calculated as (Fees ÷ Liquidity Value) × (365 ÷ Days Open). You can use initial or final liquidity value as the denominator–both are valid, just be consistent.
- Uniswap v4 vs v3: The UI differs slightly, but the underlying concentrated liquidity mechanics are identical. V4 adds hooks (programmable extensions) on top of v3’s foundation–strategies apply equally to both.
- Meteora DLMM: A Solana-based DEX that uses discrete bins instead of continuous curves. Offers dynamic fees and skewed liquidity distribution. Pool configuration selection matters–compare TVL, volume, bin step, and base fee across available pools.
- Token flow tracking: Record every token that leaves and enters your wallet–deposits, gas costs, fee claims, and withdrawals–as negative (outflows) or positive (inflows). Calculate token net flows (delta columns) to see the net effect of each position.
- Tools–DeBank, Basescan, and Solscan: DeBank gives a portfolio-level view of your positions across protocols without requiring a wallet connection. Basescan and Solscan let you inspect individual transactions to extract exact token amounts and gas costs.
In the next chapter, we’ll look at how AMMs work–what actually happens inside the pool when someone makes a swap, how arbitrage bots keep the pool price aligned with the market, and where the yield we earn as LPs actually comes from.
Wrapped Bitcoin issued by Coinbase.↩︎
A blockchain is the network your transaction runs on; each has its own transaction fees (called gas) and speed. Base and Solana both typically charge well under $0.01 per transaction.↩︎
Rabby Wallet (Chrome extension): https://chromewebstore.google.com/detail/rabby-wallet/acmacodkjbdgmoleebolmdjonilkdbch. Always double-check any URL before clicking.↩︎
Phantom Wallet (Chrome extension): https://chromewebstore.google.com/detail/phantom/bfnaelmomeimhlpmgjnjophhpkkoljpa. Always double-check any URL before clicking.↩︎
Welcome
Log in to access this book.